Source: https://dzone.com/articles/tddbdd-an-introduction-amp-usage-guide
Take a look at how you can use Cucumber to ensure your BDD methods are up to par.
When I was asked to implement TDD/BDD in
our work, I searched a lot for a single-page document/site but was not
able to find one. Though there are plenty of very good resources
available on this topic, I have decided to create a single article to
show both of these 2 approaches hands-on.
Overview
In Agile development, organizations want to be market ready
for new products, features, and functionalities within a very small
period of time. But traditional testing methodologies cannot ensure
this. To keep up the pace with this rapid development in an Agile
environment, a few new design practices for Software Testing were born.
We can name a few like ATDD, TDD, BDD, or Integration Testing, but we
will limit our discussion to TDD & BDD which are the most used
practice nowadays.
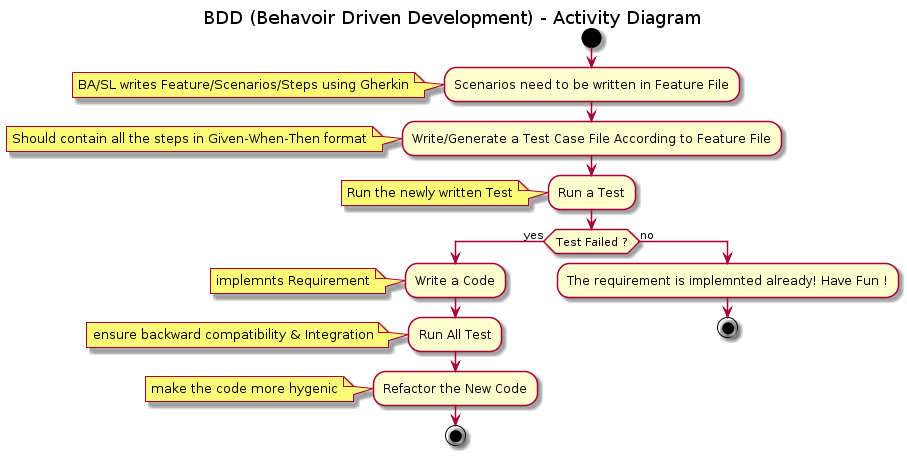
BDD (Behavior-Driven Development)
Chronologically, BDD practice comes after TDD came in
action. Basically, BDD is an evolution over TDD. The purpose of this
design is to make a bridge between business analyst and development
teams through a common language which is purely based on business
requirements and Agile practice.
BDD follows a similar process as TDD but it follows an
Outside-In approach as opposed to TDD. Here, test cases are written at
the start of the development phase. A test case has to be run to fail,
the developer needs to write the business logic code, then run the test
cases again. The same is true for TDD. But the difference here is the
common language used for describing the functionality. Let's explain
this in an Agile way.
When a requirement comes to technology teams for
implementation, some business analyst/Product Owner creates a feature in
a collaborative tool like Jira or RTC. Now every feature will have few
scenarios to be implemented which are known as the acceptance criteria.
The BDD approach takes the acceptance criteria to be implemented as test
cases. So, while a new feature is being implemented, BDD makes sure all
the scenarios are converted to proper test cases. Thus, the greatest
advantages of the BDD approach is to fill the gaps between non-technical
teams and development teams.
BDD Framework Overview
There are a couple of available frameworks in the open
source community for BDD practice, like JBehave, RSpec, GivWenZen, and
Cucumber, to name a few. But we will take Cucumber as it’s the most
common framework for Spring Boot and microservices architectures.
Cucumber
Cucumber is an open source library available for most language platforms, but we will concentrate our discussion with only Java.
Before deep dive into Cucumber with examples, we need to
understand few basics of it. Basically, Cucumber reads executable
specifications written in plain text and validates that the software
does what those specifications say. In order for Cucumber to understand
the scenarios, they must follow some basic syntax rules, called Gherkin.
Gherkin
Gherkin uses a set of special keywords to give structure and
meaning to executable specifications. You can think this as
representations of acceptance criteria. Gherkin can be supported by many
languages but we will use English as a reference language.
The lines in each Gherkin file contains a keyword. A few of the most used keywords are below:
- Feature
- Scenario
- Given, When, Then, And, But (known as Steps)
- Examples
There are other few keywords which we will learn on the job itself. A very basic example of Gherkin Structure is below:
Feature: The purpose of the Feature keyword
is to provide a high-level description of a software feature. It should
be the same description as the epic or feature in Jira or RTC.
Scenario: The scenario gives you the
different expected results of that particular features. It can be
multiple success/failure cases as defined in Swagger.
Steps: Each step starts with Given, When,
Then, And, or But. Cucumber executes each step in a scenario one at a
time, in the sequence you’ve written them in. When Cucumber tries to
execute a step, it looks for a matching step definition to execute.
- Given: Input
- When: Method or Function
- Then: Expected Result
- And: Multiple Result
- But: If – Else Result
Cucumber Configuration
Enough with the terminology and technical details. Let's
have some fun with hands-on coding. First, you need a favorite IDE
(Eclipse, STS or IntelliJ). We will create a sample Spring Boot project
from start.spring.io, or use the plugin and add a Spring Test Dependency
along with Starter boot parent.
POM Configuration
Now let's configure the POM with the required Cucumber
dependency. I used version as 2.3.1 but you can use the latest version
as well.
<properties>
<java.version>1.8</java.version>
<cucumber.version>2.3.1</cucumber.version>
</properties>
<dependencies>
<dependency>
<groupId>org.springframework.boot</groupId>
<artifactId>spring-boot-starter-integration</artifactId>
</dependency>
<dependency>
<groupId>org.springframework.boot</groupId>
<artifactId>spring-boot-starter-web</artifactId>
</dependency>
<dependency>
<groupId>org.springframework.boot</groupId>
<artifactId>spring-boot-starter-test</artifactId>
<scope>test</scope>
</dependency>
<dependency>
<groupId>io.cucumber</groupId>
<artifactId>cucumber-java</artifactId>
<version>${cucumber.version}</version>
<scope>test</scope>
</dependency>
<dependency>
<groupId>io.cucumber</groupId>
<artifactId>cucumber-junit</artifactId>
<version>${cucumber.version}</version>
<scope>test</scope>
</dependency>
<dependency>
<groupId>io.cucumber</groupId>
<artifactId>cucumber-spring</artifactId>
<version>${cucumber.version}</version>
<scope>test</scope>
</dependency>
</dependencies>
Once you configure your POM, let's run a Maven build to ensure the dependency got injected in your local system.
Create Feature File
Now it's time to write the Gherkin in a Cucumber readable
file. Basically, the Cucumber framework can read a Gherkin file but that
needs to be named as a .feature file. So we have created below file in Eclipse workspace. We named as loginAlias.feature.

Write/Generate Step Definitions Class
Next step would be to write the test cases which execute the
steps defined in the .feature file.Basically, you can write by your own
or use a Plugin to generate the StepDefs Java files.
You can download the plugin from Eclipse MarketPlace
Once you install the plugin, you can right click on the
feature file and generate the StepDefs file using the Plugin (Run as
Feature). In the console, you can find the required methods, which you
can put in StepExecution.class.
So if you see Cucumber Plugin has already developed the
required methods for us in the console.So we need to put these methods
in a Test class.So the final Test Class will be like below:

If you see the example
StepExecution class,
you will notice we have given the exact definitions as per Given, When,
& Then. The only thing we have changed is the Regex pattern to
inject the string & int parameters into the methods. If there is any mismatch with the Definitions in .feature file and StepExecution class, the test cases will not be passed.Write Cucumber Runner Class
Now we need to write Cucumber Runner class so that Runner class can directly run the .feature files and 
StepExecution class.
So the Runner class starts with
@RunWith which starts the Cucumber framework. It is same as @RunWith in JUnit testing.@CucumberOptions will
help us to include the path where all the features are present and it
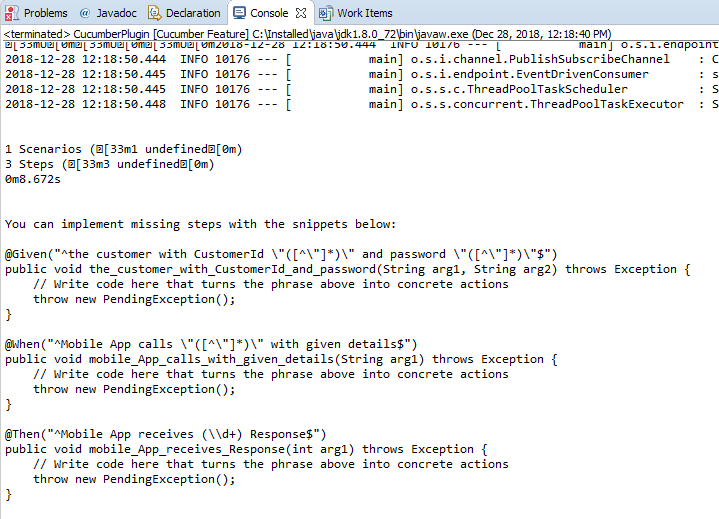
will also give us an option to generate a report of the test cases.Run Cucumber Runner Class
We are all done with our primary setup and now we are ready
to rock. We need to run the Runner Class with JUnit test case. But as
you know, if there is no implementation of the actual business logic, it
will always fail like below.

The implementation is not there in the project yet and we
are good to implement the business logic. So the next step would be
implementing the business logic by the developers.
Pass Cucumber Test Case
Alternately, to pass the test case, we can create SoapUI
Mock service or write a Mock Rest Endpoint within the project. The
example might look like below:
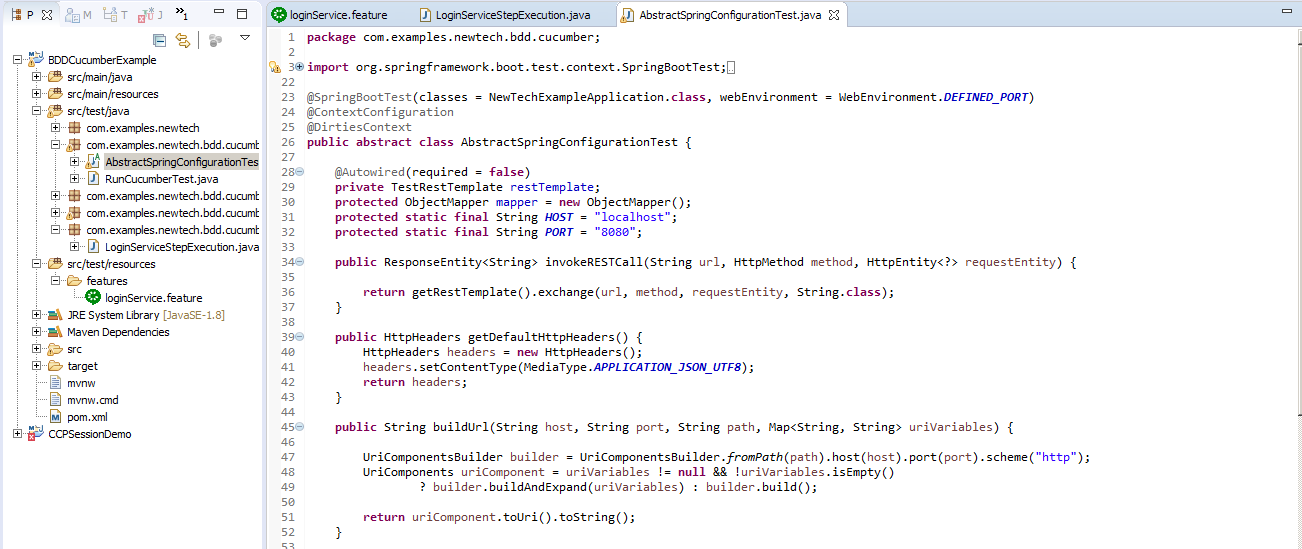
To make the test case pass, we need to extend this abstract
class in our StepExecution class and we can now call an endpoint
created by
AbstractSpringConfigurationTest class. So the modified StepExecution class file looks like below: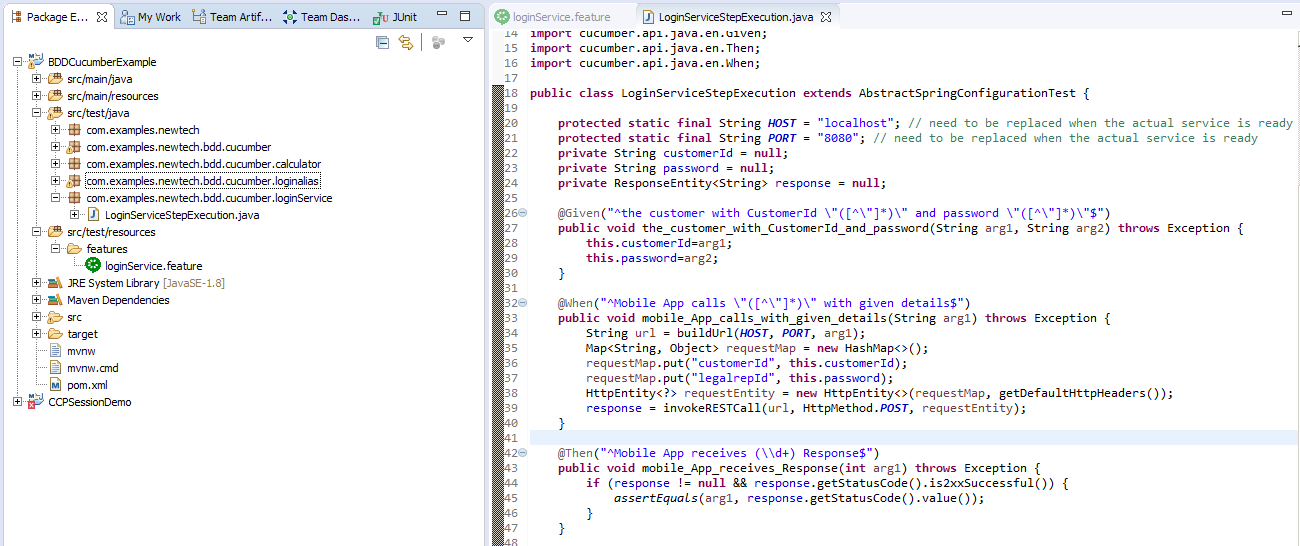
Now if we run the Runner Class with JUnit, it should pass and show as below:

Hopefully, with this explanation, we can understand the basics of BDD & Cucumber in a nutshell.