This article introduces a set of tools essential to building REST APIs.
This article introduces a set of tools
essential to building REST APIs. The tools are platform independent,
which means they are applicable to REST APIs built with any technology
stack. The goal of this article is to familiarise novice API developers
with different stages of API development and introduce tools that help
with those stages. Detailed coverage of these tools can be found on the
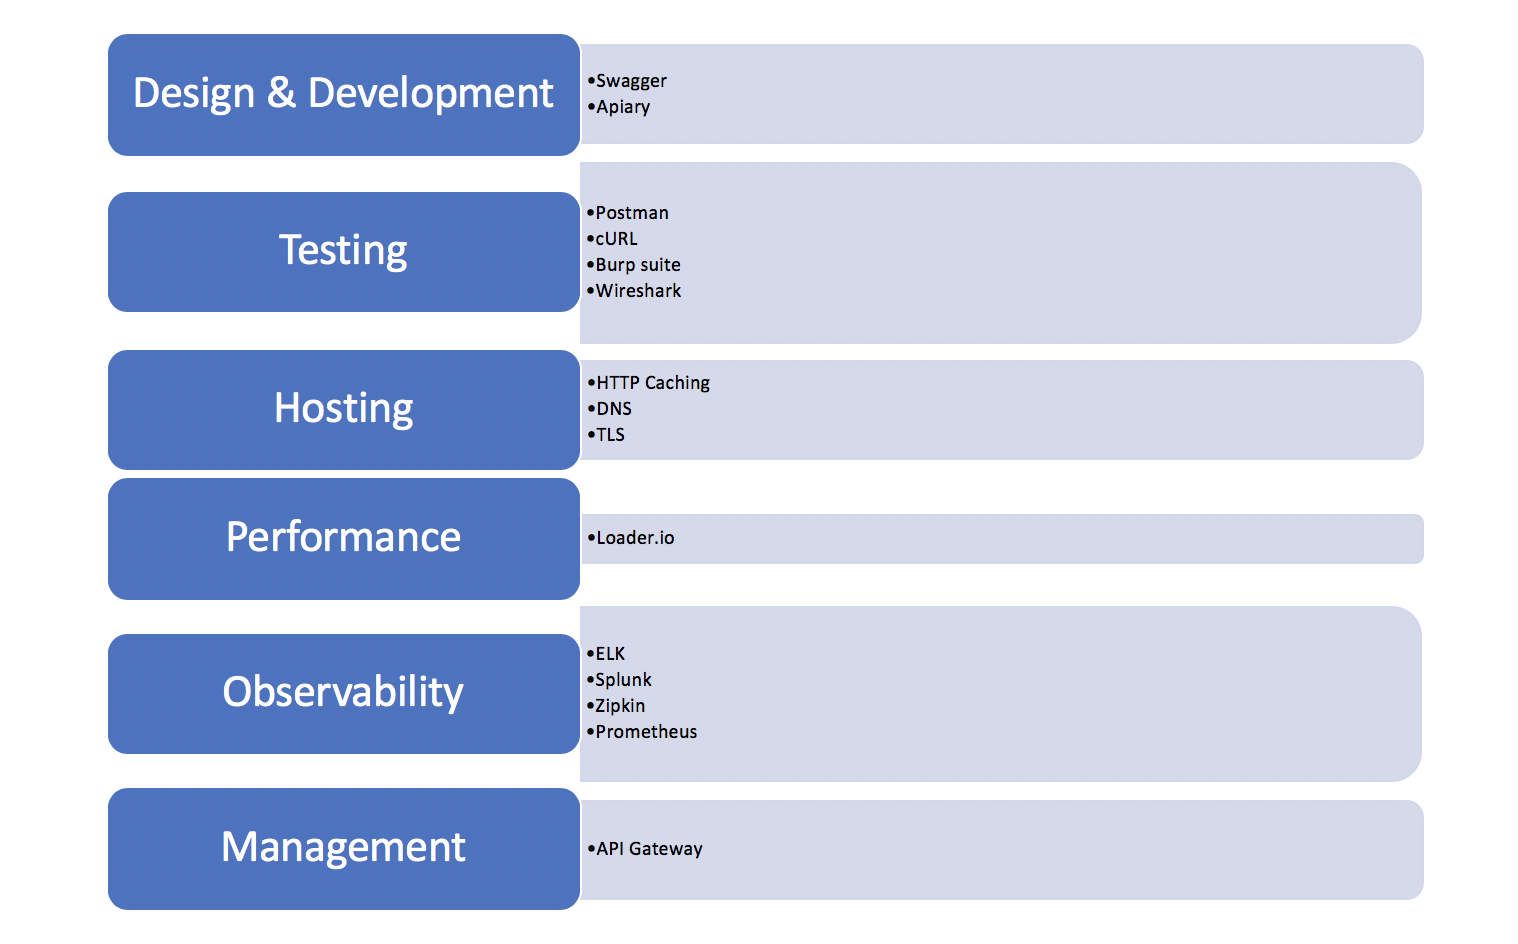
web. The different phases of API development are enumerated below.
- Design — The main goal here is to define the shape of APIs, document interfaces, and provide stub endpoints.
- Testing — Here, we do functional testing of APIs by sending a request and analyzing the response at different levels of visibility, namely, application, HTTP, and network.
- Web Hosting — When deployed on the web, there are HTTP tools that help with the hosting of APIs for performance, security, and reliability.
- Performance — Before moving on to production, we use tools for performance testing of APIs that tell us how much load APIs may support.
- Observability — Once the API is deployed in production, testing in production provides the overall health of live APIs and alert us if any problem occurs.
- Management — Lastly, we will take a look at some of the tools for API management activities like traffic shaping, blue-green deployment, canary, etc.
The following figure shows different stages highlighting the tools.
We will illustrate the usage of tools on APIs exposed by a
web application as we elaborate on each phase of API development.
Product Catalog is a Spring Boot web application that manages a catalog
of products. It exposes REST APIs to perform CRUD operations on a
product catalog. The code is available on my GitHub.
Design
In the design phase, the API developer collaborates with
clients of the API and the data provider to arrive at the shape of the
API. REST API essentially consists of exchanging JSON messages over
HTTP. JSON is a dominant format in REST API since it is a compact, easy
to understand, and has a flexible format that does not require declaring
schema up front. Different clients can use the same API and read the
data that they need.
We will illustrate API design using Swagger. It is a tool
that uses open format to describe the APIs coupled with Web UI for
visualizing and sharing. There is no separation between design and
implementation. It is an API documentation tool where the documentation
is hosted alongside the API. The benefit of this is that the API and the
documentation will also remain in sync. The drawback is that only API
developers can change the structure of the API. The documentation is
generated from the API. This means we need to build the skeleton of our
API first. We have used Spring Boot to develop the API and Springfox
package to generate the swagger documentation. Bring in swagger 2 and
swagger-ui maven dependencies into your pom.xml.
<dependency>
<groupId>io.springfox</groupId>
<artifactId>springfox-swagger2</artifactId>
<version>2.6.1</version>
</dependency>
<dependency>
<groupId>io.springfox</groupId>
<artifactId>springfox-swagger-ui</artifactId>
<version>2.5.0</version>
</dependency>
Add
SwaggerConfig.java to the project with following content.package com.rks.catalog.configuration;
import org.springframework.context.annotation.Bean;
import org.springframework.context.annotation.Configuration;
import springfox.documentation.builders.PathSelectors;
import springfox.documentation.builders.RequestHandlerSelectors;
import springfox.documentation.spi.DocumentationType;
import springfox.documentation.spring.web.plugins.Docket;
import springfox.documentation.swagger2.annotations.EnableSwagger2;
public class SwaggerConfig {
public Docket api() {
return new Docket(DocumentationType.SWAGGER_2)
.select()
.apis(RequestHandlerSelectors.any())
.paths(PathSelectors.any()).build();
}
}
This configuration tells Swagger to scan all the controllers
and include all the URLs defined in those controllers for API
documentation.
Once the application is started, Swagger documentation of the APIs can be accessed at the URL
http://localhost:8080/swagger-ui.html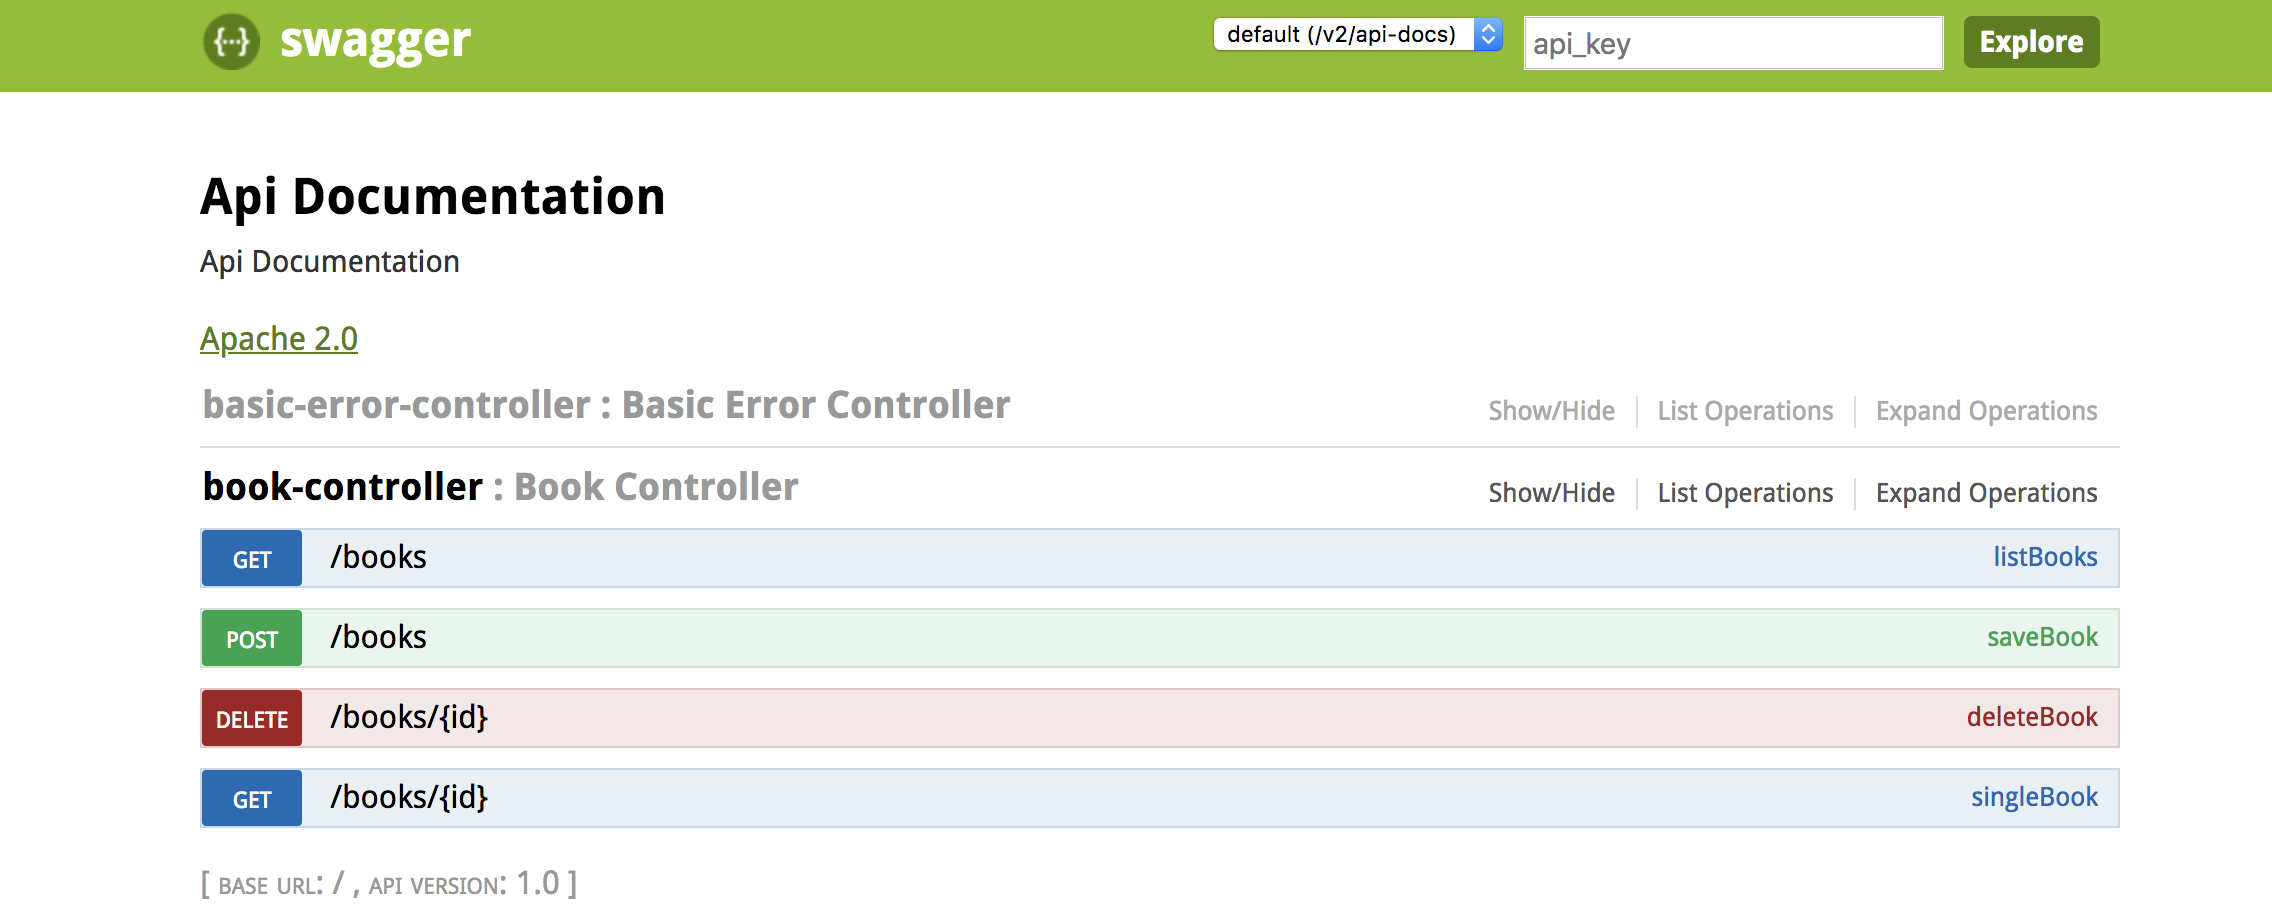
Click on each API to examine the details — the URL, HTTP
headers, and the HTTP body where applicable. A useful feature is the
"Try it out!" button, which provides a sandbox environment that lets
people play with the API to get a feel for it before they start plugging
them in their apps.
Testing
Functional testing of REST APIs entails sending HTTP
requests and checking responses so that we can verify that APIs behave
as we expect. REST uses HTTP for transport that specifies the request
and response formats of API. TCP/IP, in turn, takes the HTTP messages
and decides how to transport them over the wire. We introduce three sets
of tools to test APIs at these three layers of protocol stack, namely,
REST Clients for REST layer, Web Debuggers for HTTP layer, and Packet
Sniffers for TCP/IP layer.
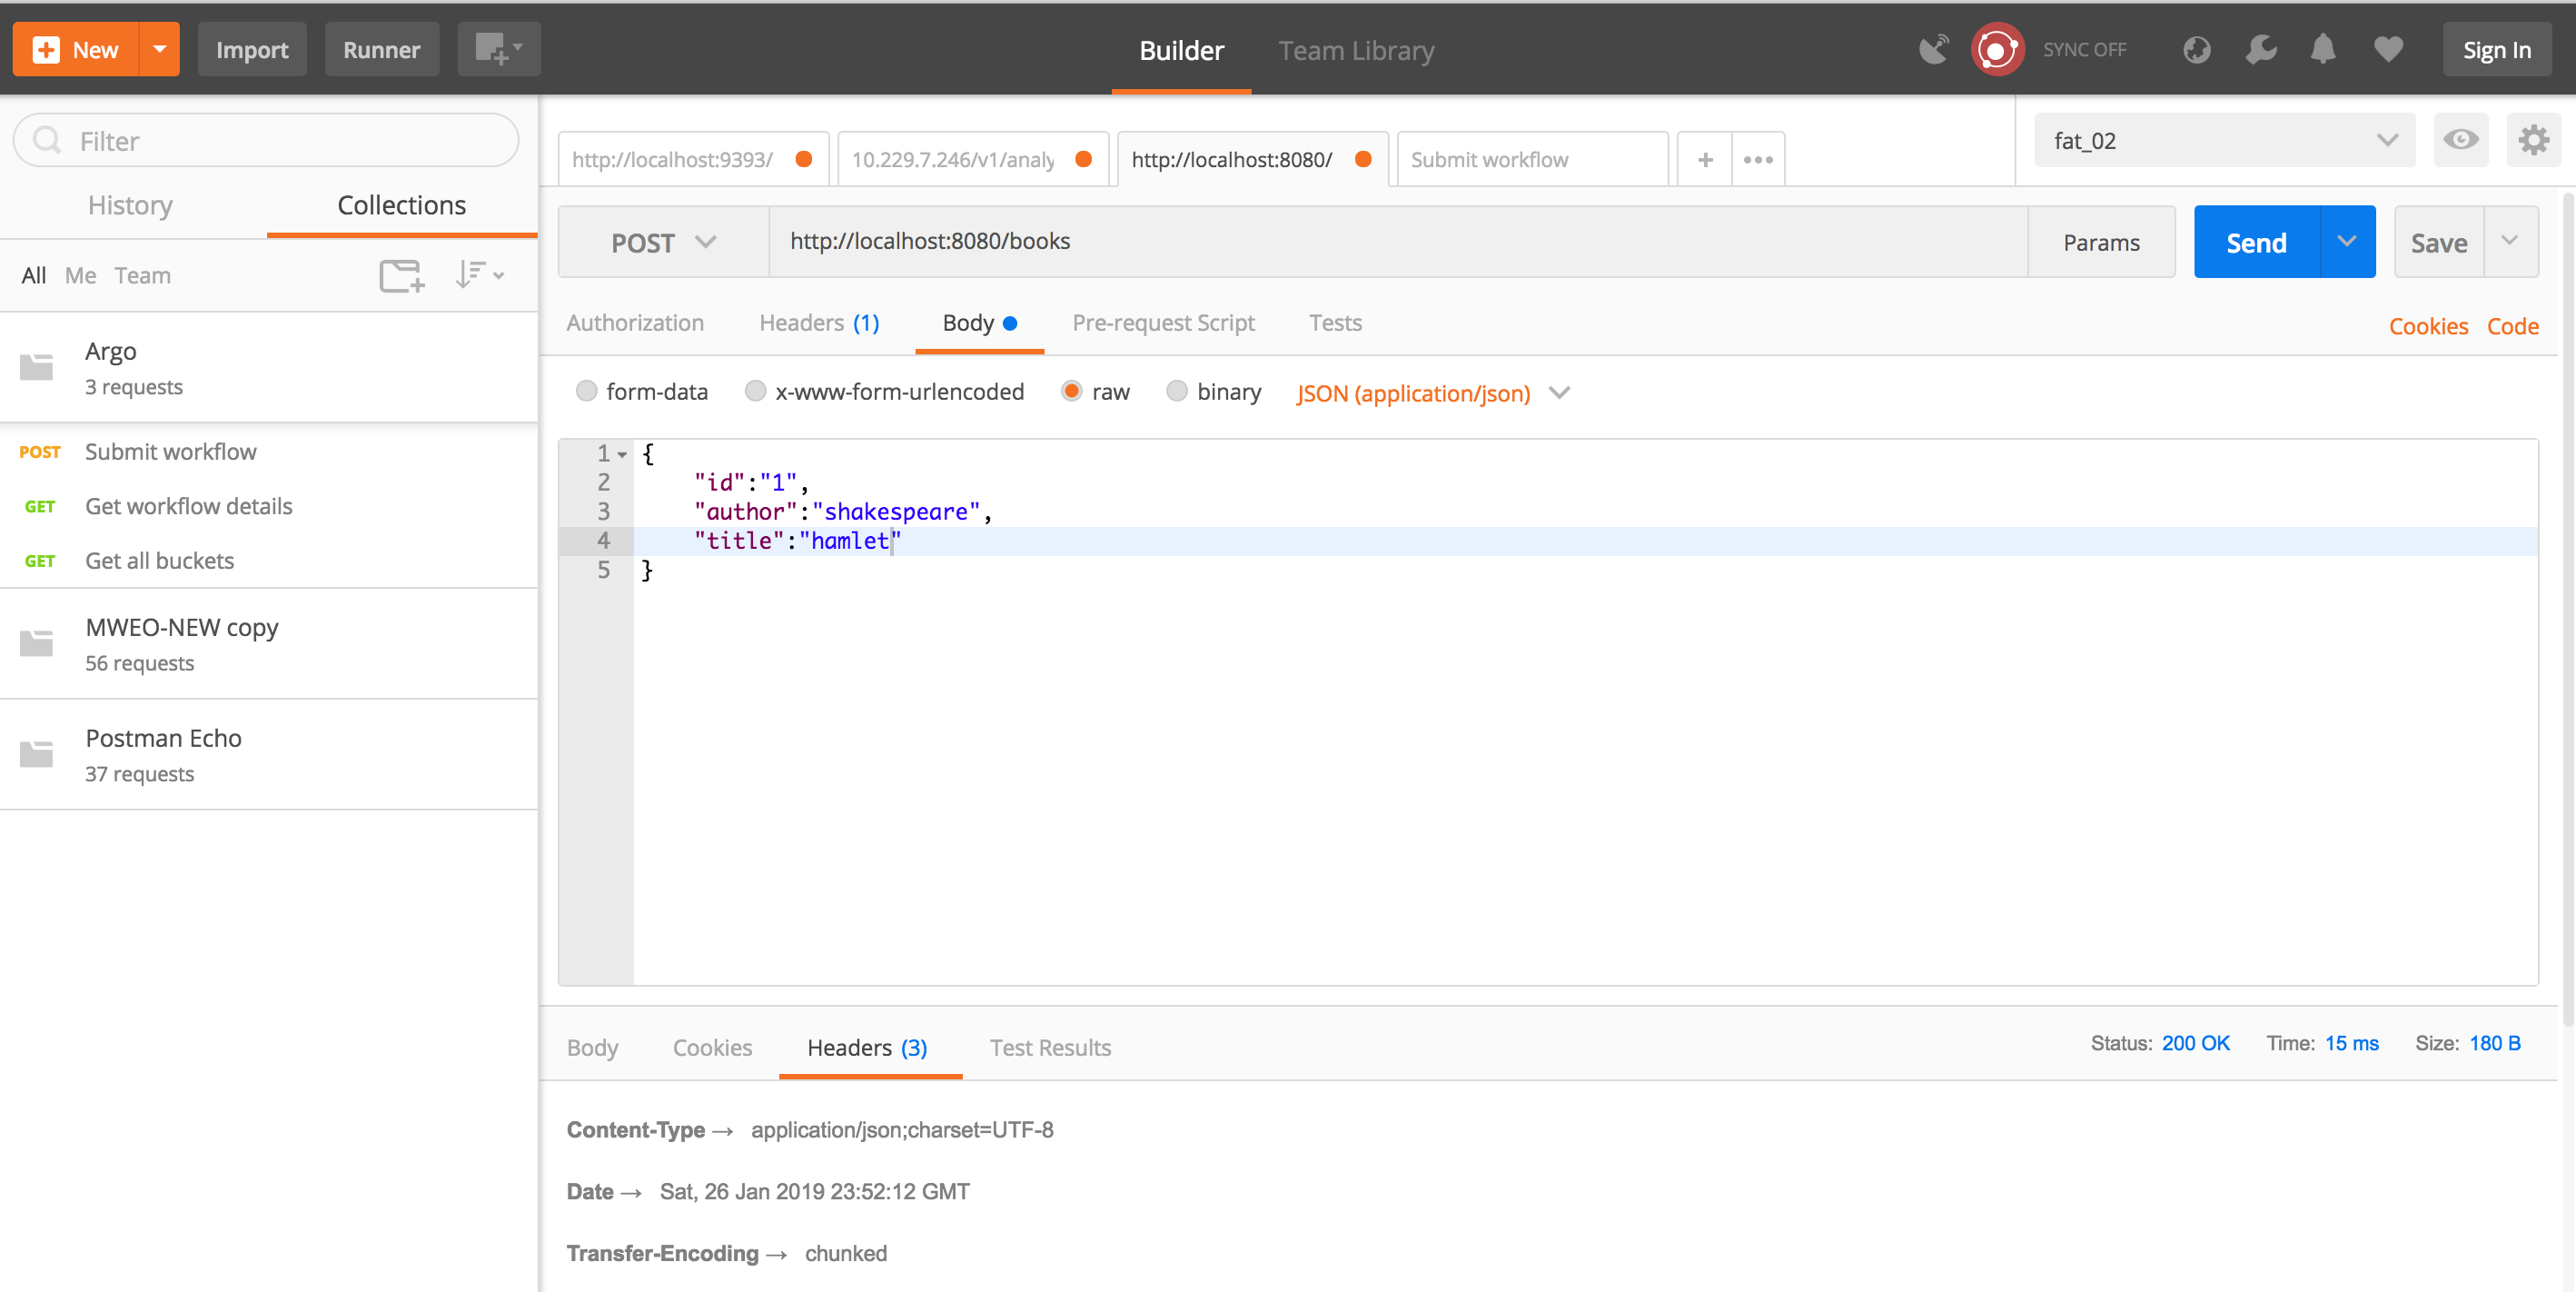
- Postman — Postman is a REST client that allows us to test REST APIs. It allows us to:
- Create HTTP requests and generate equivalent cURL commands that can be used in scripts.
- Create multiple environments for Dev, Test, Pre-Prod as each environment has different configurations.
- Create a test collection having multiple tests for each product area. The different parts of a test can be parameterized that allows us to switch between environments.
- Create code snippets in JavaScript to augment our tests, e.g., assert return codes or set an environment variables.
- Automate running of tests with a command-line tool called Newman.
- Import/export test collections and environments.
- cURL — It is a command-line tool that uses it's own HTTP stack and is available cross platform.
curl -X POST \
http://localhost:8080/books \
-H 'Cache-Control: no-cache' \
-H 'Content-Type: application/json' \
-d '{
"id":"1",
"author":"shakespeare",
"title":"hamlet"
}'
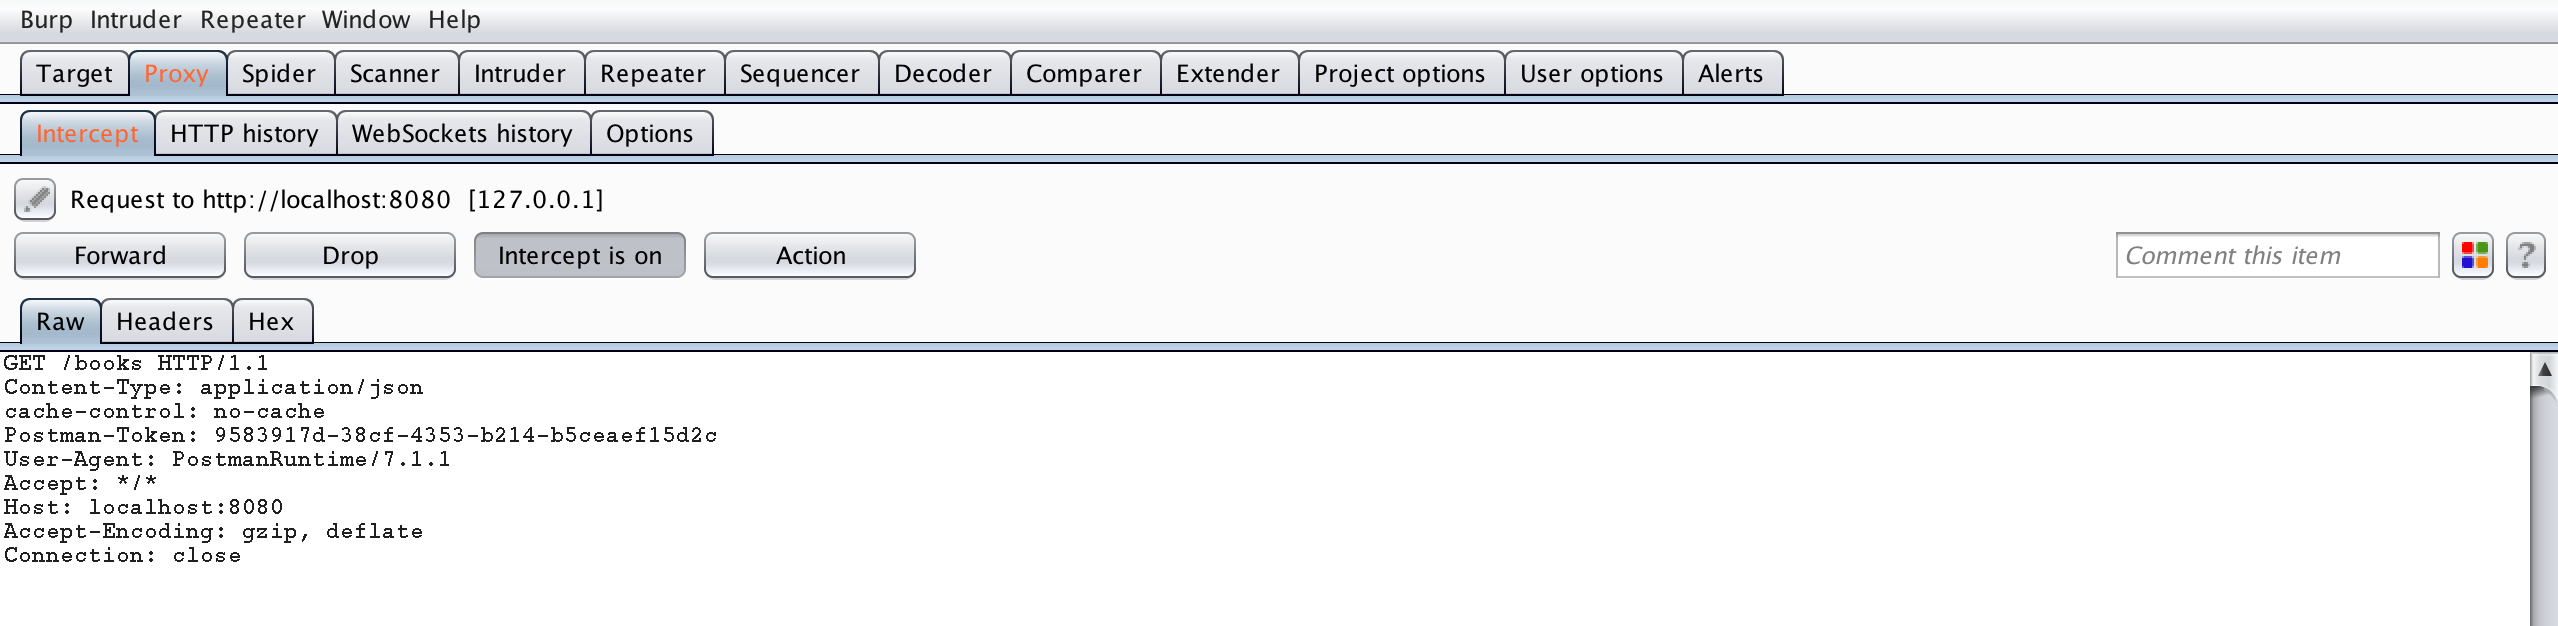
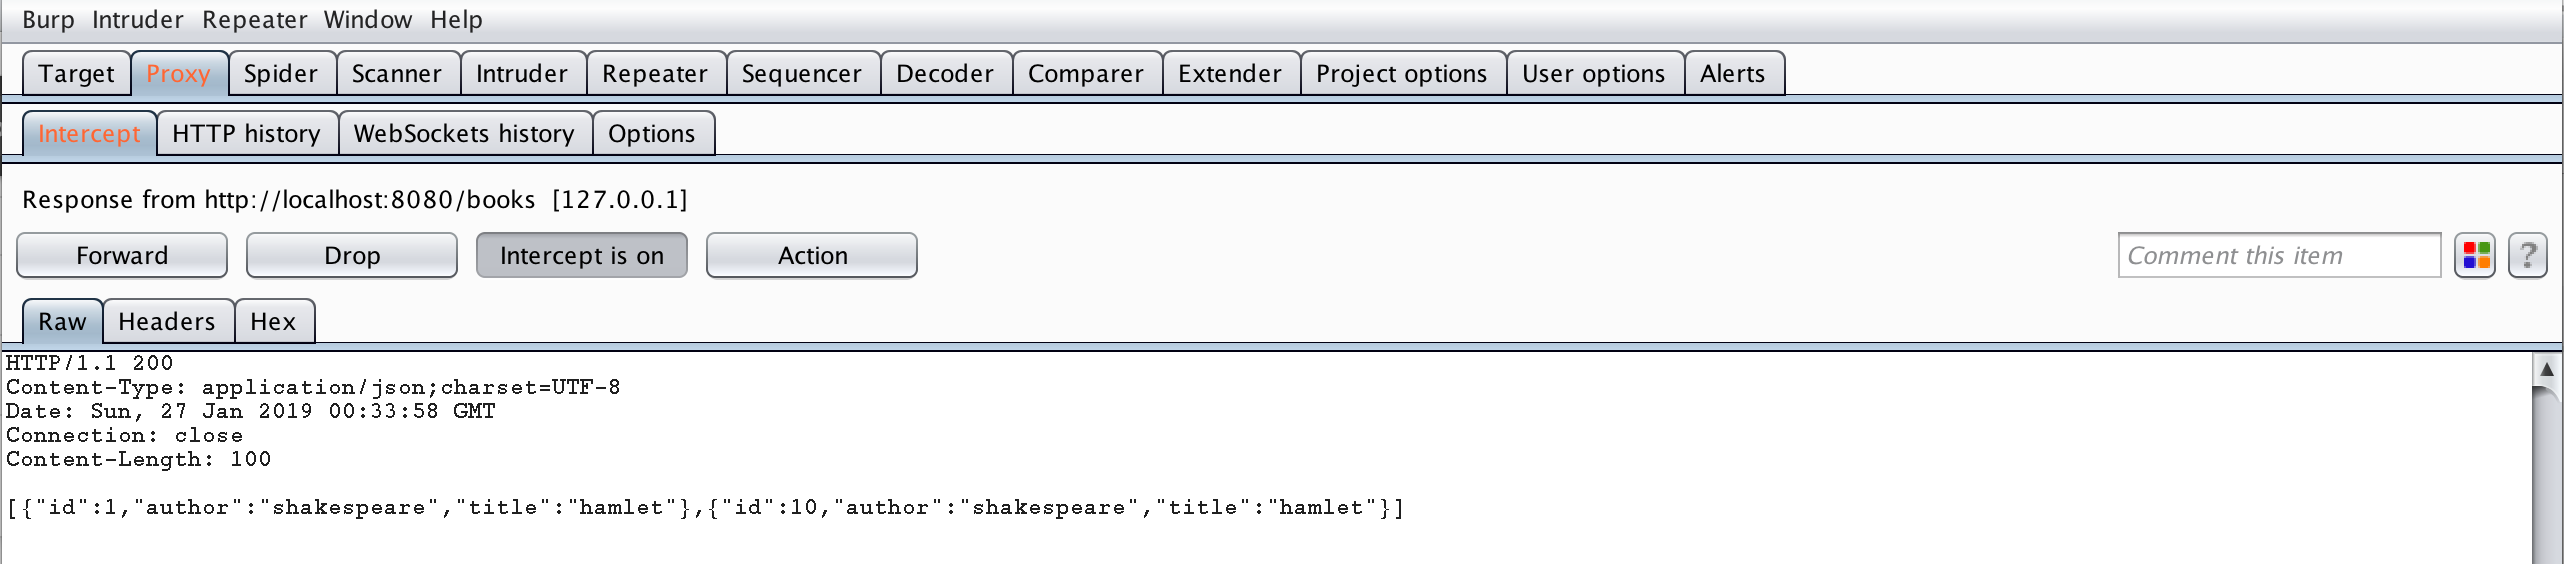
- Burp — Burp is a HTTP debugger that let us see the web traffic that goes between the client and the API. It runs as a proxy between the client and the server. This allows us to intercept the request and the reponse and modify them to create scenarios that are otherwise difficult to test without changing the client. It is a suite of tools that is mainly used for security testing but it can be very useful for API testing as well. Set up your postman to send request to Burp proxy and configure Burp to intercept client request and server response. Intercept request and response as shown below.
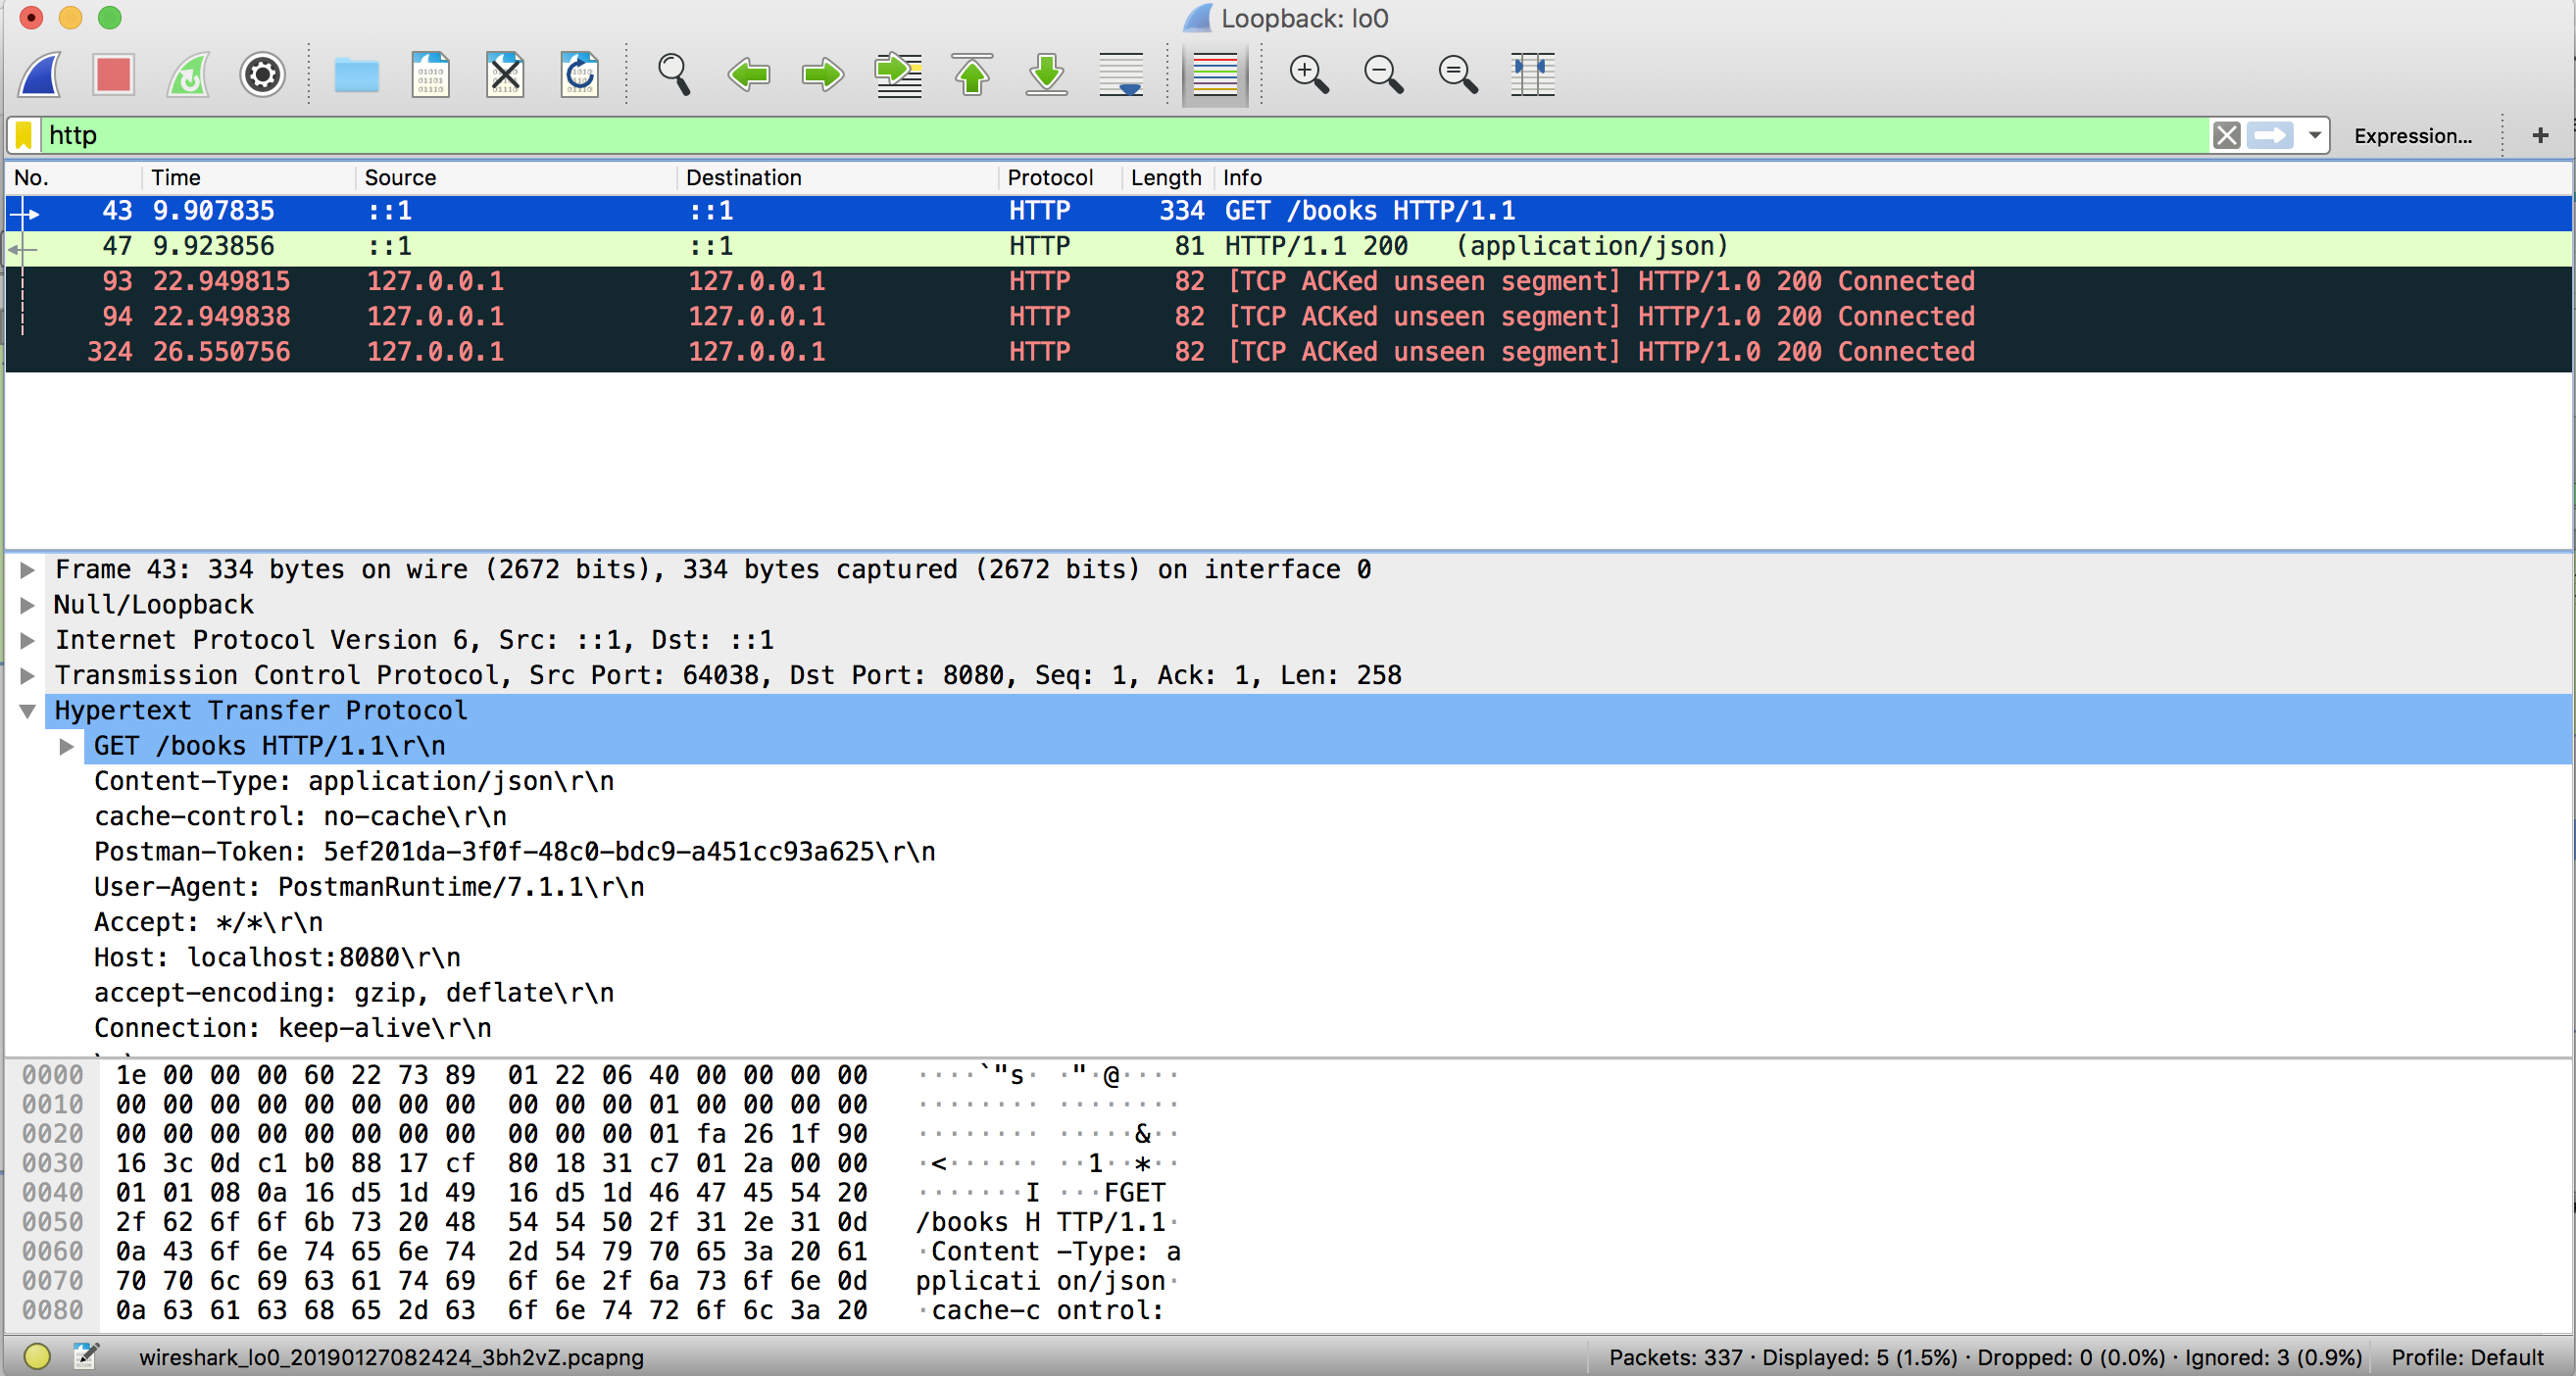
- Wireshark — Verification of some features of API, e.g., encryption, compression, etc., will require us to look a level deeper to see what is being sent and received on the network. Wireshark is a tool that monitors network interface and keeps a copy of all TCP packets that pass through it. Traffic is split by layers — HTTP, TCP, IP, etc. It also helps us to troubleshoot issues that require us to go deeper, e.g., TLS handshake.
Web Hosting
In this section, we will look at some of the features of the
HTTP protocol that, if properly used, help us deliver performant,
highly available, robust, and secure APIs. In particular, we will cover
three parts of HTTP protocol — Caching for performance, DNS for high
availability and scalability, and TLS for transport security.
- Caching — Caching is one of the best ways to
improve client performance and reduce load on API. HTTP allows clients
to save a copy of resource locally by sending a caching header in the
response. Next time, the client sends HTTP request for the same
resource, it will be served from the local cache. This saves both
network traffic and compute load on the API.
- HTTP 1.0 Expiration Caching. HTTP 1.0 provides
Expiresheader in the HTTP response indicating the time when the resource will expire. This can be useful for shared resource with a fixed expiration time. - HTTP 1.1 Expiration Caching. HTTP 1.1 provides a more flexible expiration header
cache-controlthat instructs a client to cache the resource for a period that is set inmax-agevalue. There is another values-maxagethat can be set for the intermediaries, e.g., a caching proxy. - HTTP Validation Caching. With caching, there is a
problem of a client having an out-dated resource or two clients to have
different versions of the same resource. If this is not acceptable or
if there are personalized resources that cannot be cached, e.g., auth
tokens, HTTP provides validation caching. With validation caching, HTTP
provides headers in the response
Etagorlast-modifiedtimestamp. If API returns either of the two headers, clients cache it and include in subsequent GET calls to the API.
- HTTP 1.0 Expiration Caching. HTTP 1.0 provides
GET http://api.endpoint.com/books
If-none-match: "4v44ffgg1e"
If the resource is not changed, the API will return
304 Not Modified response with no body, and the client can safely use its cached copy.- DNS — Domain Name System finds IP addresses for a
domain name so that clients can route their request to the correct
server. When HTTP request is made, clients first query a DNS server to
find the address for the host and then send the request directly to the
IP address. DNS is a multi-tiered system that is heavily cached to
ensure requests are not slowed down. Clients maintain a DNS cache, then
there are intermediate DNS servers leading all the way to a nameserver.
DNS provides CNAME (Canonical Names) to access different parts of the
server, e.g., both API and the webserver may be hosted on the same
server with two different CNAMEs —
api.endpoint.comandwww.endpoint.comor CNAMEs may point to different servers. CNAMEs also let us segregate parts of our API. For HTTP GET requests, we can have separate CNAME for static and transactional resources that let us set up a fronting proxy for resources that we know are likely to be cache hits. We can also have a CNAME for HTTP POST requests to separate reads and writes so that we can scale them independently. Or we can provide a fast lane for priority customers.
With advanced DNS like Route53, a single CNAME instead of
just pointing to a single server may point to multiple servers. A
routing policy may then be configured for weighted routing, latency
routing or for fault tolerance.
- TLS — We can secure our APIs with TLS which lets us serve our request over HTTPS. HTTPS works on the basic security principle of key-pair. To enable HTTPS on our API, we need a certificate on our server that contains public and private key-pair. The server sends a public key to the client, which uses it to encrypt data and the server uses its private key to decrypt it. When the client first connects to an HTTPS endpoint, there is a handshake where client and server agree upon how to encrypt the traffic. They exchange another key unique to the session which is used to encrypt and decrypt data for the life of that session. There is a performance hit during the initial handshake due to the asymmetric encryption, but once the connection is established, symmetric encryption is used which is quite fast.
For proxies to cache the TLS traffic, we have to upload the
same certificate that is used to encrypt the traffic. Proxy should be
able to decrypt the traffic, save it in its cache and encrypt it with
the same certificate and send it to the client. Some proxy servers do
not allow this. In such situations, one solution is to have two CNAMEs —
one for static cacheable resources over HTTP and for non-cacheable
personalized resources, requests over secured TLS channel will be served
by the API directly.
Performance
In this section, we will look at tools to load test our API
so that we can quantify how much traffic our infrastructure can cope
with. The basic idea behind performance testing is to send lots of
requests to the API at the same time and see at what point performance
degrades and ultimately fails. The answers we look for are:
- What response times can the API give under different load conditions?
- How many concurrent requests can the API handle without errors?
- What infrastructure is required to deliver the desired performance?
loader.io
is a cloud-based free load testing service that allows us to stress
test our APIs. To get a baseline performance of API, different kinds of
load tests can be run with increasing loads, measured by the number of
requests per second, to find out performance figures quantified by
errors and response times, for
- Soak test — average load for long periods, e.g., run for 48 hours @1 request per second. This will uncover any memory leaks or other similar latent bugs.
- Load test — peak load, e.g., run 2K requests per second with 6 instances of API.
- Stress test — way-over peak load, e.g., run10K requests per second for 10 minutes.
This also lets us decide the infrastructure that will let us
deliver API with desired performance numbers and whether our solution
scales linearly.
Observability
Once API is deployed in production, it does not mean we can
forget about the API. Production deployment kicks off another phase of
testing — testing in production that may uncover issues that remained
uncaught in earlier phases. Testing in production includes a set of
activities clubbed together as observability that includes logging,
monitoring, and tracing. The tools for these activities will help us to
diagnose and resolve issues found in production.
- Logging — Logging needs to be done explicitly by the developers using their preferred logging framework and a logging standard. For example, one log statement for every 10 lines of code or more if the code is complex with log levels split as - 60 percent DEBUG, 25 percent INFO, 10 percent WARN and 5 percent ERROR.
- Monitoring — Monitoring runs at a higher level than logging. While logging explicitly tells us what is going on with the API, monitoring provides the overall health of API using generic metrics exposed by the platform and the API itself. Metrics are typically exposed by an agent deployed on the server or it may be part of the solution and are collected periodically by the monitoring solution deployed remotely.
Diagnostic endpoints may be included in the solution that tells us the overall health of the API.
- Tracing — Zipkin is a distributed tracing system. It helps gather timing data needed to troubleshoot latency problems in microservice architectures.
Enabling Centralized Logging
covers logging and tracing. For monitoring, interesting metrics may be
stored in a time-series store like Prometheus and visualized using
Grafana.
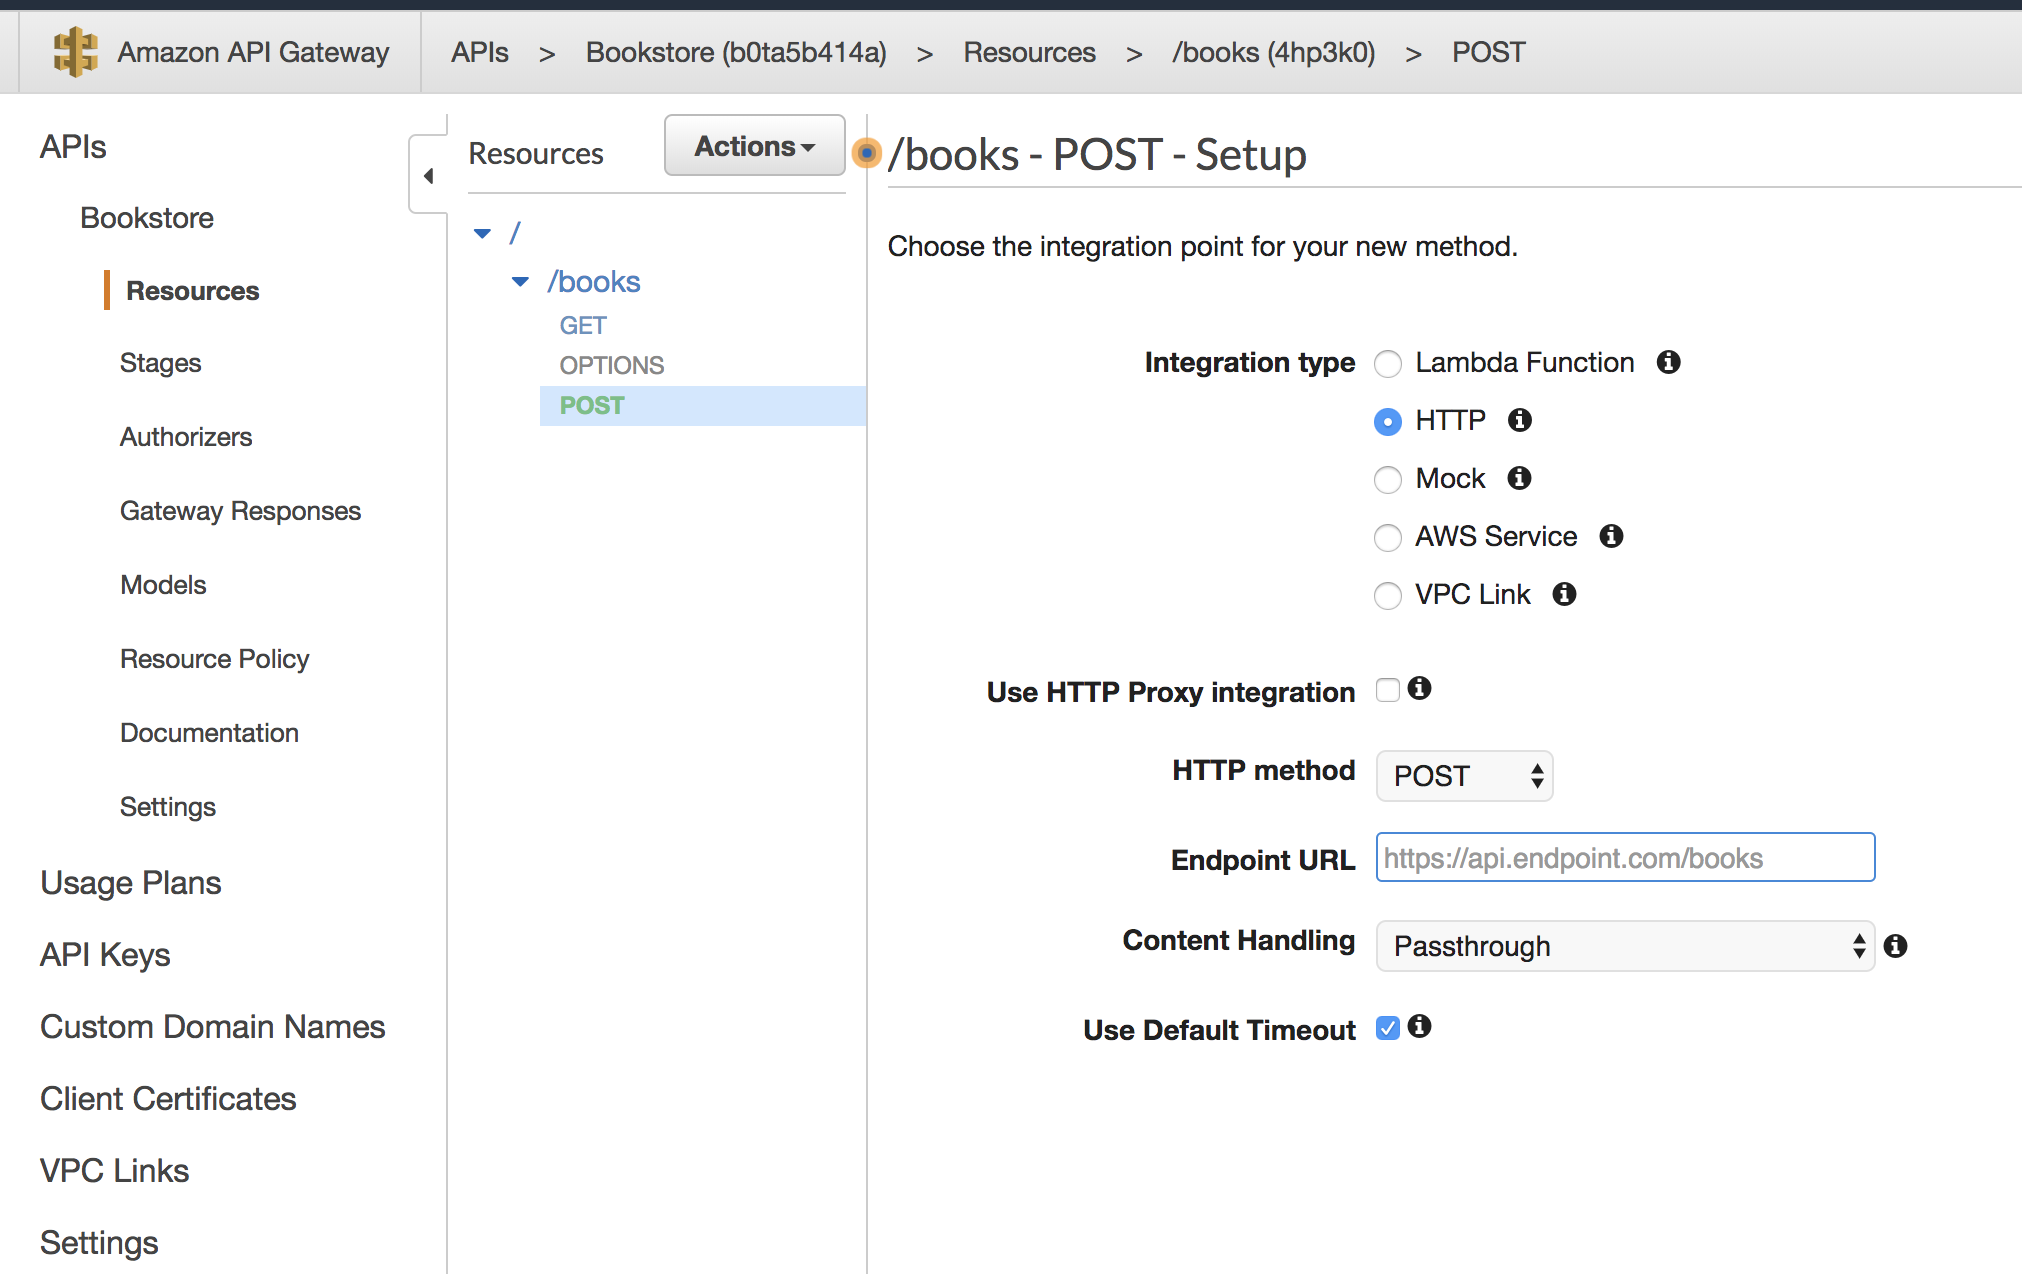
Management
API Management tools serve as a gateway that provides services that let:
- API Clients provision themselves by getting API key
- API Providers configure DNS, caching, throttling policies, API versioning, canarying.
These features and more are available on AWS API Gateway.