How to create NFTs with JavaScript
June 11, 2021 14 min read
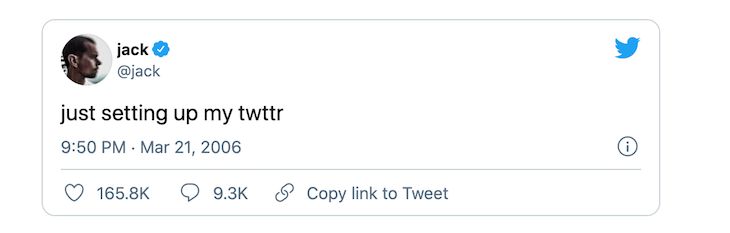
In February 2021, Figma CEO Dylan Fields sold a piece of NFT art for $7.5 million. Similarly, Twitter co-founder Jack Dorsey sold his first tweet on Twitter as an NFT for $2,915,835.47.
An NFT (non-fungible token) is a fascinating new technology that represents ownership of an asset digitally. In this tutorial, we’ll cover some important background information, set up third-party services, and finally code and deploy our very own NFT to the Ropsten Testnet.
Let’s get started!
Background information
Before creating our own NFT, let’s take a look at the technologies and features that make NFTs work.
Fungible vs. non-fungible
Fungibility is essentially the ability to exchange an item for a similar item of the same value. Consider a five-dollar bill. It always equals the same amount anywhere in the world. You can exchange five one-dollar bills for a single five-dollar bill, and they are worth the same value all the time.
On the other hand, non-fungible items do not have the same value in comparison to each other. For example, an exact replica of the Mona Lisa is not equal in value to the original painting, despite being the same in every way. Non-fungible items are inherently unique and cannot be considered equivalent to any other item.
An item can be both fungible and non-fungible. For example, while two seats in economy class on a plane are worth the same price, one person may place sentimental value on a window seat, decreasing the value of every other seat for that person.
Blockchain
A blockchain is a public database or digital ledger that keeps track of transactions. It is replicated across several computer systems that are part of the chain. We’ll build our NFT on the Ethereum blockchain.
Minting ERC721 tokens
Minting is the process of creating something for the first time, or in our case, publishing a unique instance of our ERC721 token on the blockchain. ERC-721 is the standard for creating an NFT, and an ERC721 token is a unique representation of digital content published to the Ethereum blockchain. No two tokens are ever the same, so each time you mint a new token with the same block of code, a new address will be generated.
Smart contracts and NFTs
Smart contracts are simple programs that are deployed to the blockchain and run as-is, meaning they’re not controlled by a user. We can use a smart contract to create and track our tokens.
An NFT is a digital store of data that conforms to the ERC-721 standard and lives on a public blockchain. NFTs contain information or data about the asset they represent, which could be a digital item like a Tweet or a physical item like a hoodie.
A smart contract can be considered an NFT if it implements the ERC-721 standard, and an NFT is an instance of a smart contract. Each time we mint a new NFT, we use the smart contract code that has been deployed to the blockchain.
Public networks: Mainnet vs. Testnet
Ethereum uses multiple networks. The network used in production is usually referred to as Mainnet and the others, which are used for testing, are called Testnet. We’ll deploy the NFT we create to the Ropsten Testnet, a proof-of-work Testnet for Ethereum.
Note that when we eventually deploy our NFT, either to production or to the Mainnet, the transaction history and balances we have on the Ropsten Testnet will not carry over. Think of the Testnet as a public staging/development environment and the Mainnet as a production environment.
Private networks
A network is considered private if its nodes are not connected to the public blockchain. You can run the Ethereum blockchain on a private network, like your local machine, or on a group of machines, like consortium networks, that are not accessible on the Mainnet or Testnet.
Running the Ethereum blockchain on a group of machines like an intranet would require validating transactions with a node, an Ethereum software running on a client that verifies blocks and transaction data.
HardHat and Ganache are two examples of Ethereum blockchain development environments that you can run on your local machine to compile, test, deploy, and debug your smart contract application.
We’ll run our application on a public network so that it can be accessed by anyone connected to the network.
Faucets
To test our application, we need to get Ether (ETH), the Ethereum cryptocurrency, from a faucet. Faucets, like the Ropsten Faucet, are web apps that allow you to specify and send test ETH to an address, which you can then use to complete transactions on a Testnet.
The price of ETH on exchanges is determined by transactions occurring on the Mainnet at any given time. If you choose to run your Ethereum application on a private network, you don’t need test ETH.
Nodes and clients
As previously mentioned, nodes verify blocks and transaction data. You can create your own node using clients like Geth and OpenEthereum and contribute to the Ethereum blockchain by validating transactions and blocks on the blockchain.
You can skip the process of creating your own node and instead use one hosted on the cloud with a node-as-a-service platform like Alchemy. We can quickly move from development to production and ensure that we get important metrics for our application.
We’ll be using the Alchemy API to deploy our application to the Ropsten blockchain. Alchemy has been described as the AWS for blockchains and provides developer tools that allow us to view insights into how our application is performing.
Building the NFT
Prerequisites
- Node.js and npm
- basic knowledge of JavaScript
I enjoy photography and take a lot of pictures on my mobile device. What better way to protect my work than to mint an NFT that I can transfer to anyone who loves my photos? They can then use the NFT data on either the Ropsten Testnet or the Mainnet to prove that they own the rights to the original image.
We’ll create an NFT that identifies the picture I took of the Osun River below, which is believed to have unique healing powers.

Create an Alchemy account
We’ll use Alchemy to code our NFT, allowing us to skip the process of running an Ethereum node on our local machine.
Navigate to the Alchemy dashboard where you’ll see a screen titled “Create your first app”. I’ve used my name as the team name and named the app “The Osun River NFT”.
Select Ropsten as the test network for the application.

Hit the Create App button to continue.
On the next screen, select the free plan. On the following screen, you can avoid entering payment information by hitting the Skip for now button, but you may choose to do that at a later time. On the last screen, select the Capped Capacity option.
Now, you’ll see our app listed on your dashboard.

Create an Ethereum account
We need to create a wallet to hold an Ethereum account. To deploy our application to a network, we’ll need to pay a fee denominated in ETH, known as gas fees. When testing our application, we can use dummy ETH to complete the process, which we’ll retrieve from a faucet later.
We’ll create an Ethereum account using MetaMask, a virtual wallet that’s available as a Chrome extension.
Once you’ve installed MetaMask and created an account, open the MetaMask extension in Chrome and select the Ropsten Test Network from the list of networks.
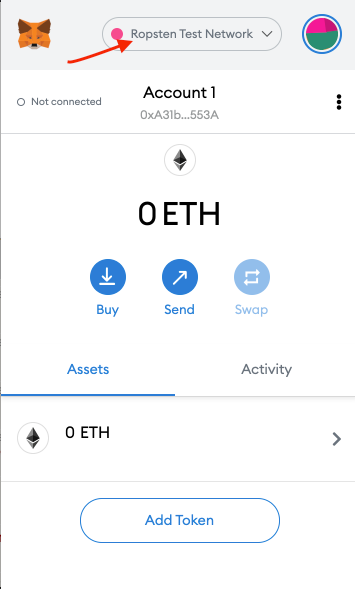
MetaMask will automatically generate a wallet address denominated in ETH. Simply click on Account 1 to copy your wallet address.
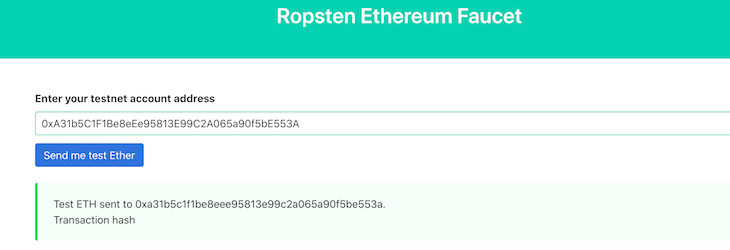
Getting ETH from a faucet
Let’s send Ether to our new wallet using the Ropsten Faucet. First, enter your wallet address, which you can copy from above, and the site will send 1ETH to your wallet.
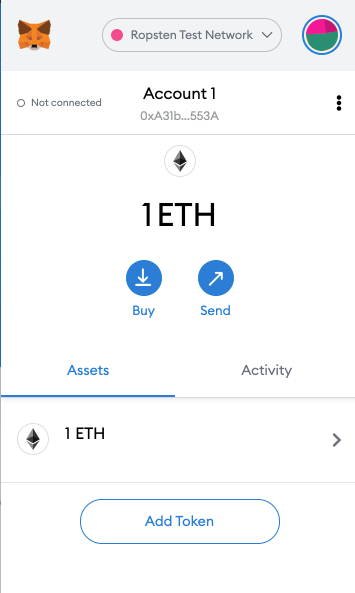
You can confirm by checking your MetaMask wallet.
Setting up our token
Let’s start coding our NFT token! First, create a new directory for our project and initialize npm:
mkdir the-osun-river-nft && cd the-osun-river-nft
npm init -y
We need to set up Hardhat, a development environment for Ethereum that allows us to compile our application on our local machine and test functionality before deploying to the Ropsten Testnet.
To install Hardhat as a development dependency within our project, run:
npm install -D hardhat
Now, initialize Hardhat using the npx hardhat command:
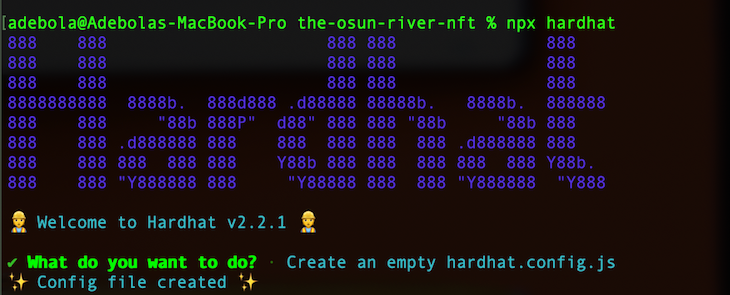
Select Create an empty hardhat.config.js. We’ll use this file to set up configuration for our project later on.
Now, we’ll set up two new folders in our project: one will hold the code for our smart contract, and the other will hold the scripts that deploy and interact with the smart contract code:
mkdir contracts && mkdir scripts
Creating a smart contract
Smart contracts are simply applications that can be run on the Ethereum blockchain. They are written in a language called Solidity.
Our smart contract code will be based on the OpenZeppelin ERC721 implementation. ERC721 is the standard for representing ownership of NFTs, and the OpenZeppelin contracts provide us with some flexibility in using ERC721.
Install the OpenZeppelin contracts library:
npm i @openzeppelin/contracts@4.0.0
In your contracts directory, create an OsunRiverNFT.sol file using the code below. I’ve left several comments that clarify each line:
//Contract based on https://docs.openzeppelin.com/contracts/3.x/erc721
// SPDX-License-Identifier: MIT
pragma solidity ^0.7.3;

// implements the ERC721 standard
import "@openzeppelin/contracts/token/ERC721/ERC721.sol";
// keeps track of the number of tokens issued
import "@openzeppelin/contracts/utils/Counters.sol";
import "@openzeppelin/contracts/access/Ownable.sol";

// Accessing the Ownable method ensures that only the creator of the smart contract can interact with it
contract TorNFT is ERC721, Ownable {
    using Counters for Counters.Counter;
    Counters.Counter private _tokenIds;

    // the name and symbol for the NFT
    constructor() public ERC721("TheOsunRiver", "TOR") {}

    // Create a function to mint/create the NFT
   // receiver takes a type of address. This is the wallet address of the user that should receive the NFT minted using the smart contract
    // tokenURI takes a string that contains metadata about the NFT

    function createNFT(address receiver, string memory tokenURI)
        public onlyOwner
        returns (uint256)
    {
        _tokenIds.increment();

        uint256 newItemId = _tokenIds.current();
        _mint(receiver, newItemId);
        _setTokenURI(newItemId, tokenURI);

        // returns the id for the newly created token
        return newItemId;
    }
}
For our NFT to be a valid ERC721 token, it must meet all ERC721 standards. import "@openzeppelin/contracts/token/ERC721/ERC721.sol"; ensures this by importing the ERC721 standards into our file.
Connecting MetaMask to the project
Now, we’ll connect our MetaMask wallet to our project. Every transaction on a virtual wallet requires a private key to complete, so we’ll need to grab our MetaMask private key.
In your Chrome browser, open up the MetaMask extension, click the three dots in the top right, and select the Account Details option. Next, click the Export Private Key button. Enter your password to see your private key, then copy it.

It’s important to keep our private key secured within our project’s codebase to prevent it from being exposed when using version control platforms like GitHub. To keep our keys secure, we will install the dotenv package:
npm i dotenv
Create a .env file in the root of your project, then add your MetaMask private key from earlier to it. You’ll also add your alchemy API_URL, which you can find by navigating to your Alchemy Dashboard, clicking the Apps dropdown, selecting the App you created earlier, then selecting the View Key button:

METAMASK_PRIVATE_KEY = "yourMetamaskPrivateKey"
API_URL = "https://eth-ropsten.alchemyapi.io/v2/your-api-key"
Setting up Ether.js
Ether.js is a library that simplifies interacting with the Ethereum blockchain. We’ll use the Ether plugin for Hardhat:
npm i -D @nomiclabs/hardhat-ethers 'ethers@^5.0.0'
Head to the hardhat.config.js file we created earlier to add some of the new dependencies we’ve installed:
/**
* @type import('hardhat/config').HardhatUserConfig
*/
require('dotenv').config();
require("@nomiclabs/hardhat-ethers");
const { API_URL, METAMASK_PRIVATE_KEY } = process.env;
module.exports = {
   solidity: "0.7.3",
   defaultNetwork: "ropsten",
   networks: {
      hardhat: {},
      ropsten: {
         url: API_URL,
         accounts: [`0x${METAMASK_PRIVATE_KEY}`]
      }
   },
}
Let’s walk through what we have in our configuration file:
dotenvpackage: lets us use environment variables within our Node.js applicationrequire("@nomiclabs/hardhat-ethers"): runs the user-friendly methods provided by Ether in our deploy scriptsdefaultNetwork: specifies which network Hardhat should use when deploying our application (Ropsten Testnet)accounts: a private key generated by MetaMask that allows our application to connect to our MetaMask virtual wallet to complete a transactionurl: specifies the URL that our Node.js application is hosted on (Alchemy servers)
We’ll connect to the Ropsten Testnet via the nodes hosted at our URL. You can read more about configuration files in Hardhat.
Now, let’s run the compile task that Hardhat provides to check that everything works correctly:
npx hardhat compile
You should see a success message like the one below. You can ignore the warnings that appear in the terminal.

Creating a deployment script
Now that we’ve wrapped up our smart contract code, let’s write the necessary scripts to deploy our smart contract to the Ethereum blockchain.
In your scripts directory, create a new file called deploy.js:
async function main() {
    const [deployer] = await ethers.getSigners();
    console.log("Deploying contracts with the account:", deployer.address);

    console.log("Account balance:", (await deployer.getBalance()).toString());
    const TOR = await ethers.getContractFactory("TorNFT");

    // Start deployment, returning a promise that resolves to a contract object
    const tor = await TOR.deploy();
    console.log("Contract deployed to address:", tor.address);
 }

 main()
   .then(() => process.exit(0))
   .catch(error => {
     console.error(error);
     process.exit(1);
   });
Now, we can run the Hardhat deploy task:
npx hardhat run scripts/deploy.js --network ropsten
We add the --network ropsten flag to tell Hardhat to connect to a specific network, in our case, Ropsten.
After a few seconds, we’ll see that our smart contract has been successfully deployed to the Ropsten Testnet. From our terminal logs, we can see the newly created address for our smart contract.

Now, let’s confirm that our smart contract is deployed to the blockchain. Head to the Ropsten Etherscan and paste your contract address into the search bar. You should see details about your contract within one minute.
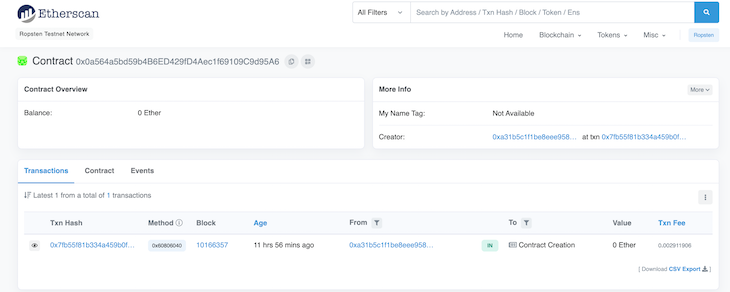
If you check your Ethereum wallet on MetaMask, you’ll notice that the amount of ETH you have has been reduced on account of the gas fees required to process transactions. Now, we’ve successfully deployed our smart contract to the Ropsten Testnet!
Minting an NFT
Our smart contract code takes in two arguments: the receiver address and a tokenURI. The tokenURI links to data that we would like to attach our token to. To use the receiver address, simply pass it in the wallet address of the user you’re giving the token to.
Data stored on the blockchain needs to be processed, verified, and replicated across multiple networks, making storing data on the blockchain very expensive. Uploading an entire image to the blockchain is not advisable, and you can store only the metadata for the NFT instead.
Although the URL for an NFT can be stored on the blockchain, the link may go offline at any time. Additionally, anyone who has access to the content at a URL may change it.
An example is when an NFT artist pulled the rug on NFTs he had sold on OpenSea, meaning he changed the original images that he’d sold to buyers. The link to those images was still present on the blockchain, however, the original content had been completely altered.
Therefore, we need a way to store data that’s affordable, persistent, decentralized, and immutable.
Using IPFS
IPFS is a distributed system for storing and accessing files that uses content addressing to tackle the problem above. Any piece of data that is uploaded to IPFS will be issued a unique content identifier (CID). Once a CID is generated for a piece of data, that CID will always represent that data, and the data cannot be changed.
Here’s an example IPFS URI:
ipfs://bafybeigdyrzt5sfp7udm7hu76uh7y26nf3efuylqabf3oclgtqy55fbzdi
To generate an IPFS URI, you simply need to prefix the CID with ipfs://. In a browser, IPFS URIs follow the format:
https://ipfs.io/ipfs/{CID}
The URI will be resolved by your user agent (browser) to display the content. There are a few browsers able to resolve IPFS URIs, but we’ll use Google Chrome browser version 90.
Setting up web3.js
Let’s continue adding metadata to our NFT. We’ll install the Alchemy Web3 package:
npm install @alch/alchemy-web3
According to its docs, web3.js is a collection of libraries that allows you to interact with a local or remote Ethereum node using HTTP, IPC, or WebSocket.
Alchemy wraps around the Web3.js library, extending its functionality by offering automatic retries and robust WebSocket support.
Setting up scripts to mint NFTs
Now, it’s time to write the scripts to mint our NFT.
In your scripts folder, create a file called mint-nft.js. Then, add the following block of code:
require('dotenv').config();
const API_URL = process.env.API_URL;
const { createAlchemyWeb3 } = require("@alch/alchemy-web3");
const alchemyWeb3 = createAlchemyWeb3(API_URL);
const contract = require("../artifacts/contracts/OsunRiverNFT.sol/TorNFT.json");
Uploading NFT metadata to Pinata
Pinata is a platform for using IPFS protocol to store our NFT’s metadata. If you haven’t already, create an account.
Once you’re signed in, select the teal upload button, click File, then select your NFT image.
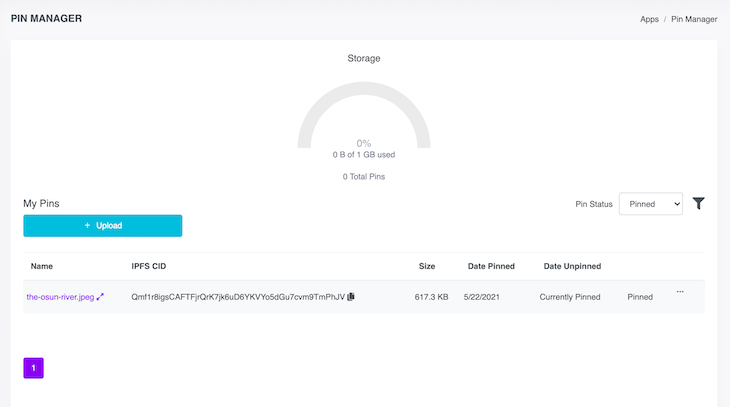
Once the image is successfully uploaded, you’ll see it on your dashboard. Make sure to take note of the alphanumeric characters under the IPFS CID column above. We’ll use them later.
Now that we’ve uploaded our image to Pinata, let’s create a JSON file to hold information about our NFT. We will store the URI on the blockchain when an NFT is minted.
In the root of your application, create a file called nft-metadata.json
and add the following information. Remember to change the image value
to use the CID that was generated when you uploaded your image to
Pinata:
{
    "description" : "An image of the Osun River captured on the suspended bridge at the Osogbo Sacred Grove.",
    "image" : "https://ipfs.io/ipfs/Qmf1r8igsCAFTFjrQrK7jk6uD6YKVYo5dGu7cvm9TmPhJV",
    "photographer" : "Adebola Adeniran"
}
Notice that for the image attribute, we have added the IPFS CID from our Pinata dashboard with the prefix https://ipfs.io/ipfs/. Save the file, then head back to Pinata to upload the file.
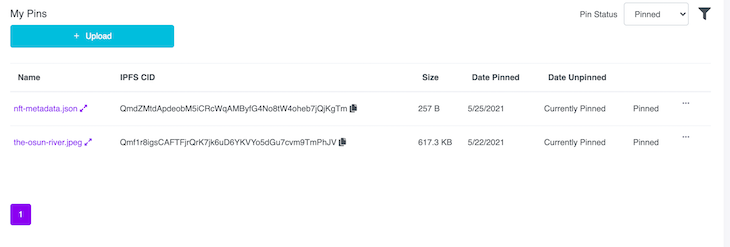
You should see both the image and JSON files on our dashboard.
Creating an instance of our contract
To mint the NFT, grab the contract address that was created when our smart contract was deployed to the Ropsten Testnet. You can see this in our terminal logs. Our contract address is 0x9436f34035a4885650C8311cA24e3E2DeD2FF0a2.

Head back into the scripts/mint-nft.js file and add the following code:
const contractAddress = "0x9436f34035a4885650C8311cA24e3E2DeD2FF0a2";
const nftContract = new alchemyWeb3.eth.Contract(contract.abi, contractAddress);
Let’s update our .env file with our public Ethereum address, which is the same account address we copied earlier. Add the address to our .env file:
METAMASK_PRIVATE_KEY="Our metamask Private key"
API_URL="Our alchemy API URL"
METAMASK_PUBLIC_KEY="Our metamask public key"
Next, we’ll need to create a transaction.
Add the following code into our mint-nft.js file. I’ve added comments to explain what we’re doing at each step:
const METAMASK_PUBLIC_KEY = process.env.METAMASK_PUBLIC_KEY;
const METAMASK_PRIVATE_KEY = process.env.METAMASK_PRIVATE_KEY;

async function mintNFT(tokenURI) {
    // get the nonce - nonce is needed for security reasons. It keeps track of the number of
    // transactions sent from our address and prevents replay attacks.
  const nonce = await alchemyWeb3.eth.getTransactionCount(METAMASK_PUBLIC_KEY, 'latest');
  const tx = {
    from: METAMASK_PUBLIC_KEY, // our MetaMask public key
    to: contractAddress, // the smart contract address we want to interact with
    nonce: nonce, // nonce with the no of transactions from our account
    gas: 1000000, // fee estimate to complete the transaction
    data: nftContract.methods
      .createNFT("0x0d28235B6191a66A3410cc1e3CeBfE53602D7865", tokenURI)
      .encodeABI(), // call the createNFT function from our OsunRiverNFT.sol file and pass the account that should receive the minted NFT.
  };
}
I’ve created a new MetaMask wallet and passed the wallet address in tx.data above. You can also pass in our METAMASK_PUBLIC_KEY if you wish. In production, the wallet address passed here should be the wallet address of the NFT’s recipient.
Now that the transaction is created, we’ll need to sign off of the transaction using our METAMASK_PRIVATE_KEY.
Add the following block of code to the mint-nft.js file within the mintNFT function:
  const signPromise = alchemyWeb3.eth.accounts.signTransaction(
    tx,
    METAMASK_PRIVATE_KEY
  );
  signPromise
    .then((signedTx) => {
      alchemyWeb3.eth.sendSignedTransaction(
        signedTx.rawTransaction,
        function (err, hash) {
          if (!err) {
            console.log(
              "The hash of our transaction is: ",
              hash,
              "\nCheck Alchemy's Mempool to view the status of our transaction!"
            );
          } else {
            console.log(
              "Something went wrong when submitting our transaction:",
              err
            );
          }
        }
      );
    })
    .catch((err) => {
      console.log(" Promise failed:", err);
    });
Finally, we need to copy the IPFS CID hash from the nft-metadata.json file we uploaded to Pinata earlier and pass that into our mintNFT function when it’s called:
mintNFT("https://ipfs.io/ipfs/QmdZMtdApdeobM5iCRcWqAMByfG4No8tW4oheb7jQjKgTm") // pass the CID to the JSON file uploaded to PinataIf you open the link above in our browser, you should see our nft-metadata.json file with the CID above:

Now, we can run node scripts/mint-nft.js in our terminal to mint our NFT. Wait a few seconds, and you should get a response like the image below in our terminal.

Now, we’ll go to the Alchemy Mempool, which tracks the status of all the transactions happening on our account without having to use Etherscan.
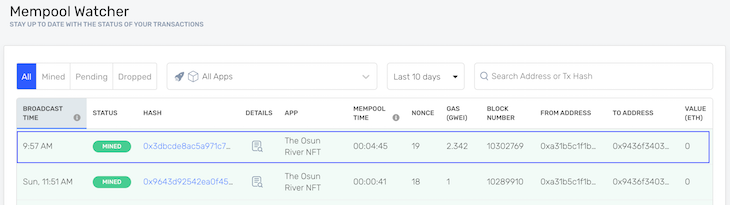
We can see information about our newly minted NFT on Etherscan, as well as the URL that links to our nft-metadata.json file on the Ethereum blockchain.
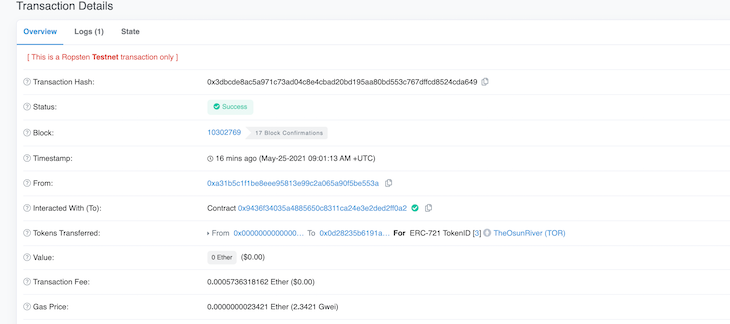
Scroll down to input data, then click the decode input data button. You should see the data we passed to our createNFT function in the contracts/OsunRiverNFT.sol file: the receiving wallet address and the URL for the JSON file that holds our NFT’s metadata.

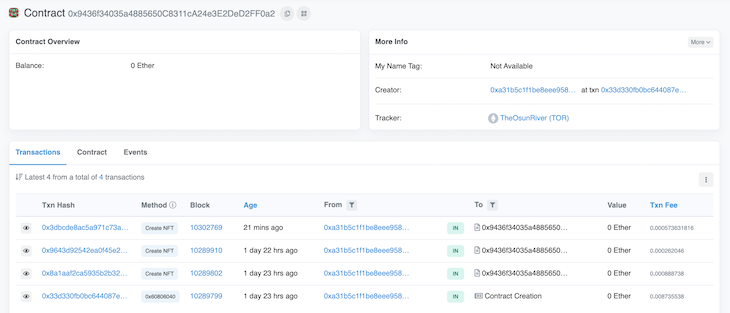
If you search for the contract address used to mint the NFT on Etherscan, you’ll see a record of all the NFTs that have been minted, or more accurately, all the transactions that have occurred using this smart contract.
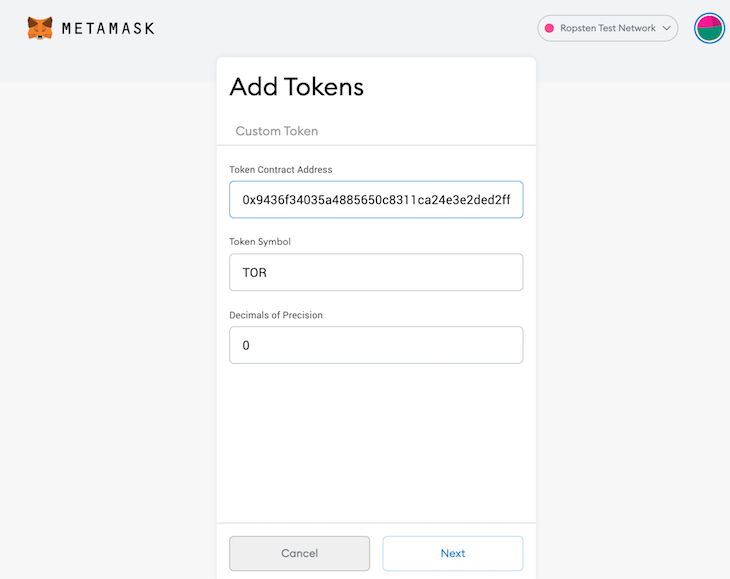
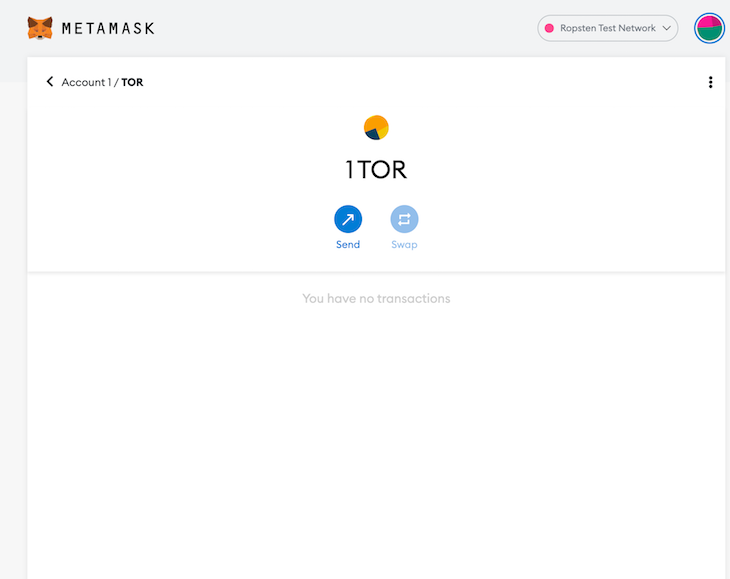
Adding our NFT to our MetaMask wallet
- Check connection to the Ropsten Test Network
- Open MetaMask wallet extension
- Click the add token button
- Copy the contract address of your new token from Etherscan and paste it into MetaMask. MetaMask will automatically generate the token’s symbol.
- Click next to add the token to your wallet
Conclusion
And with that, we’ve learned how to:
- Create and deploy a smart contract to the Ropsten Testnet
- Mint NFTs by deploying the smart contract to a blockchain
- Add metadata to our NFT using content addressing protocol in IPFS via Piñata
- View our NFT in our MetaMask wallet
Hopefully, you see why NFTs are causing such commotion. This is a fascinating technology that is likely to stick around a while.
In production, the steps are exactly the same as in this tutorial. The only difference is that you’ll now be interacting with the Mainnet rather than a Testnet.
You can see all the code for this project on my GitHub.
Are you adding new JS libraries to improve performance or build new features? What if they’re doing the opposite?
There’s no doubt that frontends are getting more complex. As you add new JavaScript libraries and other dependencies to your app, you’ll need more visibility to ensure your users don’t run into unknown issues.
LogRocket is a frontend application monitoring solution that lets you replay JavaScript errors as if they happened in your own browser so you can react to bugs more effectively.
 https://logrocket.com/signup/
LogRocket works perfectly with any app, regardless of framework, and has plugins to log additional context from Redux, Vuex, and @ngrx/store. Instead of guessing why problems happen, you can aggregate and report on what state your application was in when an issue occurred. LogRocket also monitors your app’s performance, reporting metrics like client CPU load, client memory usage, and more.
Build confidently — Start monitoring for free.