Translate

Thursday, February 21, 2019

Demystifying Blockchain In 8 Days: Part 1

Source: https://blog.makersacademy.com/demystifying-blockchain-in-8-days-part-1-a22e8eda37ce

by


For our final project at Makers our project team was united by our desire to complete a technical project. We had very different opinions on what this represented though. Some people expressed interest in developing prototypal programming languages. There were also discussions about developing compilers, web browsers and machine-learning driven chat rooms.

After around 45 minutes of discussions we decided to build a blockchain based product. We all shared several reasons for going in this direction. All of us wanted to demystify a technology that is not well understood and has become wrapped up in cryptocurrency hysteria. The process of building a blockchain also presented a sufficiently technical challenge to pique everybody’s interest in the group. Once the initial product — an array that would detect if an index was altered after creation — was developed, there was also considerable scope to expand the blockchain and eventually we incorporated the blockchain algorithm we wrote into a web app.

This allowed us to apply the web development skills we picked up at Makers to the project. We eventually incorporated the blockchain into a prescription management application.

I’ll go into more detail on this in part two. The final product illustrated how blockchain technology could be used to prevent prescription fraud and store a secure record of patient prescriptions that were authorised by doctors.

What Is A Blockchain?

At the very core, a blockchain is a ledger, or record of transactions that is secure. The diagram below shows the basic data that each block contains.

https://cdn-images-1.medium.com/max/1600/1*SLNxWRWoRTeD3FkUyRHnoA.png

Blockchains can be used to store any types of transactions. These can be financial transactions like the purchase of property or financial instruments. They can also be social transactions, like votes for political candidates. Whenever a new transaction is added to the blockchain the transaction becomes encrypted. The encrypted transaction then becomes the unique key or ID for each block. When a new block is added to the blockchain, in addition to encrypting it’s own data it also stores the key of the previous transaction. Every new block in the chain points to the preceding block except for the genesis transaction, which simply is used to signify the beginning of the blockchain.

The security of the blockchain rests on two pillars. The first pillar is the fact that all the data is encrypted. Only those who have access to the encryption key can review the data. The second (and more interesting) pillar of security lies in the blocks themselves.

Every block contains the previous blocks encryption key (which is also referred to as a hash). You can loop through and compare the previous key of the subsequent key of the current block. If they are not equal then you know that one of the blocks has been changed post creation and the security of the blockchain has been compromised. Unlike user authentication, where passwords are encrypted when they are sent to databases, and decrypted when the user logs in, the hash remains permanently encrypted. If any index or record or in the blockchain is modified, then a new hash is generated from the modified data.

Building & Testing The Basic Blockchain

Once we understood the basic principles of a blockchain we realised, in algorithmic terms, that the blockchain could be represented by an array of encrypted objects that held the unique encryption of the previous object. We decided to develop this using NodeJS for a number of reasons. Our group were all familiar with JavaScript from the Makers course and understood that JavaScript is a flexible programming language that we could use throughout our application. The NodeJS ecosystem is also incredibly exciting and there are great tutorials and libraries that we used to support the development of the project.

We took an Object-Orientated (OO) approach to the project and began by creating and testing block objects. OO JavaScript was used due to our familiarity with OO programming and testing.

Block Object Testing

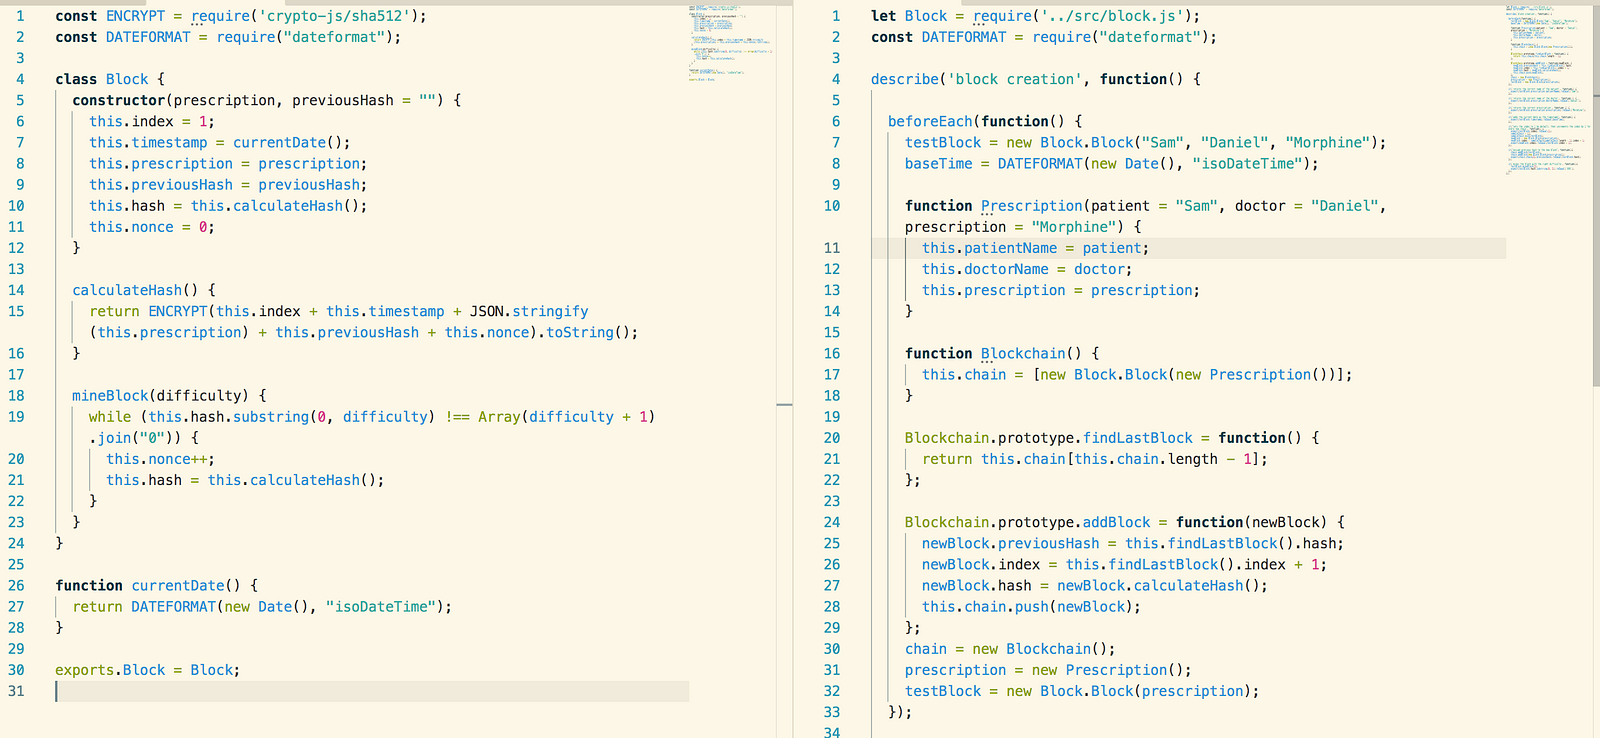
The screenshot below is a screenshot of the Block object that we created and the basic tests we used. The prescription object is created separately and is simply three strings.

https://cdn-images-1.medium.com/max/1600/1*dERexU9K7YAK8oiwrg8CDg.png

To test the block objects were being successfully created we created a fake Blockchain object (or double). The fake Blockchain only has the functionality for adding additional blocks to the chain. This is just enough functionality to enable us to test that new blocks contain the hash generated upon the creation of the previous block.

To test that the hashing is working we pass in two blocks to the Blockchain double, then compare that the previous hash of the block at index 2 is equal to the hash of the block at index 1.

https://cdn-images-1.medium.com/max/1600/1*Mq9h4aYJnniUiTN5ZgCcfA.png

We also test that the hash generation function calculates hashes at the stated complexity. The mineBlock function uses the “nonce” variable to determine the complexity of the encryption.

The “nonce” is used to determine the number of 0s that each hash must begin with. The greater number of 0s, the more computational resources are required to generate a hash as the hash generator will keep running until the encrypted string has the correct number of 0s.

We tested this by passing a difficulty/nonce value of 3 and mine the block. We then ensure that the encrypted string begins with the same number of 0s as the nonce.

https://cdn-images-1.medium.com/max/1600/1*HG9V2PWa9nbKkqhJOm1i-Q.png

Chain Object Testing

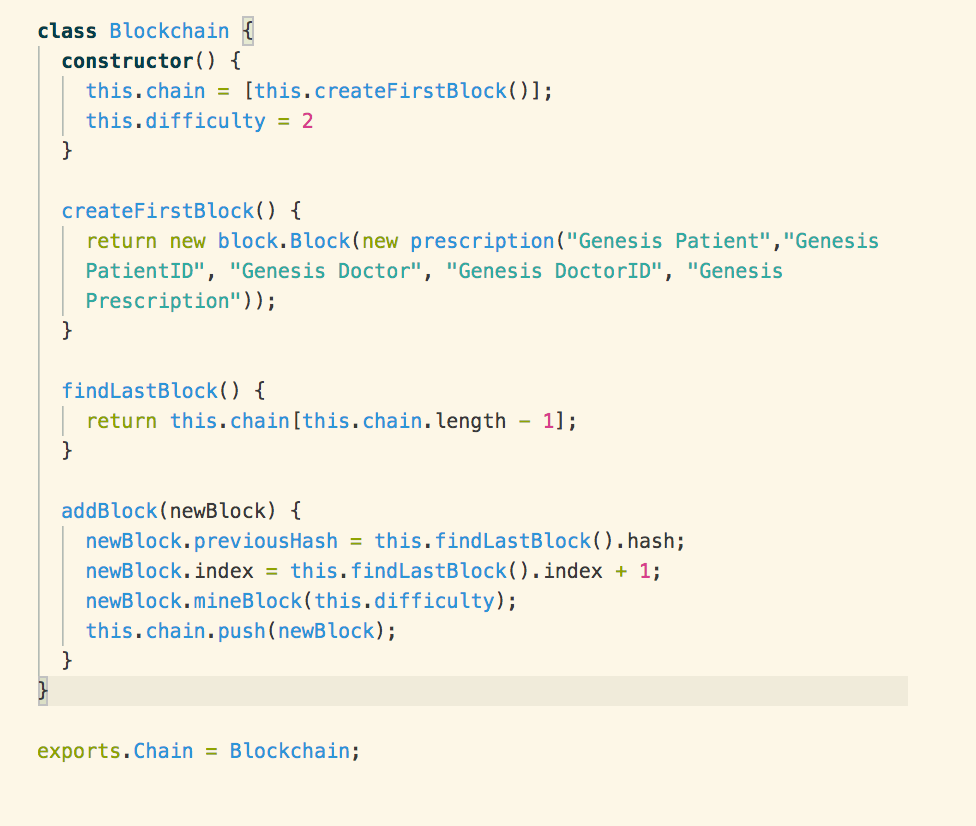
Below is a screenshot of the Blockchain that is used to store the blocks.
https://cdn-images-1.medium.com/max/1600/1*pjliI7pyj79stt0D-tGiFg.png

The first thing we ensure is that the create genesis/first block method is working as intended. This is achieved through a simple (and slightly self-referential test) that the function returns the same value as the first element in the blockchain.

From there it’s a simple case of testing that the add block and return last block methods do actually return the correct blocks:
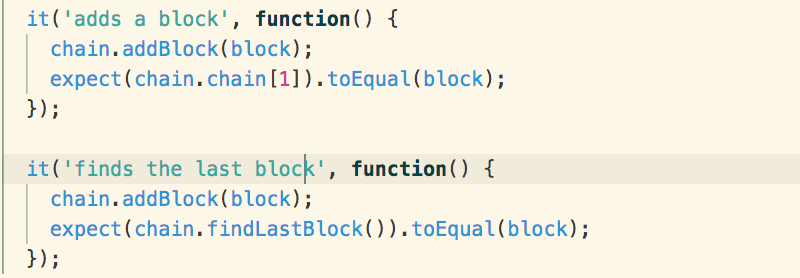
https://cdn-images-1.medium.com/max/1600/1*yh8PqMB6CNkb19KRutafrw.png

In the algorithm most of the functionality is delegated to the block objects. The role of the chain is very simple; the chain simply creates a genesis block as a reference point, adds new blocks and has the capacity to return the last block.

Ensuring the blockchain is valid is delegated to a validity checker object.

Validity Testing

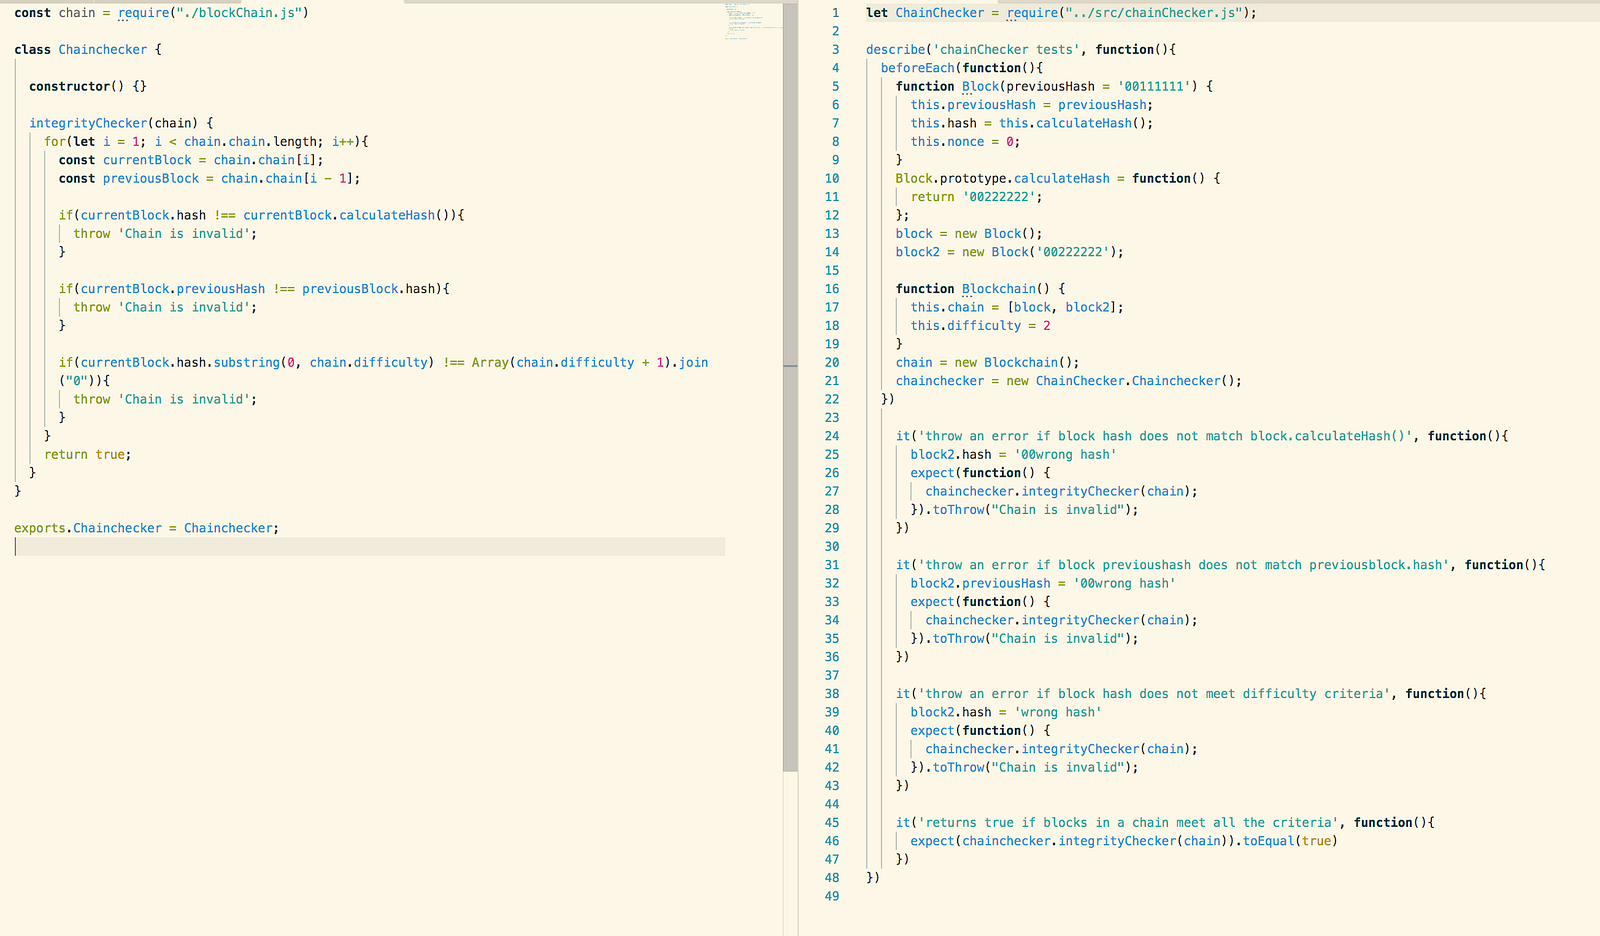
The final object that makes up the core of the blockchain is the validity checker object. The validity checker receives the array of block items as an argument and loops through all the blocks in the array. The loop begins at index 1, and also selects the block in the preceding index. If the previous hash variable in the “current block” does not match the current hash of the previous block then the security of the blockchain has been compromised.

This was tested by creating a double blockchain that was composed of double block objects. We then went through and changed elements inside the objects to test the following scenarios:

  • The current block has been compromised
  • The previous block has been compromised
  • The blockchain is valid

https://cdn-images-1.medium.com/max/1600/1*OLxdPOLBT-AZREfSVzg2nQ.png

Having the three components of the blockchain separated out into different objects made it easier to test that each object was demonstrating the correct behaviours that we expected. It also allowed us to develop more functionality for the blockchain with confidence as we knew that the core product was fully tested and devoid of bugs.

This confidence enabled our team to extend out the blockchain algorithm into a full-stack web application. We decided to use pharmaceutical prescriptions to illustrate how the blockchain could be deployed to the web, and how it could be used to solve real-world problems.

In the follow-up article, I’ll discuss how we incorporated the blockchain into a full-stack web application. The web application is very interesting as we created two different user types, and set different authorisation levels to represent how the blockchain could be used by different users.

**If you want to review the code, here it is! **

Tuesday, February 19, 2019

Imperative vs. Declarative JavaScript

In this corner, weighing in at 7 lines of code, we have an imperative JS function, and in this corner, coming in at a lean, mean 2 LoC, declarative! Let's get ready to rumble!

 by Cliff Hall·Feb. 12, 2019
Source: https://dzone.com/articles/imperative-vs-declarative-javascript

I was recently doing a JavaScript code review and came across a chunk of classic imperative code (a big ol' for loop) and thought, here's an opportunity to improve the code by making it more declarative. While I was pleased with the result, I wasn't 100% certain how much (or even if) the code was actually improved. So, I thought I'd take a moment and think through it here.

Imperative and Declarative Styles


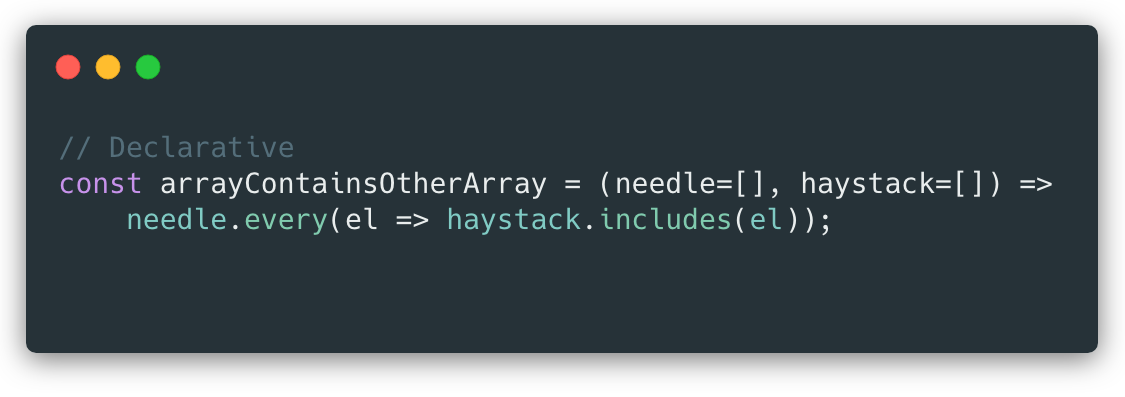
To frame the discussion, imperative code is where you explicitly spell out each step of how you want something done, whereas with declarative code you merely say what it is that you want done. In modern JavaScript, that most often boils down to preferring some of the late-model methods of Array and Object over loops with bodies that do a lot of comparison and state-keeping. Even though those newfangled methods may be doing the comparison and state-keeping themselves, it is hidden from view and you are left, generally speaking, with code that declares what it wants rather being imperative about just how to achieve it.

The Imperative Code


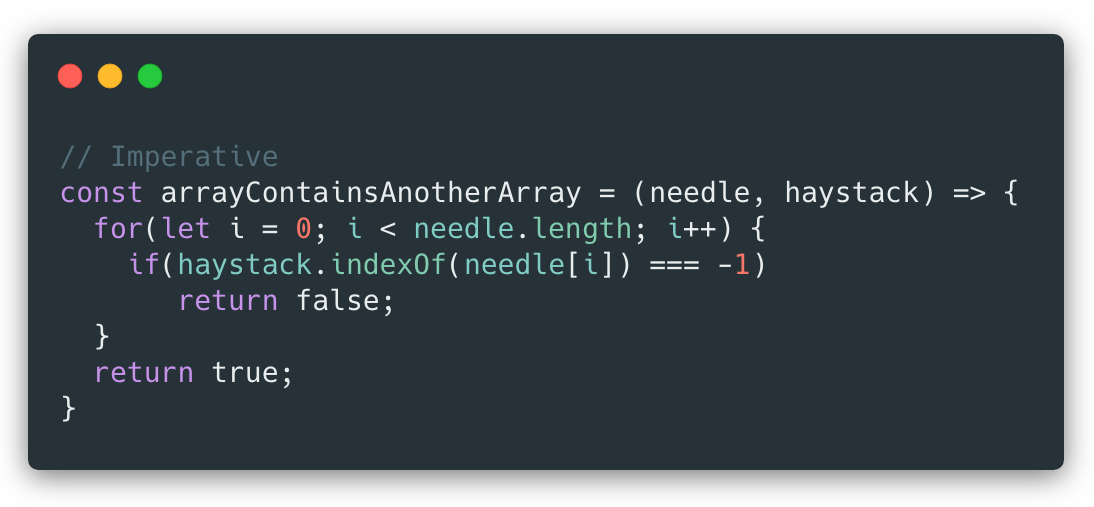
Image title

Let's break down the thought process required to figure out what's going on here.

  1. JavaScript isn't typed, so figuring out the return and argument types is the first challenge.
  2. We can surmise from the name of the function and the two return statements that return literal boolean values that the return type is boolean.
  3. The function name suggests that the two arguments may be arrays, and the use of needle.length and haystack.indexOf confirms that.
  4. The loop iterates the needle array and exits the function returning false whenever the currently indexed value of the needle array is not found in the haystack array.
  5. If the loop completes without exiting the function, then we found no mismatches and true is returned.
  6. Thus, if all the values of the needle array (in any order) are found in the haystack array, we get a true return, otherwise false.

The Declarative Code


Image title

Note: Tip o' the propeller beanie to Michael Luder-Rosefield who offered this solution which is much simpler than the previous version which used reduce. 

That took fewer lines, but you still have to break it down to understand what it's doing. Let's see how that process differs.

  1. JavaScript isn't typed, so figuring out the return and argument types is the first challenge.
  2. We can surmise from the name of the function and the returned result of an array's every  method that the return type is boolean.
  3. The function name suggests that the two arguments may be arrays, as do the default values now added to the arguments for safety.
  4. The  needle.every call names its current value  el, and checks if it is present in the haystack array using  haystack.includes.
  5. The  needle.every call returns true or false, telling us, quite literally, whether every element in the needle array is included in the haystack array.

Comparisons


Now, let's weigh the relative merits of each implementation.

Imperative


Pros


  1. The syntax of the venerable for loop is known by all.
  2. The function will return immediately if a mismatch is found.
  3. The for loop is probably faster (although it doesn't matter much at the small array size we're dealing with).

Cons

  1. The code is longer: 7 lines, 173 characters.
  2. Having two exits from a function is generally not great, but to achieve a single exit, it would need to be slightly longer still.
  3. While the loop does iterate the entire length of the needle array, it has to be explicit about it, and we need to visually verify the initializer, condition, and increment inspection. Bugs can creep in there.
  4. Comparing the result of the haystack.indexOf call to -1 feels clunky because the method name gives you no hint about what it will return if the item isn't found (-1 as opposed to null or undefined).

Declarative

Pros

  1. The code is shorter: 2 lines, 102 characters.
  2. The function will return immediately if a mismatch is found.
  3. The result of a single expression is returned, so right away it's obvious what the function is attempting to do.
  4. The use of needle.every feels satisfying, because the method name implies that we'll get a true or false result, AND we don't have to explicitly manage an iteration mechanism.
  5. The use of haystack.includes feels satisfying, because the method name implies that we'll get a true or false result, AND we don't have to compare it to anything.

Cons

  1. The every call is probably slower (although it doesn't matter much at the small array size we're dealing with).

Conclusion

Both of these implementations could probably be improved upon. For one thing, and this has nothing to do with imperative vs declarative, the function name and arguments could be given clearer names. The function name seems to indicate that we want to know if one of the arrays is an element of the other. The argument names actually seem to reinforce that. In fact, we just want to know if the contents of the two arrays match, disregarding order. This unintended misdirection creates mental friction that keeps us from readily understanding either implementation upon first sight.

Aside from naming issues, it looks like the declarative approach has more pros than cons, so on a purely numerical basis, I'm going to declare it the winner.

Implementing declarative code is widely expected to enhance readability. How it affects performance is another question, and one that should certainly be considered, particularly if a lot of data is being processed. If there isn't much performance impact, then a more readable codebase is a more manageable codebase.

If you see other pros or cons I missed for either of these contenders, or take issue with my approximation of their merits, please feel free to leave your comments. And again, thanks to Michael Luder-Rosefield for doing just that on the Medium version of this post.

Monday, February 18, 2019

How to Locate Security Issues in Your API

Check out a free online API contract security assessment tool that can help developers lock down their API definitions.

by Dmitry Sotnikov·Feb. 13, 2019

Source: https://dzone.com/articles/how-to-locate-security-issues-in-your-api
According to Gartner, by 2022, API abuse will be the most frequented attack vector in enterprises. Today, a popular API security community site launched a free online API contract security assessment tool that can help developers lock down their API definitions.

Let's have a quick look at how it works.

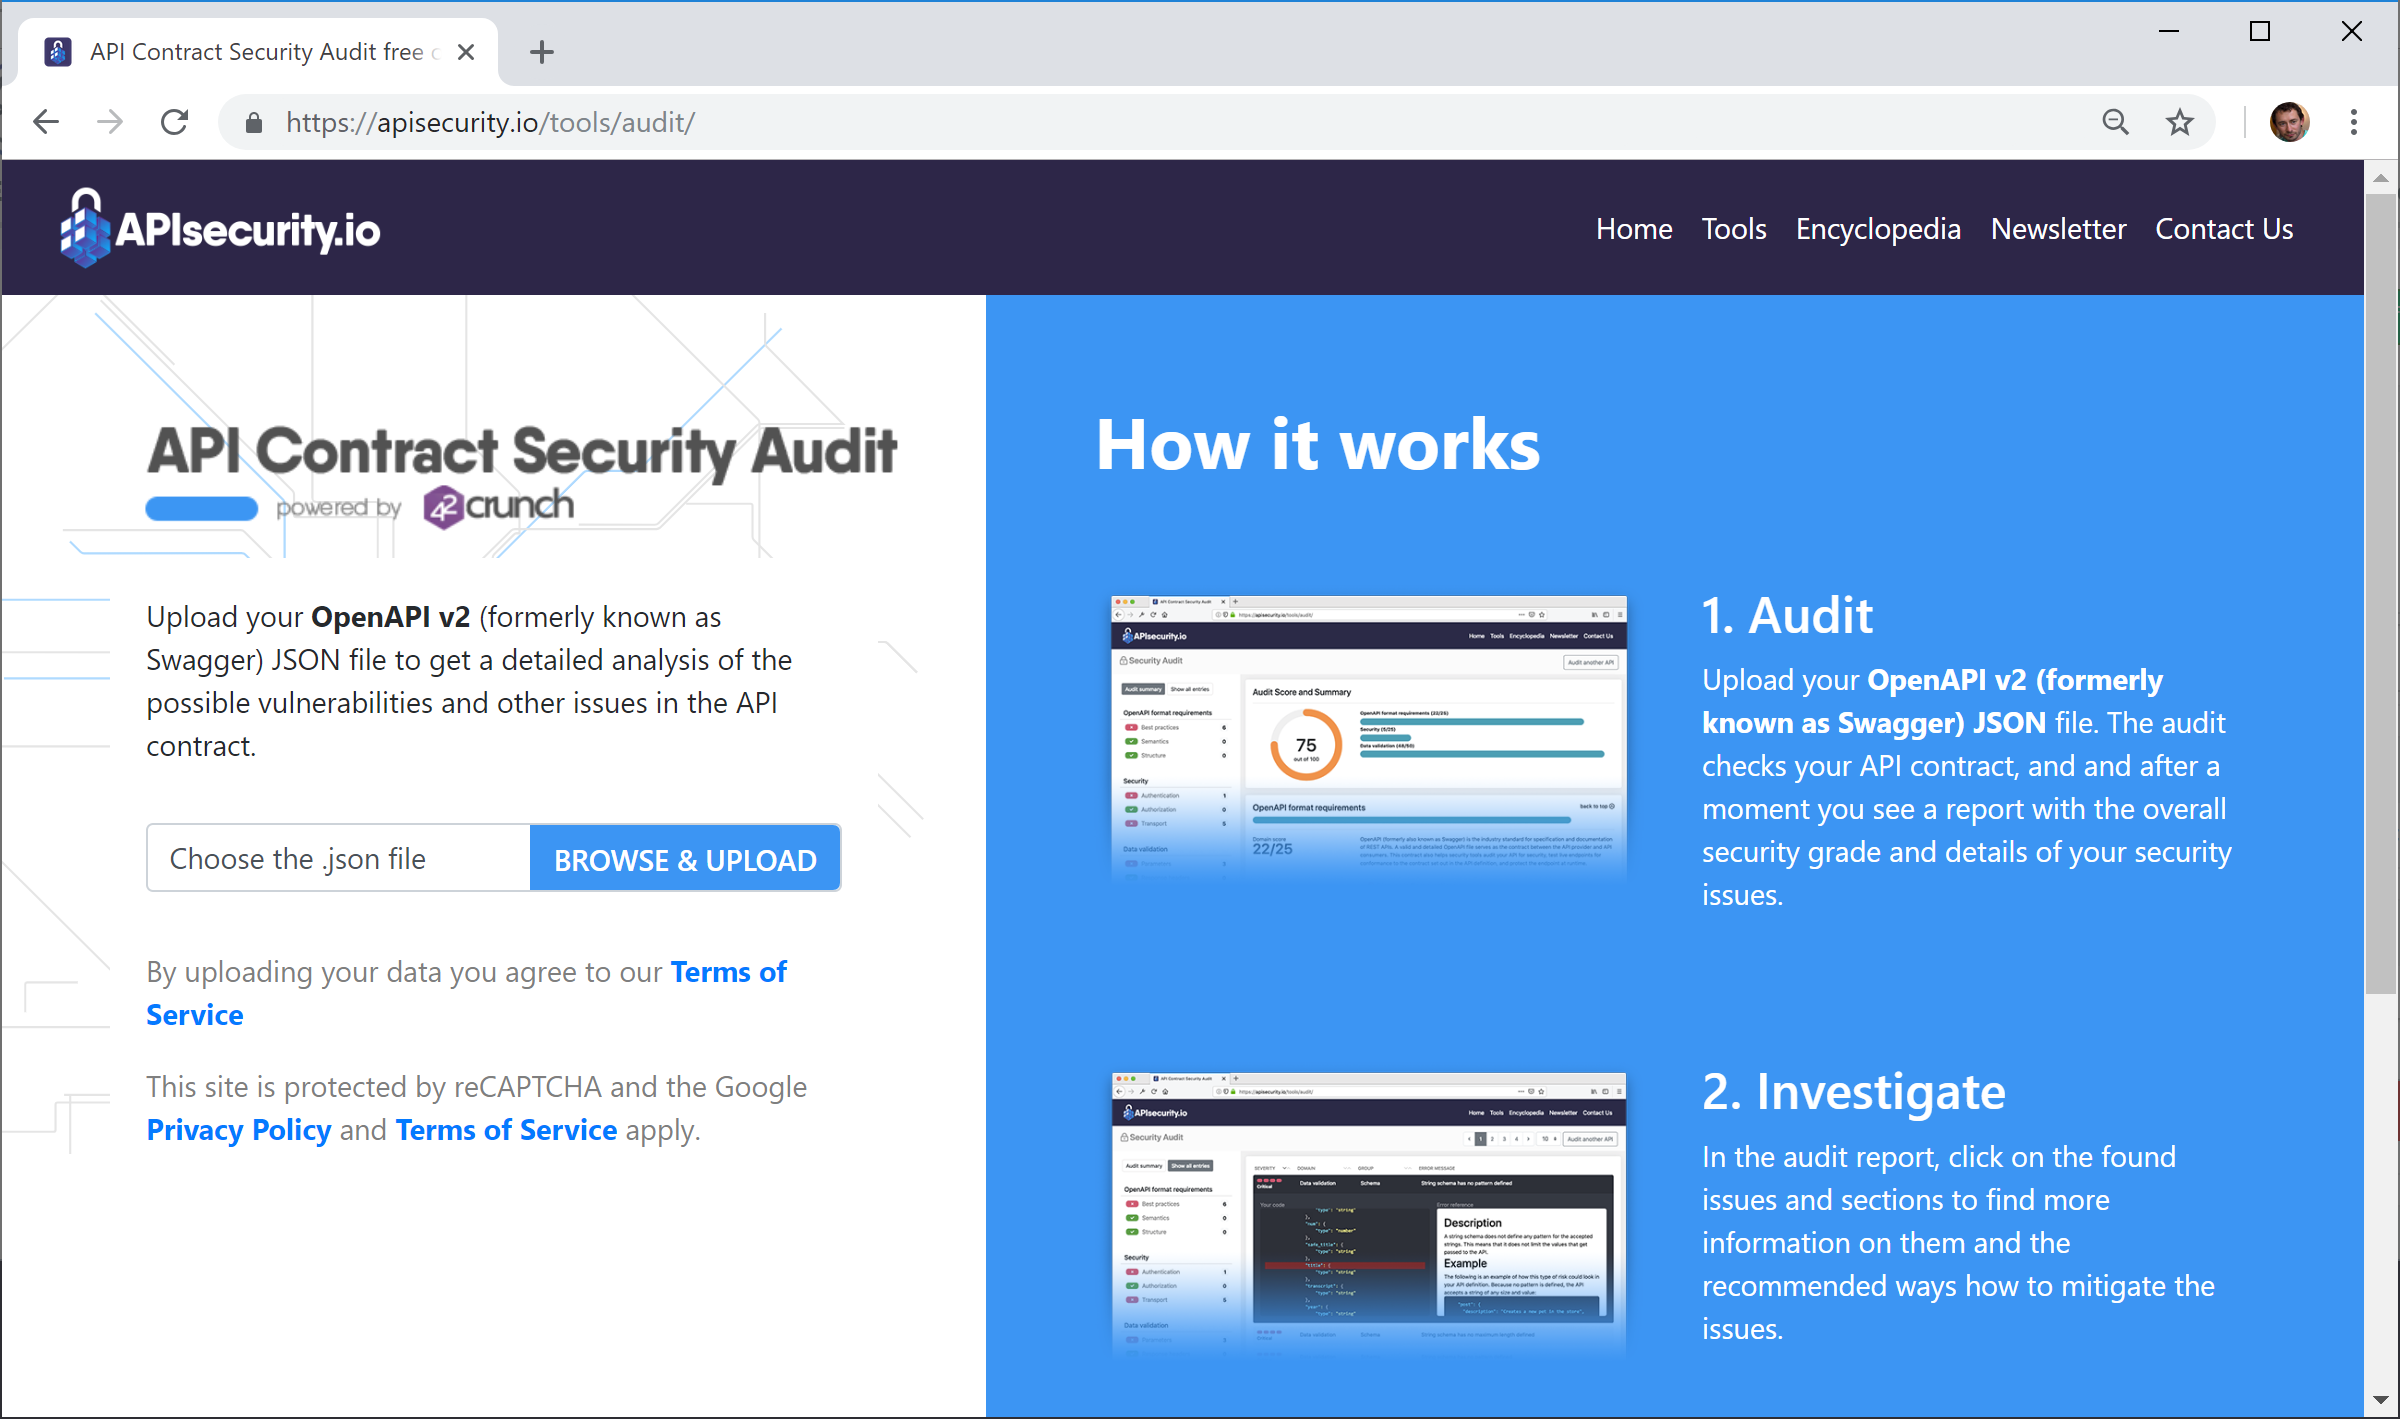
1. On the API Contract Security Assessment page, click the Browse & Upload button and browse to an OpenAPI (aka Swagger) file. For example, I used petstore-expanded.json from OpenAPI GitHub examples.

Image title

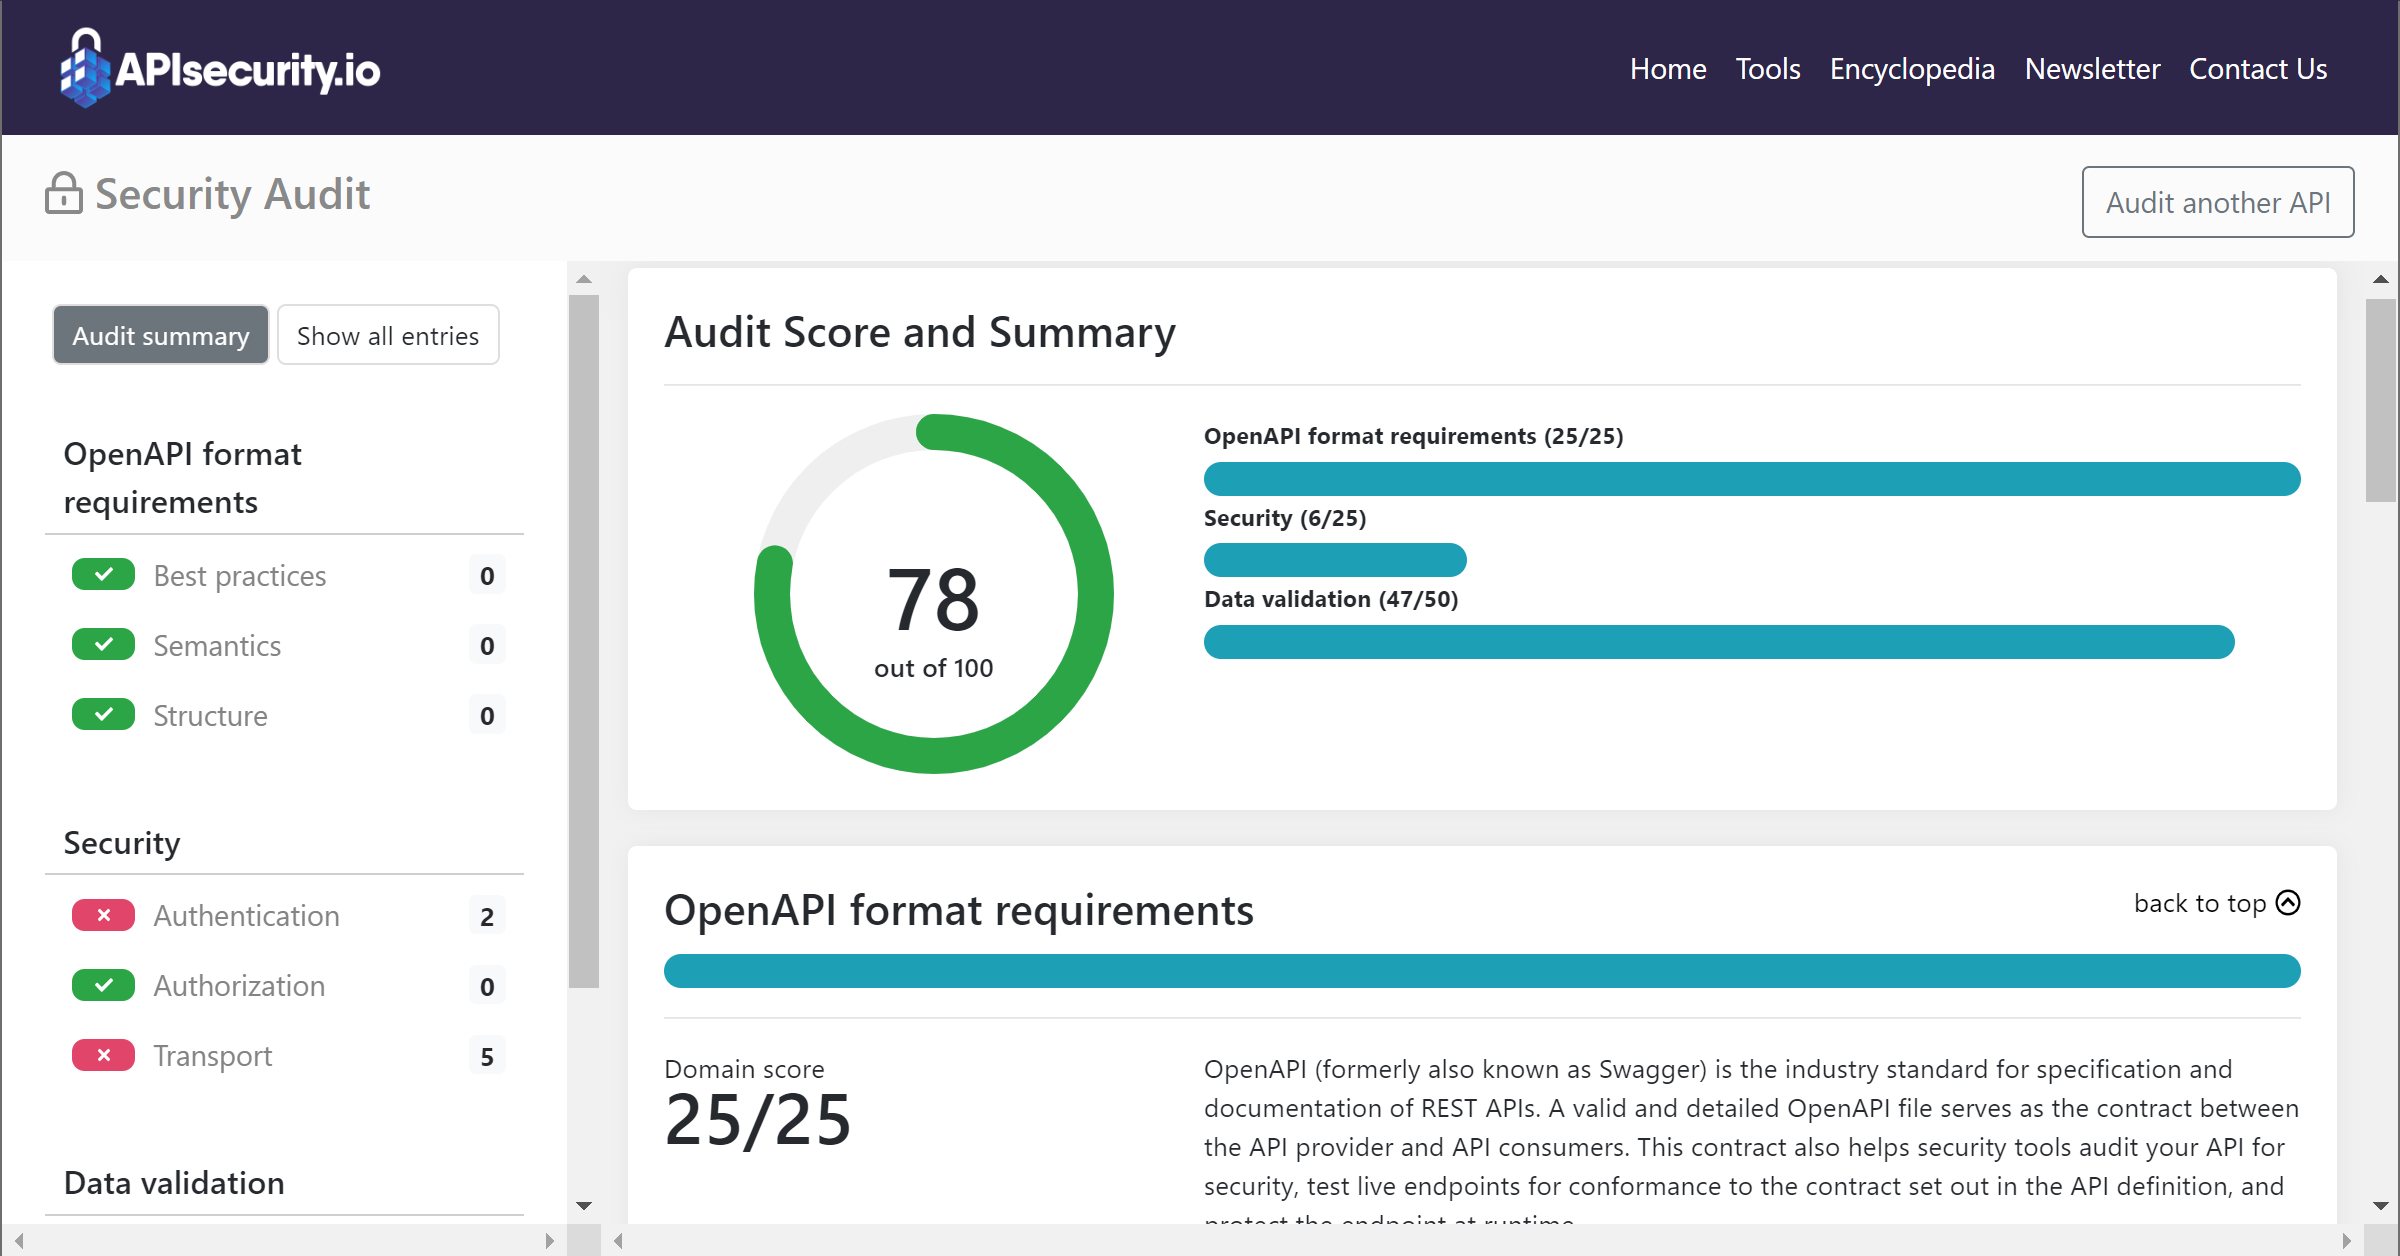
2. Once the file is processed, the tool displays the report including the overall score and information about the areas covered:

Image title

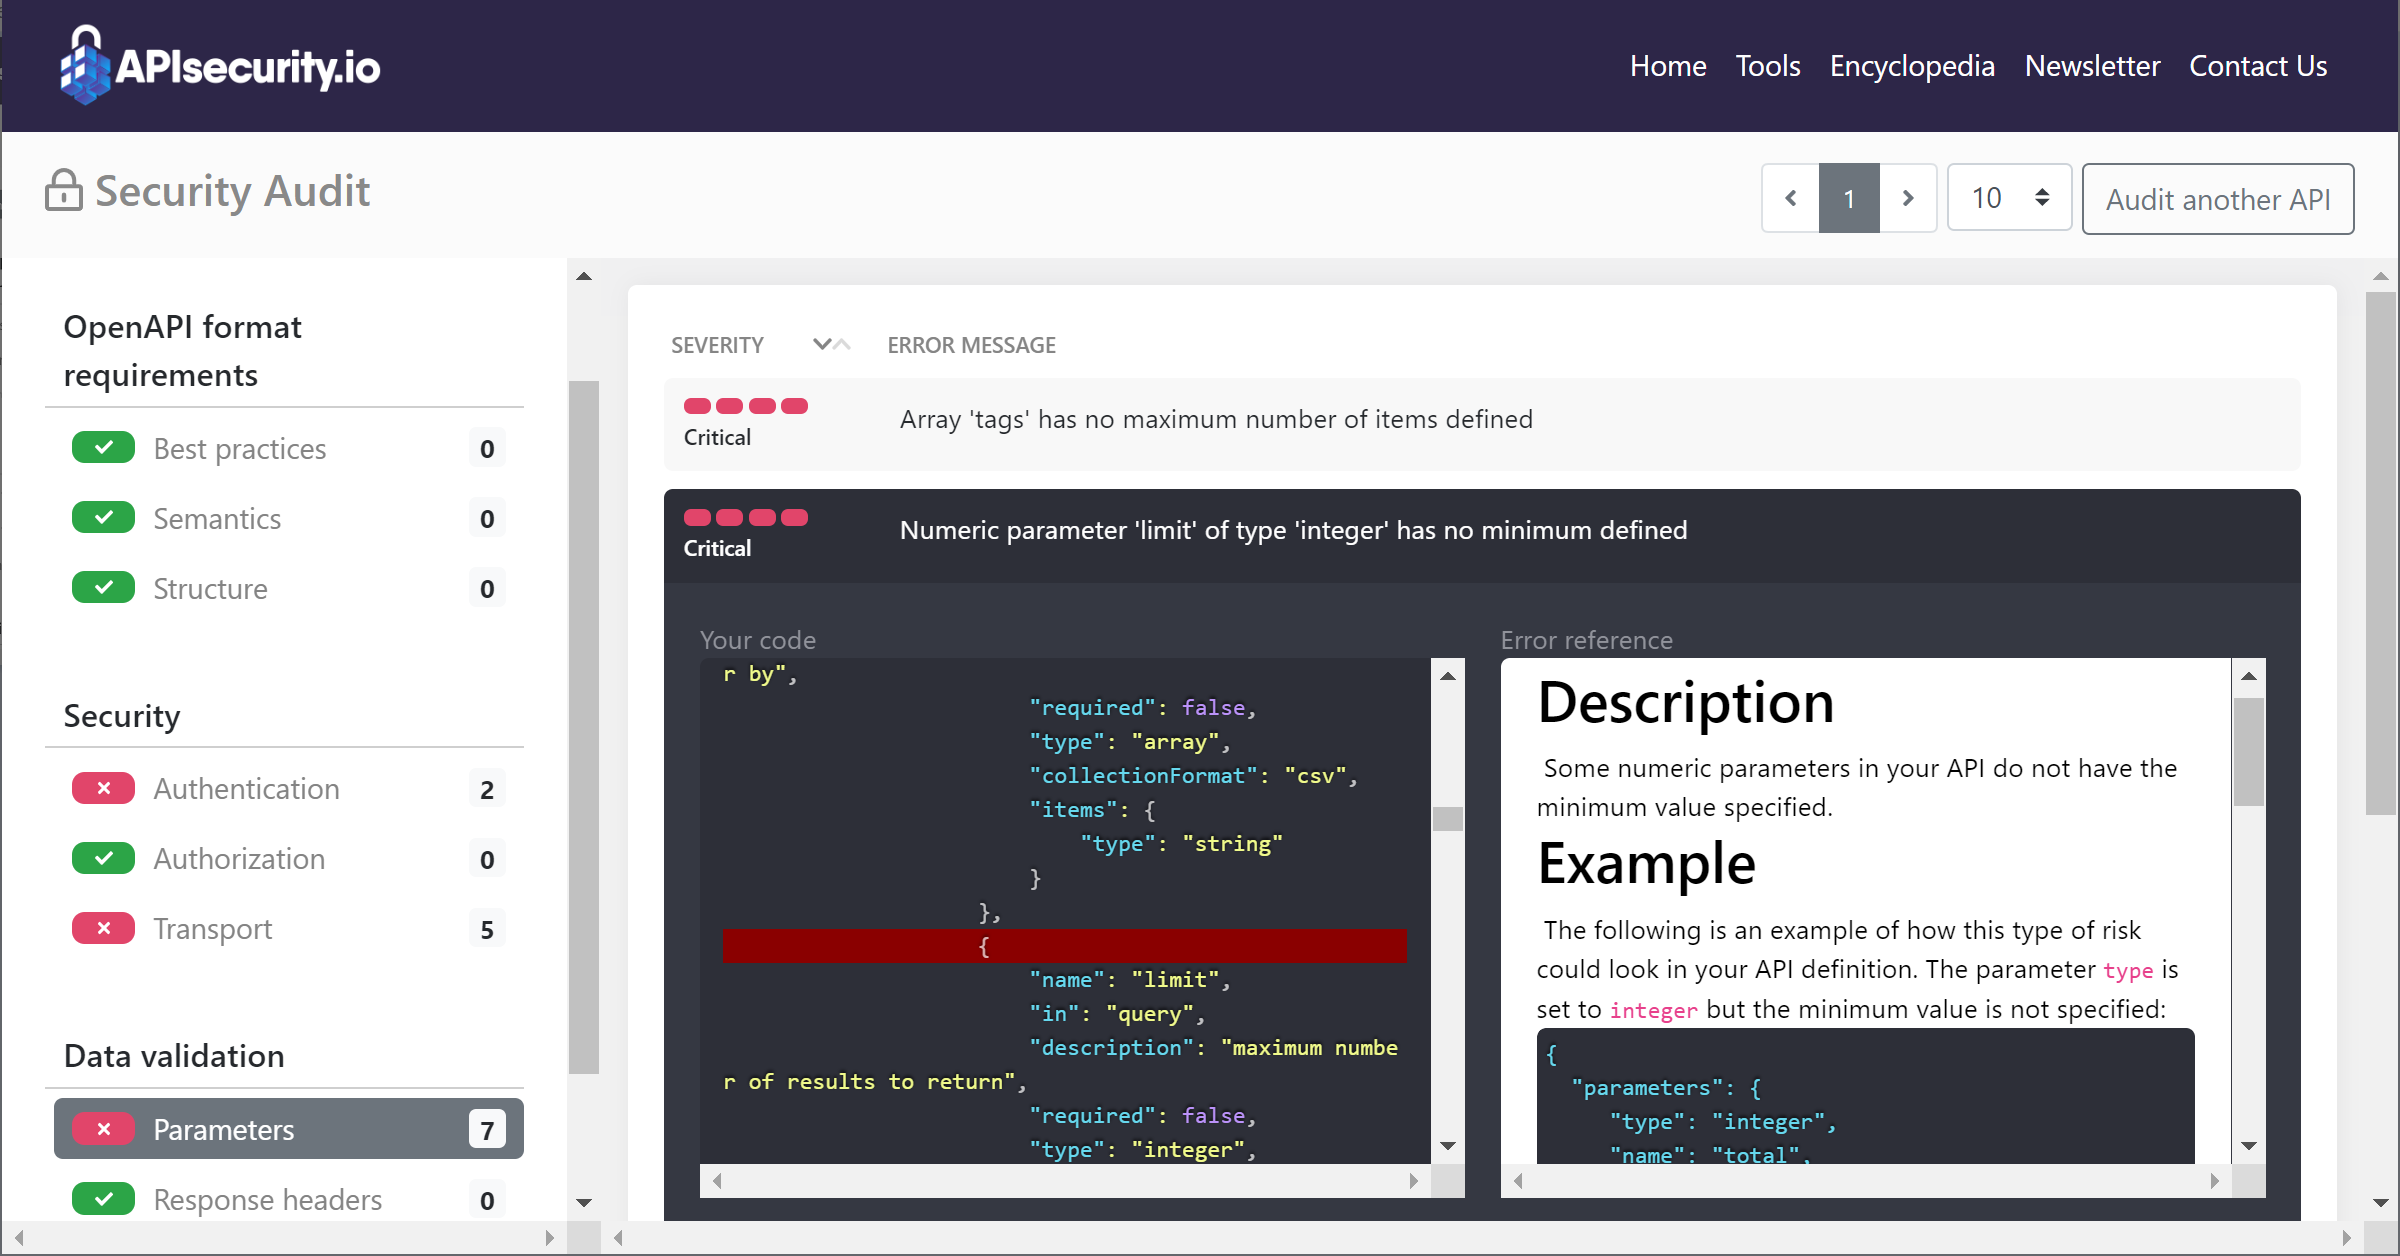
3. I can click the sections on the left-hand side to see the list of vulnerabilities that the tool located. Clicking an individual vulnerability gives an expanded view with information about the possible exploit scenario and recommendation on the way to fix it.

Image title

4. Once you are done editing your OpenAPI contract file, you can re-evaluate it by clicking the Audit another API button at the top right.

5. If you find any issues that you think have not been properly detected or reported, you can click the Contact Us menu item at the very top right and give your feedback.

Give it a try and let us know what you think!

Thursday, February 14, 2019

Developing REST APIs

This article introduces a set of tools essential to building REST APIs.

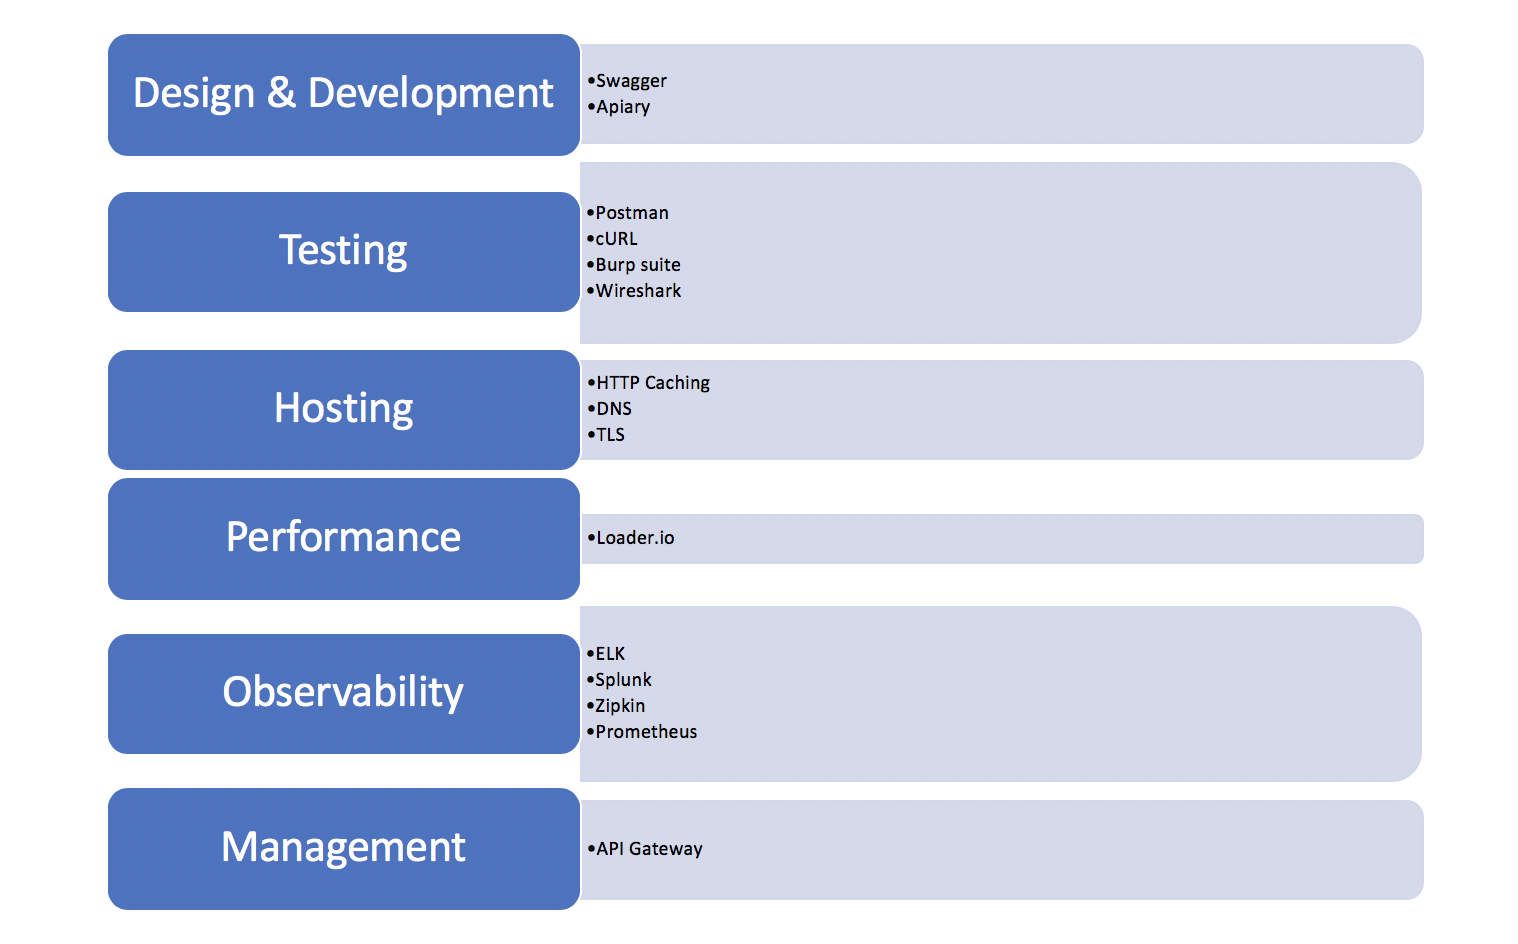
This article introduces a set of tools essential to building REST APIs. The tools are platform independent, which means they are applicable to REST APIs built with any technology stack. The goal of this article is to familiarise novice API developers with different stages of API development and introduce tools that help with those stages. Detailed coverage of these tools can be found on the web. The different phases of API development are enumerated below.
  1. Design — The main goal here is to define the shape of APIs, document interfaces, and provide stub endpoints.
  2. Testing — Here, we do functional testing of APIs by sending a request and analyzing the response at different levels of visibility, namely, application, HTTP, and network.
  3. Web Hosting — When deployed on the web, there are HTTP tools that help with the hosting of APIs for performance, security, and reliability.
  4. Performance — Before moving on to production, we use tools for performance testing of APIs that tell us how much load APIs may support.
  5. Observability — Once the API is deployed in production, testing in production provides the overall health of live APIs and alert us if any problem occurs.
  6. Management — Lastly, we will take a look at some of the tools for API management activities like traffic shaping, blue-green deployment, canary, etc.
The following figure shows different stages highlighting the tools.
Image title
We will illustrate the usage of tools on APIs exposed by a web application as we elaborate on each phase of API development. Product Catalog is a Spring Boot web application that manages a catalog of products. It exposes REST APIs to perform CRUD operations on a product catalog. The code is available on my GitHub.

Design

In the design phase, the API developer collaborates with clients of the API and the data provider to arrive at the shape of the API. REST API essentially consists of exchanging JSON messages over HTTP. JSON is a dominant format in REST API since it is a compact, easy to understand, and has a flexible format that does not require declaring schema up front. Different clients can use the same API and read the data that they need.
We will illustrate API design using Swagger. It is a tool that uses open format to describe the APIs coupled with Web UI for visualizing and sharing. There is no separation between design and implementation. It is an API documentation tool where the documentation is hosted alongside the API. The benefit of this is that the API and the documentation will also remain in sync. The drawback is that only API developers can change the structure of the API. The documentation is generated from the API. This means we need to build the skeleton of our API first. We have used Spring Boot to develop the API and Springfox package to generate the swagger documentation. Bring in swagger 2 and swagger-ui maven dependencies into your pom.xml.
<dependency>
    <groupId>io.springfox</groupId>
    <artifactId>springfox-swagger2</artifactId>
    <version>2.6.1</version>
</dependency>
<dependency>
    <groupId>io.springfox</groupId>
    <artifactId>springfox-swagger-ui</artifactId>
    <version>2.5.0</version>
</dependency>
Add SwaggerConfig.java to the project with following content.
package com.rks.catalog.configuration;
import org.springframework.context.annotation.Bean;
import org.springframework.context.annotation.Configuration;
import springfox.documentation.builders.PathSelectors;
import springfox.documentation.builders.RequestHandlerSelectors;
import springfox.documentation.spi.DocumentationType;
import springfox.documentation.spring.web.plugins.Docket;
import springfox.documentation.swagger2.annotations.EnableSwagger2;
@Configuration
@EnableSwagger2
public class SwaggerConfig {
    @Bean
    public Docket api() {
        return new Docket(DocumentationType.SWAGGER_2)
        .select()
        .apis(RequestHandlerSelectors.any())
        .paths(PathSelectors.any()).build();
    }
}
This configuration tells Swagger to scan all the controllers and include all the URLs defined in those controllers for API documentation.
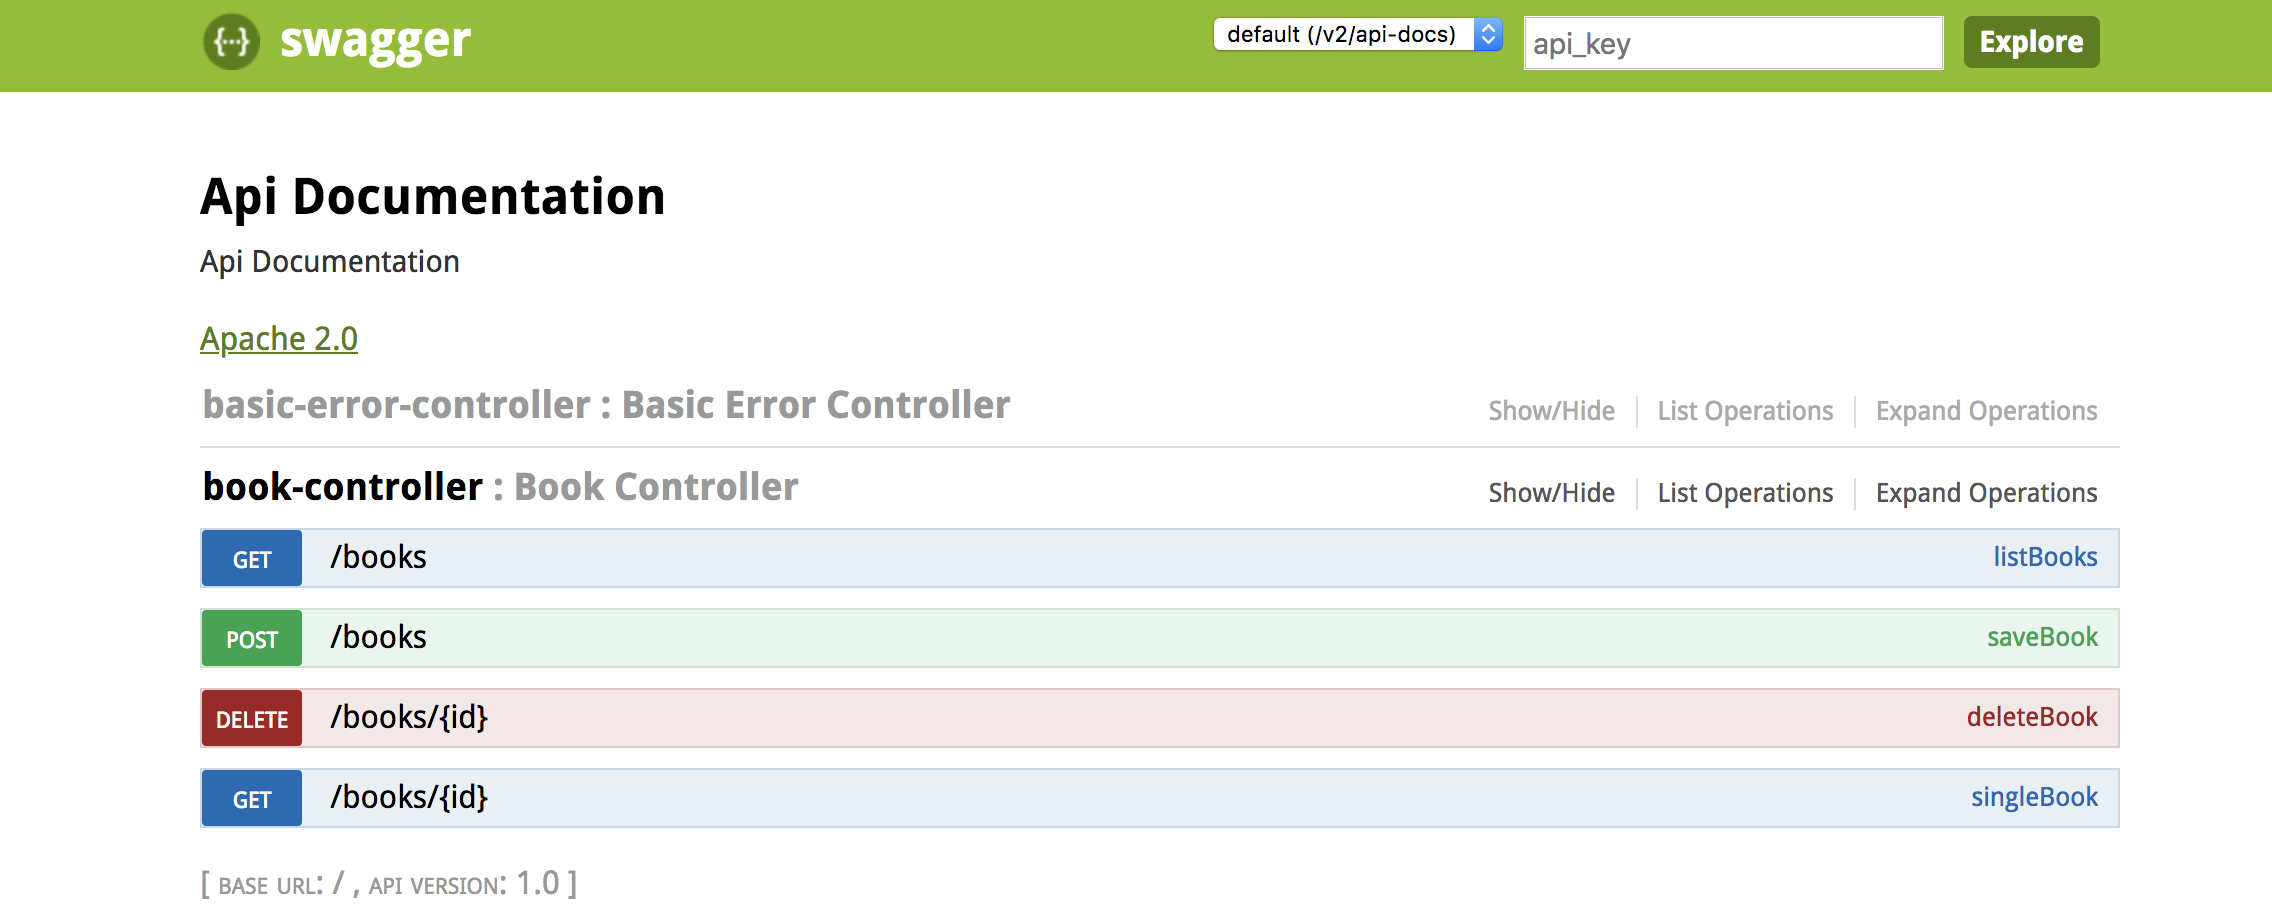
Once the application is started, Swagger documentation of the APIs can be accessed at the URL
http://localhost:8080/swagger-ui.html
Image title
Click on each API to examine the details — the URL, HTTP headers, and the HTTP body where applicable. A useful feature is the "Try it out!" button, which provides a sandbox environment that lets people play with the API to get a feel for it before they start plugging them in their apps.

Testing

Functional testing of REST APIs entails sending HTTP requests and checking responses so that we can verify that APIs behave as we expect. REST uses HTTP for transport that specifies the request and response formats of API. TCP/IP, in turn, takes the HTTP messages and decides how to transport them over the wire. We introduce three sets of tools to test APIs at these three layers of protocol stack, namely, REST Clients for REST layer, Web Debuggers for HTTP layer, and Packet Sniffers for TCP/IP layer.
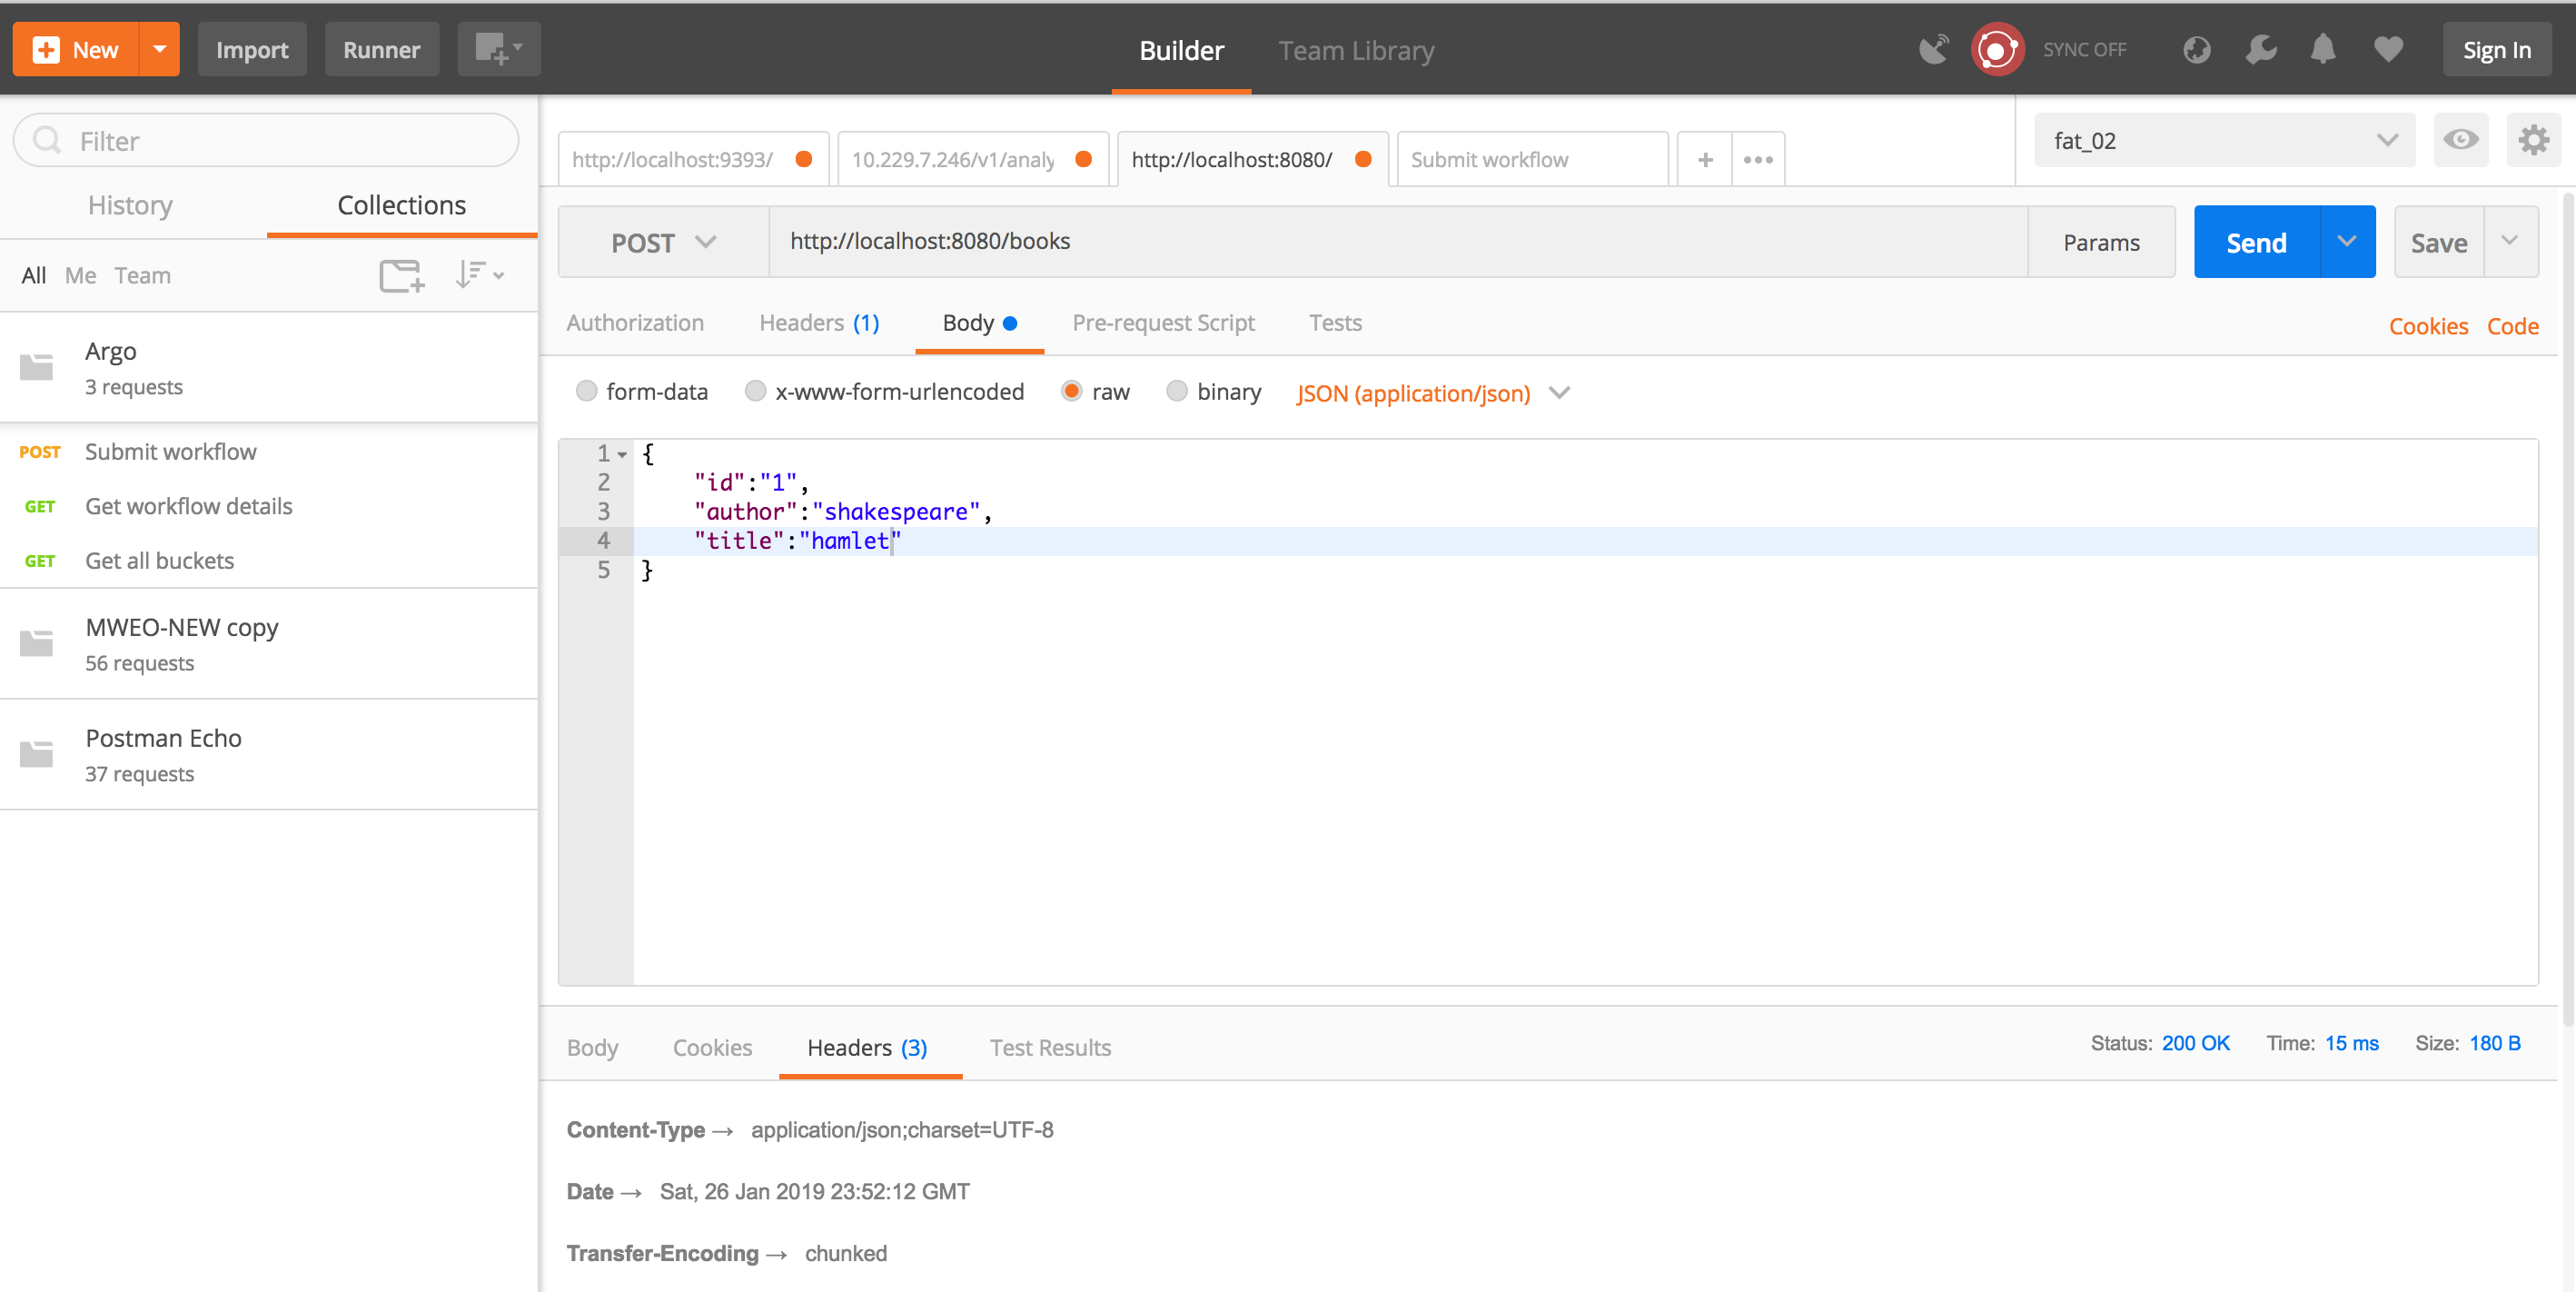
  • Postman — Postman is a REST client that allows us to test REST APIs. It allows us to:
    • Create HTTP requests and generate equivalent cURL commands that can be used in scripts.
    • Create multiple environments for Dev, Test, Pre-Prod as each environment has different configurations.
    • Create a test collection having multiple tests for each product area. The different parts of a test can be parameterized that allows us to switch between environments.
    • Create code snippets in JavaScript to augment our tests, e.g., assert return codes or set an environment variables.
    • Automate running of tests with a command-line tool called Newman.
    • Import/export test collections and environments.
Image title
  • cURL — It is a command-line tool that uses it's own HTTP stack and is available cross platform.
curl -X POST \
  http://localhost:8080/books \
  -H 'Cache-Control: no-cache' \
  -H 'Content-Type: application/json' \
  -d '{
"id":"1",
"author":"shakespeare",
"title":"hamlet"
}'
  • Burp — Burp is a HTTP debugger that let us see the web traffic that goes between the client and the API. It runs as a proxy between the client and the server. This allows us to intercept the request and the reponse and modify them to create scenarios that are otherwise difficult to test without changing the client. It is a suite of tools that is mainly used for security testing but it can be very useful for API testing as well. Set up your postman to send request to Burp proxy and configure Burp to intercept client request and server response. Intercept request and response as shown below.
Image title
Image title
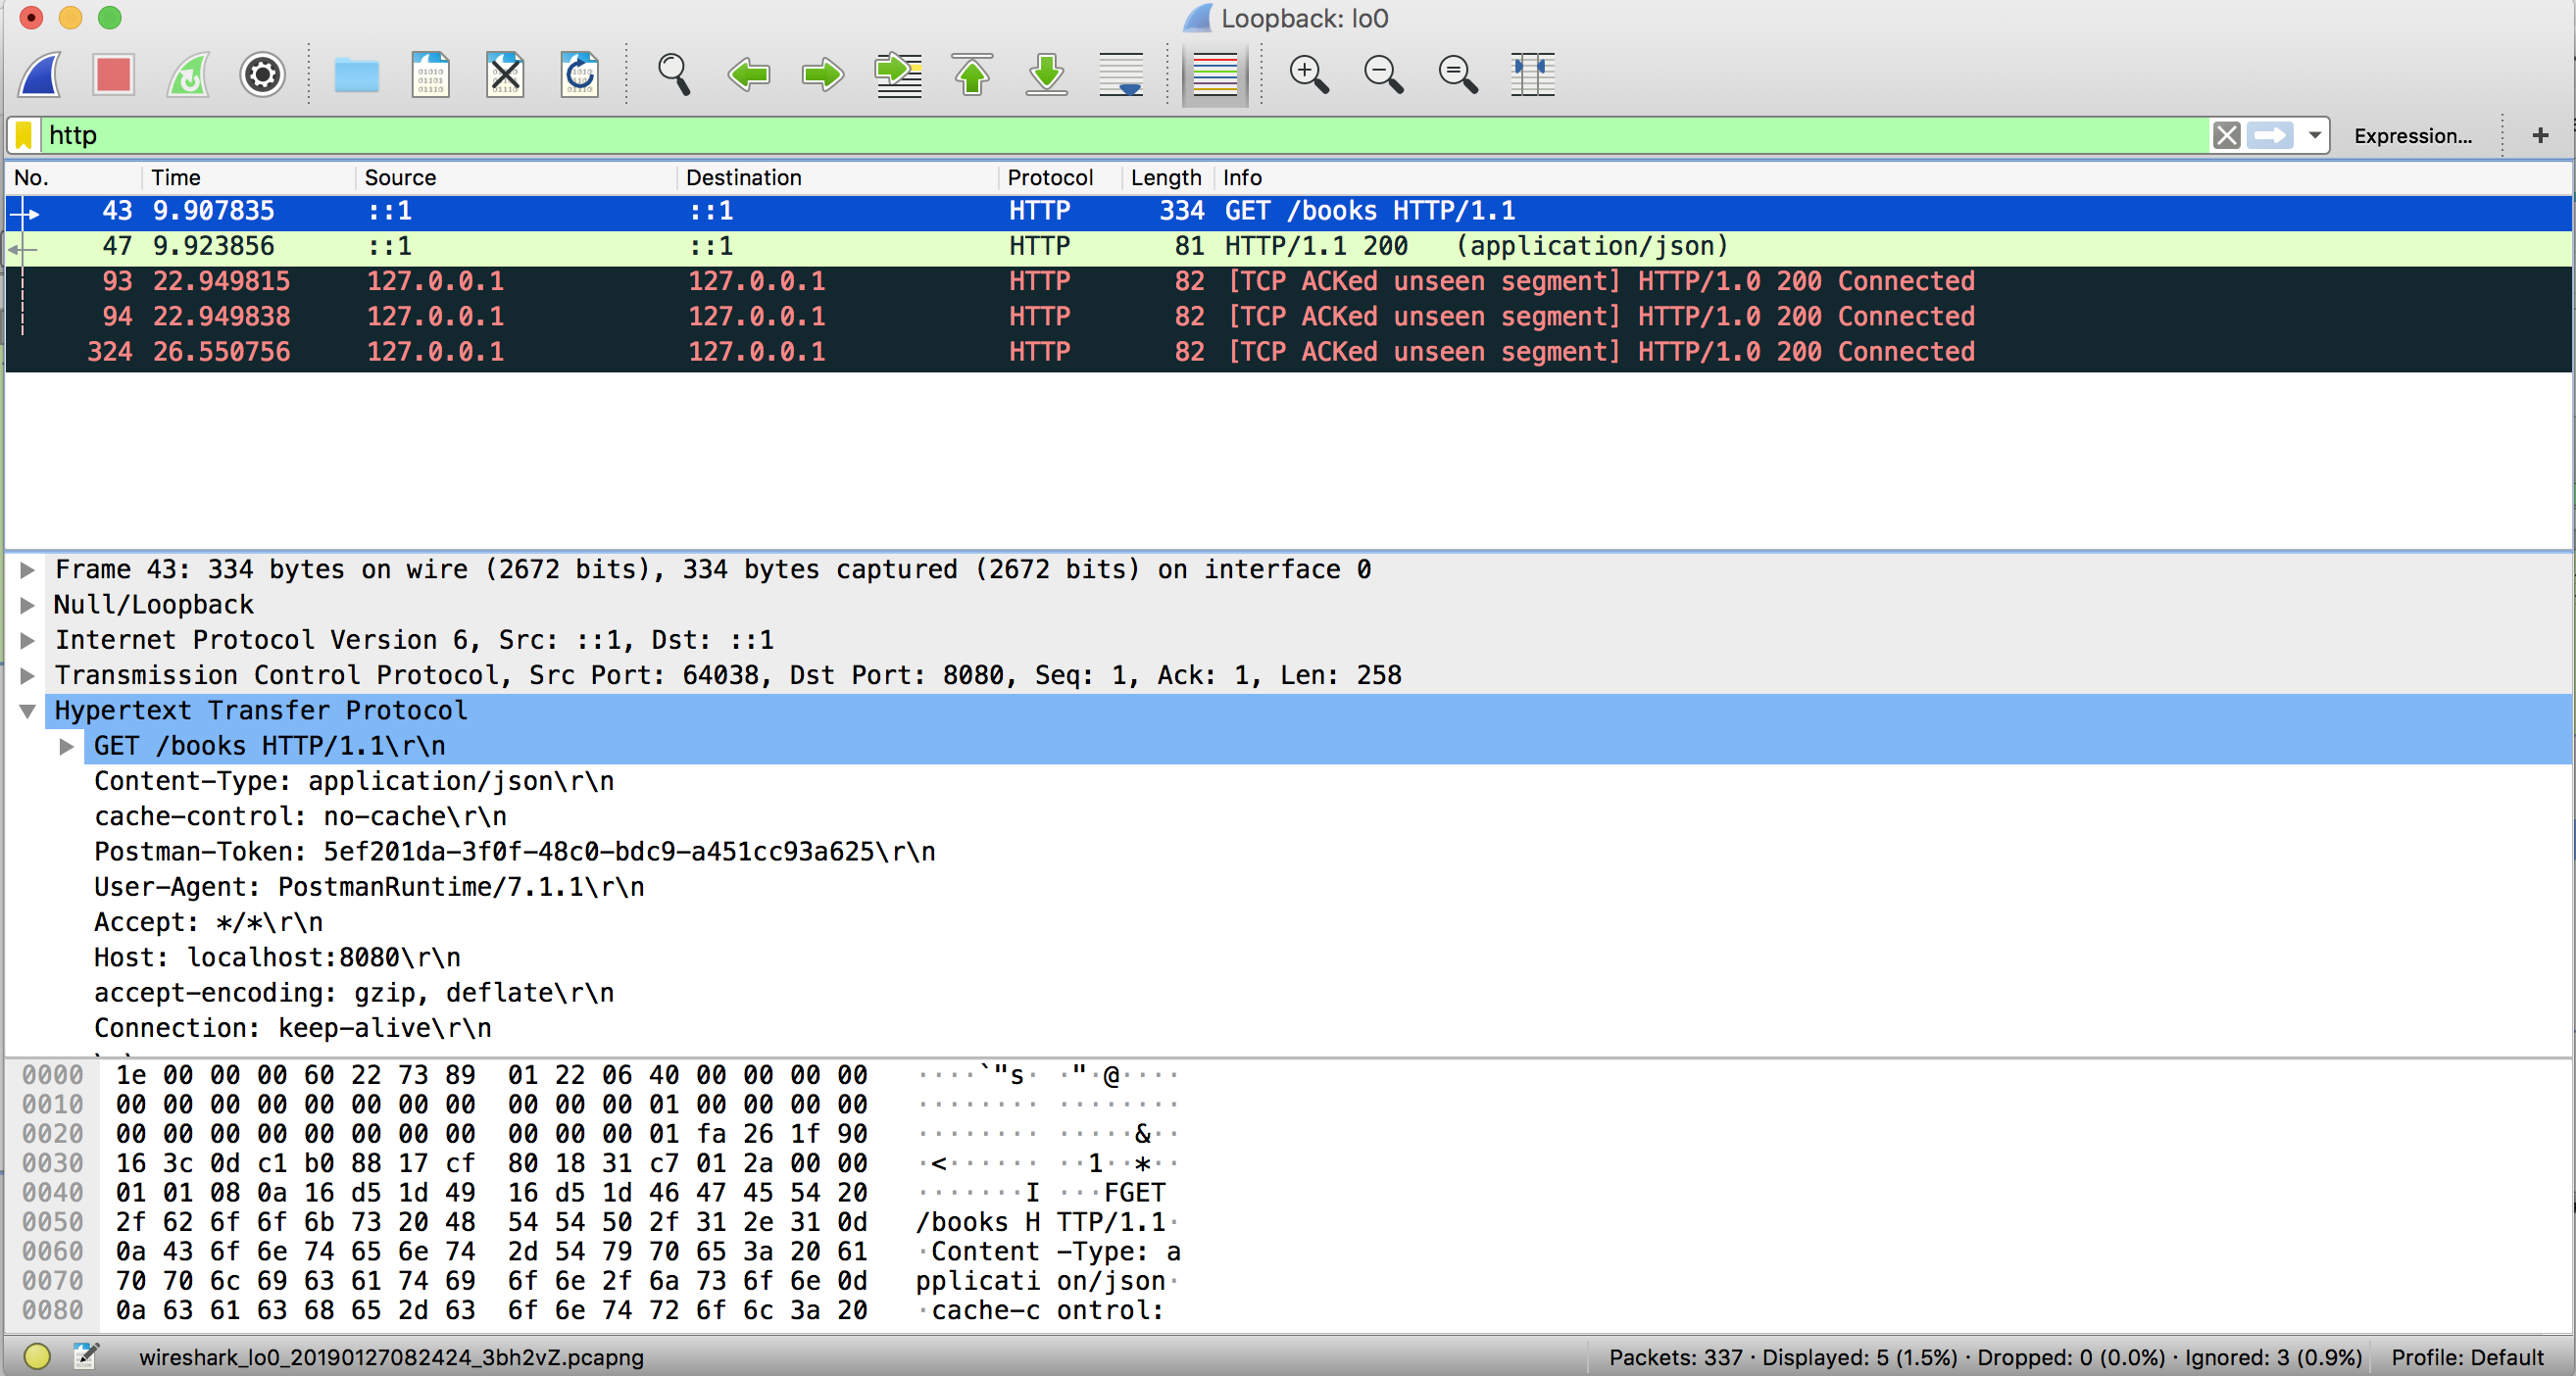
  • Wireshark — Verification of some features of API, e.g., encryption, compression, etc., will require us to look a level deeper to see what is being sent and received on the network. Wireshark is a tool that monitors network interface and keeps a copy of all TCP packets that pass through it. Traffic is split by layers — HTTP, TCP, IP, etc. It also helps us to troubleshoot issues that require us to go deeper, e.g., TLS handshake.
Image title

Web Hosting

In this section, we will look at some of the features of the HTTP protocol that, if properly used, help us deliver performant, highly available, robust, and secure APIs. In particular, we will cover three parts of HTTP protocol — Caching for performance, DNS for high availability and scalability, and TLS for transport security.
  • Caching — Caching is one of the best ways to improve client performance and reduce load on API. HTTP allows clients to save a copy of resource locally by sending a caching header in the response. Next time, the client sends HTTP request for the same resource, it will be served from the local cache. This saves both network traffic and compute load on the API.
    • HTTP 1.0 Expiration Caching. HTTP 1.0 provides Expires header in the HTTP response indicating the time when the resource will expire. This can be useful for shared resource with a fixed expiration time.
    • HTTP 1.1 Expiration Caching. HTTP 1.1 provides a more flexible expiration header cache-control that instructs a client to cache the resource for a period that is set in max-age value. There is another value s-maxage that can be set for the intermediaries, e.g., a caching proxy.
    • HTTP Validation Caching. With caching, there is a problem of a client having an out-dated resource or two clients to have different versions of the same resource. If this is not acceptable or if there are personalized resources that cannot be cached, e.g., auth tokens, HTTP provides validation caching. With validation caching, HTTP provides headers in the response Etag or last-modified timestamp. If API returns either of the two headers, clients cache it and include in subsequent GET calls to the API.
GET http://api.endpoint.com/books
If-none-match: "4v44ffgg1e"
If the resource is not changed, the API will return 304 Not Modified response with no body, and the client can safely use its cached copy.
  • DNS — Domain Name System finds IP addresses for a domain name so that clients can route their request to the correct server. When HTTP request is made, clients first query a DNS server to find the address for the host and then send the request directly to the IP address. DNS is a multi-tiered system that is heavily cached to ensure requests are not slowed down. Clients maintain a DNS cache, then there are intermediate DNS servers leading all the way to a nameserver. DNS provides CNAME (Canonical Names) to access different parts of the server, e.g., both API and the webserver may be hosted on the same server with two different CNAMEs — api.endpoint.com and www.endpoint.com or CNAMEs may point to different servers. CNAMEs also let us segregate parts of our API. For HTTP GET requests, we can have separate CNAME for static and transactional resources that let us set up a fronting proxy for resources that we know are likely to be cache hits. We can also have a CNAME for HTTP POST requests to separate reads and writes so that we can scale them independently. Or we can provide a fast lane for priority customers.
With advanced DNS like Route53, a single CNAME instead of just pointing to a single server may point to multiple servers. A routing policy may then be configured for weighted routing, latency routing or for fault tolerance.
  • TLS — We can secure our APIs with TLS which lets us serve our request over HTTPS. HTTPS works on the basic security principle of key-pair. To enable HTTPS on our API, we need a certificate on our server that contains public and private key-pair. The server sends a public key to the client, which uses it to encrypt data and the server uses its private key to decrypt it. When the client first connects to an HTTPS endpoint, there is a handshake where client and server agree upon how to encrypt the traffic. They exchange another key unique to the session which is used to encrypt and decrypt data for the life of that session. There is a performance hit during the initial handshake due to the asymmetric encryption, but once the connection is established, symmetric encryption is used which is quite fast.
For proxies to cache the TLS traffic, we have to upload the same certificate that is used to encrypt the traffic. Proxy should be able to decrypt the traffic, save it in its cache and encrypt it with the same certificate and send it to the client. Some proxy servers do not allow this. In such situations, one solution is to have two CNAMEs — one for static cacheable resources over HTTP and for non-cacheable personalized resources, requests over secured TLS channel will be served by the API directly.

Performance

In this section, we will look at tools to load test our API so that we can quantify how much traffic our infrastructure can cope with. The basic idea behind performance testing is to send lots of requests to the API at the same time and see at what point performance degrades and ultimately fails. The answers we look for are:
  • What response times can the API give under different load conditions?
  • How many concurrent requests can the API handle without errors?
  • What infrastructure is required to deliver the desired performance?
loader.io is a cloud-based free load testing service that allows us to stress test our APIs. To get a baseline performance of API, different kinds of load tests can be run with increasing loads, measured by the number of requests per second, to find out performance figures quantified by errors and response times, for
  • Soak test — average load for long periods, e.g., run for 48 hours @1 request per second. This will uncover any memory leaks or other similar latent bugs.
  • Load test — peak load, e.g., run 2K requests per second with 6 instances of API.
  • Stress test — way-over peak load, e.g., run10K requests per second for 10 minutes.
This also lets us decide the infrastructure that will let us deliver API with desired performance numbers and whether our solution scales linearly.

Observability

Once API is deployed in production, it does not mean we can forget about the API. Production deployment kicks off another phase of testing — testing in production that may uncover issues that remained uncaught in earlier phases. Testing in production includes a set of activities clubbed together as observability that includes logging, monitoring, and tracing. The tools for these activities will help us to diagnose and resolve issues found in production.
  • Logging — Logging needs to be done explicitly by the developers using their preferred logging framework and a logging standard. For example, one log statement for every 10 lines of code or more if the code is complex with log levels split as - 60 percent DEBUG, 25 percent INFO, 10 percent WARN and 5 percent ERROR.
  • Monitoring — Monitoring runs at a higher level than logging. While logging explicitly tells us what is going on with the API, monitoring provides the overall health of API using generic metrics exposed by the platform and the API itself. Metrics are typically exposed by an agent deployed on the server or it may be part of the solution and are collected periodically by the monitoring solution deployed remotely.
Diagnostic endpoints may be included in the solution that tells us the overall health of the API.
  • Tracing — Zipkin is a distributed tracing system. It helps gather timing data needed to troubleshoot latency problems in microservice architectures.
Enabling Centralized Logging covers logging and tracing. For monitoring, interesting metrics may be stored in a time-series store like Prometheus and visualized using Grafana.

Management

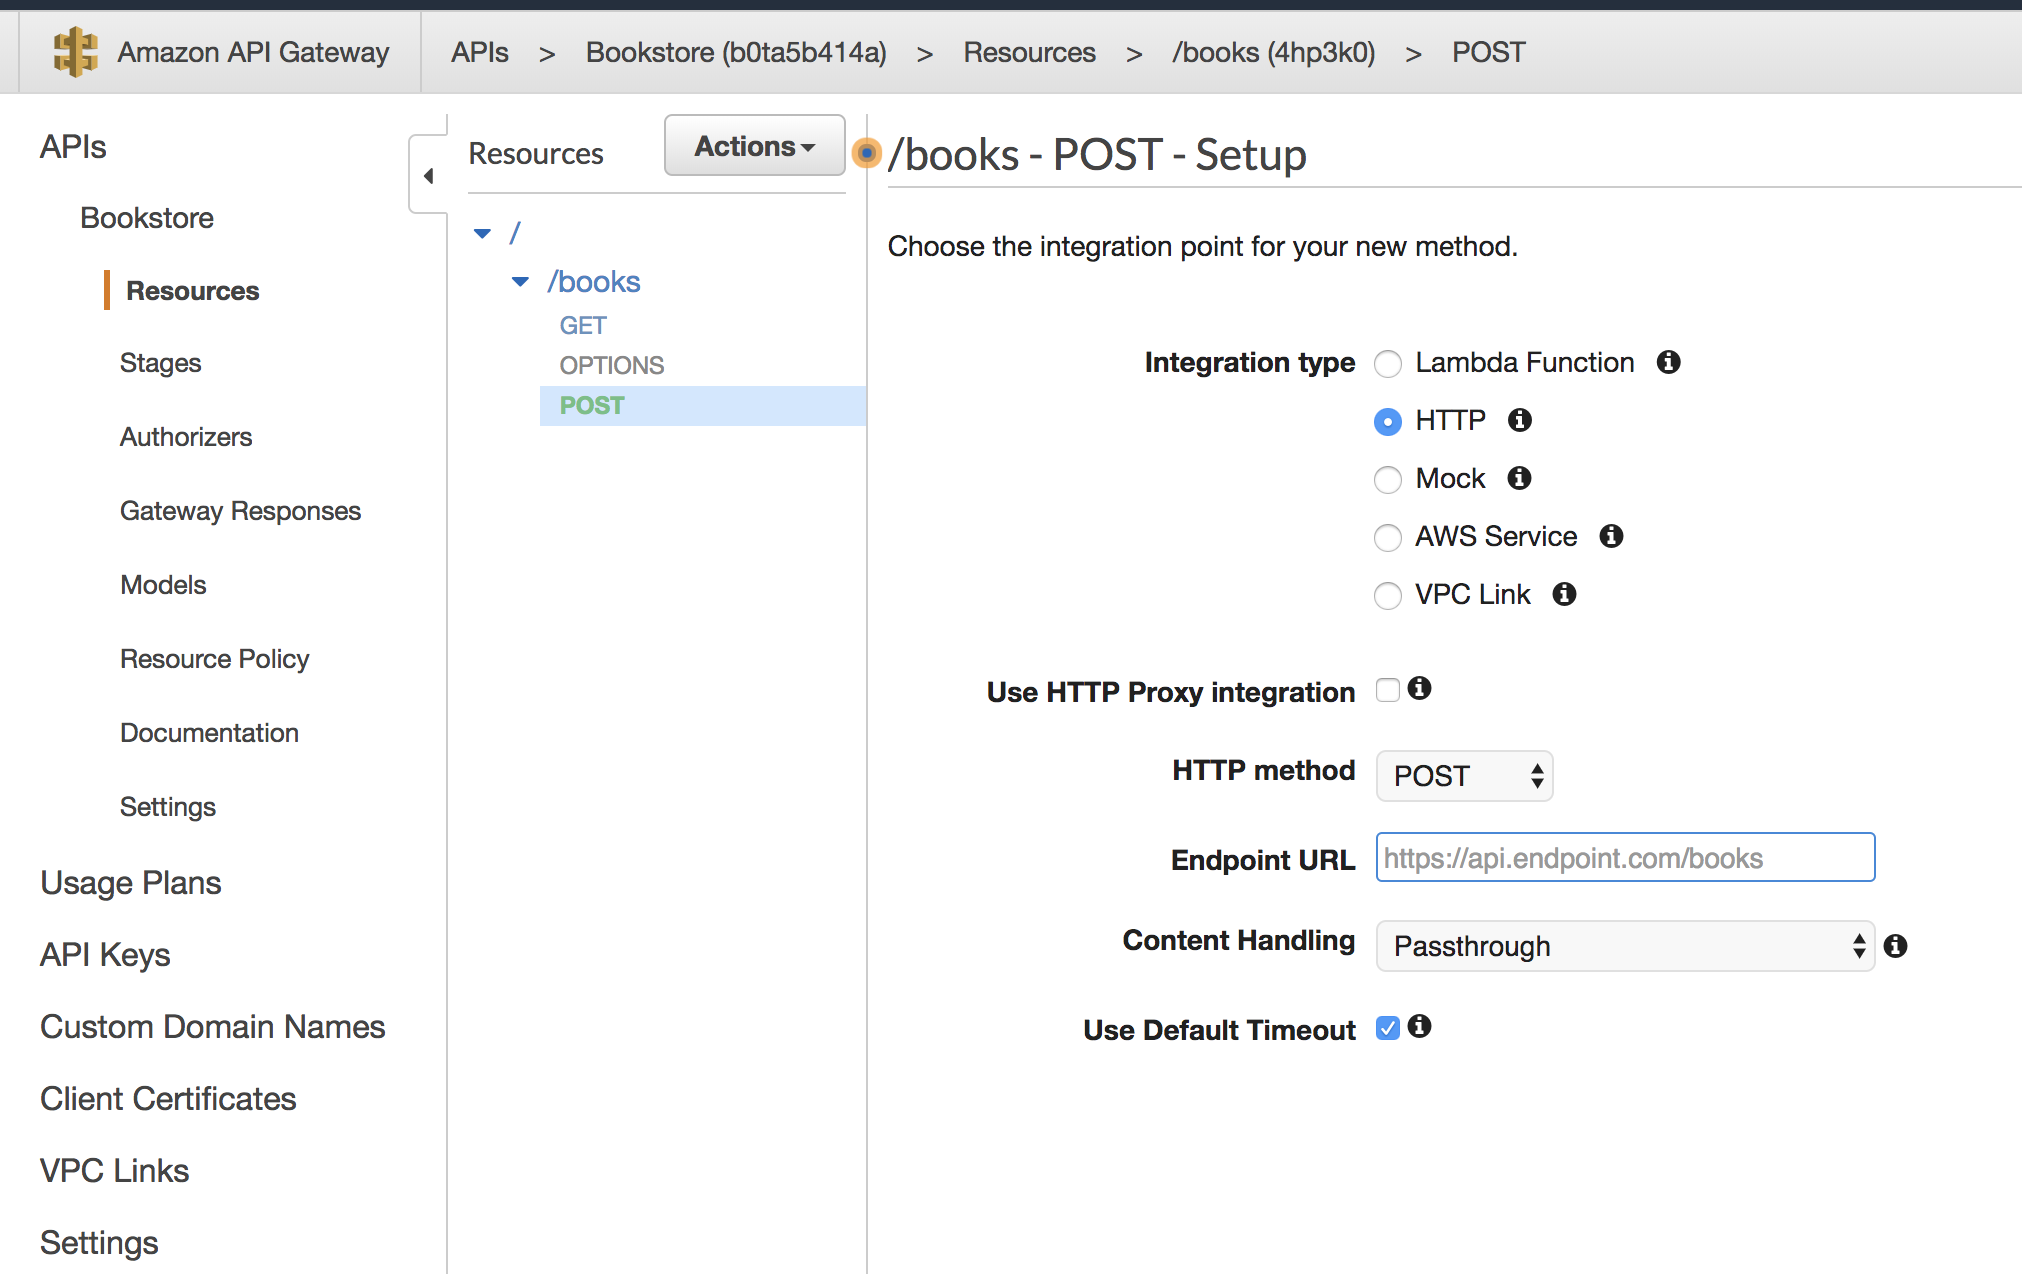
API Management tools serve as a gateway that provides services that let:
  • API Clients provision themselves by getting API key
  • API Providers configure DNS, caching, throttling policies, API versioning, canarying.
These features and more are available on AWS API Gateway.
Image title


Wednesday, February 13, 2019

Design First, Not Mobile First

Why design is more important than technical capabilities and feature set, and how this ties into the way we think about and build microservices.
Source: https://dzone.com/articles/design-first-not-mobile-first


Imagine a chair. Four legs (or 3 ), a place to sit, and some support to lean on. The technology is ubiquitous. Nonetheless, IKEA has hundreds (maybe thousands) of different items that you could call a chair. And beyond that, IKEA has a design language that differentiates it from other furniture makers also making chairs. And all of these chair makers are making chairs — even I could make a chair after a trip to Home Depot, or by just pulling together some things that I have lying around the house.
Yet, IKEA is successful, people love their chairs, and pay hundreds of dollars for them.

Better Wi-Fi

Before Wi-Fi, we had high-speed modems connected to grey cables. Before high-speed modems, we had just regular modems. They were clunky, noisy, and not very user-friendly. Slowly they became faster — 9.6k to 14.4k and beyond. Right around 100m we stopped caring. The speed of the modem was higher than what we needed. A 100m modem allows you to watch Youtube no problem. All of a sudden a new modem promising 120m will no longer have an impact.
There is a dynamic balance — at some point, the maximum bandwidth required to enjoy most Internet-based services became lower than the maximum bandwidth available.
At this point, Wi-Fi started showing up. Wi-Fi really solves a design problem. It did not “innovate” technologically — you are still just connecting to the same internet, watching the same movies. But it liberated you from that grey cable. A contractor was no longer required to run wires through your drywall just to get internet upstairs.
And now Wi-Fi is ubiquitous. Most companies provide a Wi-Fi router that will allow you to stream 4k on Netflix anywhere in the house.
And so Google entered the market by building one that is easier to hook up and connect, and it looks sleek.

Design Matters When Functional Capabilities Stop Being Exceptional

For Steve Jobs to succeed, Bill Gates had to succeed. Only after “a computer was on every desk and in every home” did people start caring about the design of a computer. And only after everyone already had a flip phone did the iPhone have a chance. In the '80s, Steve Jobs was too far ahead of his time — in 2006 he was just right.
For years I was a proud Android user who scoffed at the fools lining up to buy an iPhone. But Samsung and co. didn’t understand the user. The user is not so concerned with the number of cores the CPU has, just with the types of apps they can use; the user doesn’t care about the number of megapixels in the camera, just about the quality of pictures they will take. While Samsung was trying to stuff features into its phone it did not investigate design. It took a long time for Samsung to understand that cell phones are saturated — to differentiate they didn’t just need to design better phones, their phones needed better design. Cellphones are now like chairs. And to succeed companies need to think like IKEA.

Design Is Not the Color of the Button

A lot of times people enter the room with the wrong assumption — that design is about the colors of the buttons and the margins, etc. As Steve Jobs explained ages ago, “Design is how it works.”
Websites, like computers and chairs, have become commoditized. Squarespace, Wix.com, etc. allow none developers to achieve almost all the functionalities that an owner of a website would want. There is no longer a need to hire a webmaster, a web designer, or a web developer to be able to sell shirts online or write a blog.

Design First Development

Mobile first is old, and most conversations still start with business requirements. Most conversations need to start with design requirements.
This means accessibility in its broadest sense — from color contrast to screen readers, to reading on mobile phones from 2008, to loading with low bandwidth, no bandwidth, etc. It means understanding the user, understanding your user, and developing a product that helps them. If the user wanted your information they already know how to get it. They can phone you, find you on Facebook, tweet you, DM you on Instagram, etc. If you want them to get it your way, you need to design it their way.
It is not enough that the information is available, the information must be more accessible and comprehensible than what is available now. To achieve this, the focus has to be on design, not on technical capability. Even one feature that's more design-friendly to the user will create valuable traction and conversion. It will drive adoption. Design will drive adoption, not your feature set.

Design First and Microservices

Often I hear people throw the microservices catchphrase around. Netflix has it, etc., and entire organizations think of it as a technology strategy. Engineers and architects need to understand that microservices do not solve a technological problem. The same way Wi-Fi didn’t solve a technological problem. The ability to be nimble and deliver features quickly is not a technological requirement, it is a design requirement that comes from seeking alignment with users.
As an architecture pattern, microservices allow software companies to embrace Design Thinking and a Design First approach to technology. We deliver a small service that is tied to a particular feature and if the feature needs to change we can write another service without breaking the first one. Some users can use the feature the way it was initially written, and some other users can be given the different version of the feature that better fits their need.
Monolithic architectures want monolithic users. Microservices embrace diversity in users. Microservices, fundamentally, solve a design problem. Starting off your architecture redesign journey without design leadership is like investing in building a great factory without having any product in mind.

Design First Technology

Some may think this is old news. But having worked most of my career with technology teams, I know that there is a weak understanding of the value of design. Design is often sacrificed first to achieve time to market. Most product owners and business executives still believe a larger feature set is preferable to a small feature set with top-notch design.
The larger feature set is only required if you are giving the user something they have never done before — like an underwater cellphone. If the user is already doing all the things they are doing — and I don’t mean digitally, I mean they are somehow doing it — then it is important to lead with design.

Tuesday, February 12, 2019

Benefits and Challenges of Taking the DevOps Route

Source: https://dzone.com/articles/benefits-and-challenges-of-taking-the-devops-route
Learn more about both the advantages and disadvantage of implementing a DevOps workflow in your development process.


As more businesses rush to beat the competition with the help of technology, software development has become more than just a sound investment. It is a major revenue channel and the main strategic benefit of a modern business.

That is why it is crucial to ensure the quality, performance, and security of your product, as well as a fast time to market.

For the last decade, businesses and software development teams around the world have been relying on the agile methodology as a way to improve team efficiency and adaptability.

However, with the increased focus on the business value of software products, traditional methods are no longer enough. There is a need for more effective ways to build and deploy software.

As a result, the DevOps methodology has emerged as an attempt to create a more holistic, end-to-end approach to software development and delivery.

What is DevOps and how does it work? Why do you need it at all? And, most importantly, how do you implement DevOps in your organization?

Read on to find the answers to these questions.

What is DevOps? How It Works and Why You Need It


Being a relatively new phenomenon in software development, it often causes confusion. In fact, there is still no unified DevOps definition.

For example, Atlassian explains DevOps as a “set of practices that automates the processes between software development and IT teams.

According to Sam Guckenheimer at Microsoft, the term means “the union of people, process, and products to enable continuous delivery of value to our end users.

And both definitions are correct.
You can say that DevOps allows you to deliver value to the end users by automating the processes and improving collaboration within the engineering and IT teams.
All in all, DevOps shifts the emphasis on people, removing the barriers between the development and operations and giving them the tools and practices to work together as one multidisciplinary team.

How DevOps Works

DevOps, as a software lifecycle management model, focuses on the end-to-end process by removing the gaps between engineers, IT staff, and stakeholders.
This means DevOps covers all the activities that are required to deliver the software to the end users, i.e. development, deployment, maintenance, and scaling.
As a result, the organizations that adopt the DevOps model become more product-centric, embracing the “you build it, you run it” philosophy.

How Can DevOps Benefit Your Business?

The wide adoption of this methodology and its growth in popularity can be attributed to a variety of reasons.
Namely, here are some of the advantages that DevOps can have for your business:
  1. Reduced chance of product failure. Software delivered by DevOps teams is usually more fit-for-purpose and relevant to the market thanks to the continuous feedback loop.
  2. Improved flexibility and support. Applications built by DevOps teams are typically more scalable and easy to maintain due to the use of microservices and cloud technologies (we’ll get to that later).
  3. Faster time to market. App deployment becomes quick and reliable thanks to the advanced Continuous Integration (CI) and automation tools DevOps teams usually rely on.
  4. Better team efficiency. DevOps means collective responsibility, which leads to better team engagement and productivity.
  5. Clear product vision within the team. Product knowledge is no longer scattered across different roles and departments which means better process transparency and decision making.
The listed benefits of DevOps implementation bring tangible ROI to your business. In the long run, adopting this approach can save your time and resources while helping you grow your revenue through increased business velocity and competitiveness.

DevOps Challenges and How to Overcome Them

Despite all the benefits, DevOps implementation is no easy task.
Namely, there are several key DevOps implementation challenges you should be prepared to face (and some tips on how to cope with them):

1. Transition Challenges (Both Technical and Organizational)

Dealing with legacy systems and re-building your applications to implement microservices architecture or moving them to the cloud is probably what stops most businesses from adopting DevOps.
In addition to adapting your product, you might need to rebuild your team and change the internal processes to fit the DevOps model. This includes changing team roles, hiring new team members, adopting new tools, etc.
Solution: To test the waters and see if this approach is good for your organization, launch a pilot project first. Thus, you will see if your team is ready for the challenge and will be more prepared for creating a full-scale DevOps implementation roadmap.

2. Lack of Talent

DevOps specialists with hands-on experience are hard to find. Most specialists in the field have 1-4 years of experience, according to Payscale. That is why DevOps engineer positions are among the top most difficult jobs to fill.
Moreover, such specialists typically come at a price: the average DevOps Engineer salary in the US ranges from $121,583, based on the data by Indeed, to $143,707, according to Glassdoor.
Solution: Consider hiring a dedicated team offshore or partnering with a trusted technology consultancy to guide you through your transition.

3. Toolset Choice

There are many DevOps tools you can consider when switching to this model, which some can consider a benefit. However, this also makes it even more difficult to choose the ones that perfectly meet your team’s needs.
Moreover, switching the tools down the road can be a real challenge and a major waste of time. You will need to transfer all of your projects as well as give your team the time to get used to them.
Solution: Appoint an experienced CTO or consultant to help you with making the correct choices, as well as assembling and putting to use the required tools.
Taking into account the listed DevOps disadvantages, you shouldn’t blindly follow the trend and rush to implement this approach within your organization. If you only update your product once a year and don’t plan to build any new ones soon, DevOps implementation might not be the best idea.

How to Implement DevOps in Your Organization

Considering the pros and cons, a DevOps strategy does seem like a reasonable investment, in most cases. So, if you are looking to build a DevOps roadmap for your organization, consider the following high-level plan as a starting point.

Assess the Risks and Understand the Potential Benefits

Before you start working on your DevOps plan, think about the real reasons why you want to implement this approach. Do you want to speed up your deployment? Do you feel that the team isn’t working to its full capacity? How often do you face the problems caused by communication gaps between various departments?
Understanding the real motives behind your DevOps initiative will help you choose the optimal path that will lead to a solid implementation strategy and outcome.
In addition to that, knowing your current bottlenecks and challenges will help you set benchmarks and track progress down the road.

Start with People

Your team members, from the developers to managers and executives, are the ones who will be in charge of your DevOps implementation strategy. That’s why it is so important to ensure everyone understands the potential benefits of this transition and is ready to contribute to the required changes.
To start with, appoint a lead to curate the process and assign the roles within your team. Allow your team members to take some time to process the changes and get used to their new roles. Plus, you might need to fill several new positions too, so it is important to start this process early.

Change the Culture

Your DevOps implementation plan won’t be complete without streamlined communication and transparency within your team. Building a culture of mutual responsibility and adopting effective collaboration practices should be one of the initial DevOps implementation steps.
To start with, put effective communication and knowledge sharing tools in place.

Adopt DevOps Best Practices (and Choose the Right Tools)

There are several elements of a successful DevOps implementation plan:
  • Continuous integration and continuous delivery
  • Test automation
  • Agile project management
  • Constant app data monitoring and logging
  • Cloud migration
  • Infrastructure as Code (IaC)
  • Microservices architecture
Most of the listed best practices aim to streamline routine tasks and optimize the team’s performance.
For example, Infrastructure as Code (which is currently one of the hottest DevOps topics) eliminates the manual work when setting up your deployment environments while helping you keep their configuration consistent. This allows you to avoid a number of common deployment issues and speed up the process itself.
Another important aspect that will shape the future of your DevOps strategy is your choice of tools to implement the above-listed best practices.

Start Small and Scale Later

Before going all in with putting your whole organization on the DevOps path all at once, consider testing the approach on a pilot project first, as mentioned previously. This will help you uncover the possible roadblocks and avoid them in the future.

Are You Struggling With Your DevOps Strategy?

Before you start your DevOps implementation plan, it is important to understand that it is an ongoing process. There is always something to improve, better tools to try, and new practices that you can adopt.
Yet, the DevOps approach is without a doubt a sound long-term investment that can help you make your organization more efficient and future-ready. If the DevOps approach is right for you, then the undertaking will certainly be worth the blood, sweat, and tears.
However, having a clear plan is not enough to mitigate the risks associated with the implementation of the DevOps methodology. You need to get someone with the relevant skills and proven expertise, preferably a professional consultancy or an experienced team to guide you through the process.