Source: https://www.cs.washington.edu/education/courses/143/11wi/eclipse-tutorial/junit.shtml
Using JUnit in Eclipse
JUnit is a Java library to help you perform unit testing. Unit testing is the process of examining a small "unit" of software (usually a single class) to verify that it meets its expectations or specification.
A unit test targets some other "class under test;" for example, the class
ArrayIntListTest might be targeting the ArrayIntList as its class under test. A unit test generally consists of various testing methods that each interact with the class under test in some specific way to make sure it works as expected.
JUnit isn't part of the standard Java class libraries, but it does come included with Eclipse. Or if you aren't using Eclipse, JUnit can be downloaded for free from the JUnit web site athttp://junit.org. JUnit is distributed as a "JAR" which is a compressed archive containing Java .class files. Here is a direct link to download the latest JUnit v4.8.2 JAR file.
Creating a JUnit Test Case in Eclipse
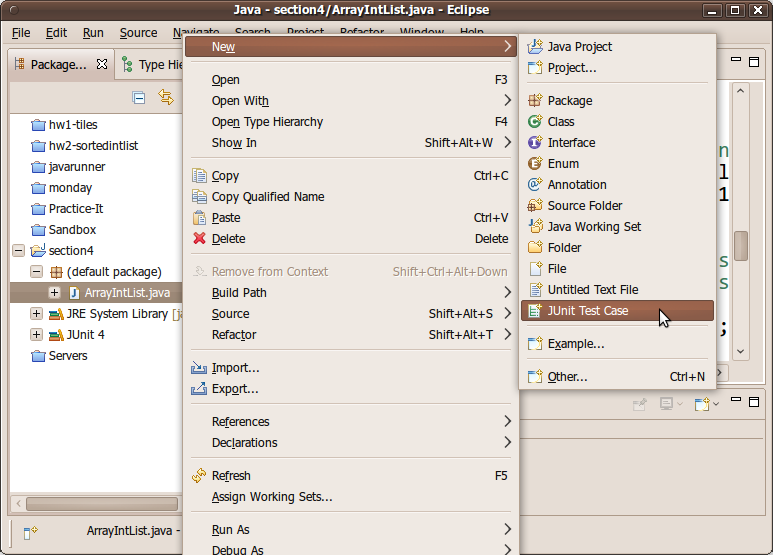
To use JUnit you must create a separate .java file in your project that will test one of your existing classes. In the Package Explorer area on the left side of the Eclipse window, right-click the class you want to test and click New → JUnit Test Case.
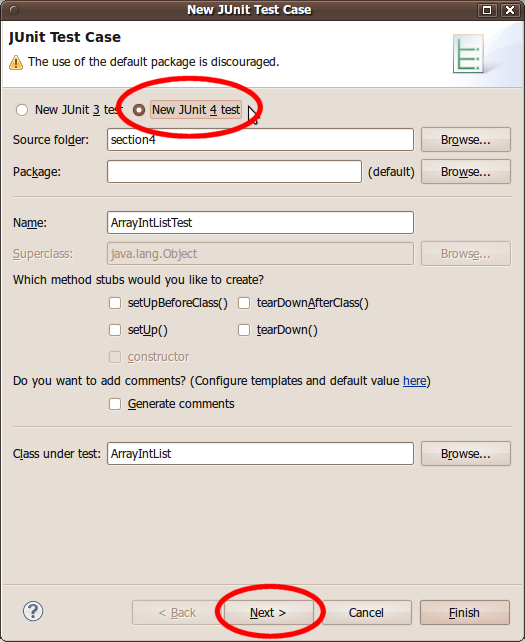
A dialog box will pop up to help you create your test case. Make sure that the option at the top is set to use JUnit 4, not JUnit 3. Click Next.
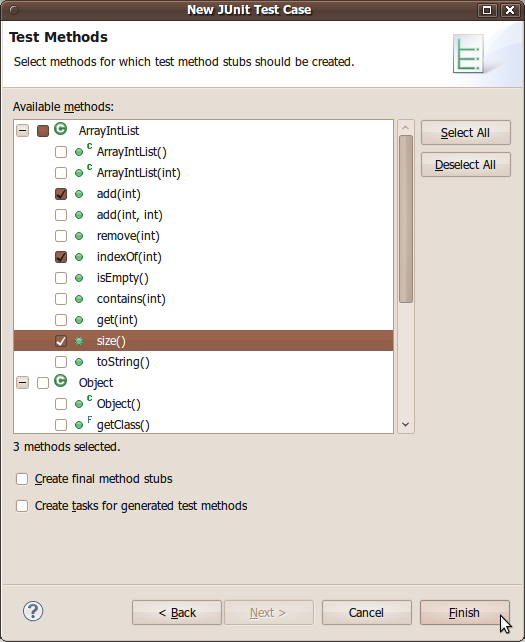
You will see a set of checkboxes to indicate which methods you want to test. Eclipse will help you by creating "stub" test methods that you can fill in. (You can always add more later manually.) Choose the methods to test and click Finish.
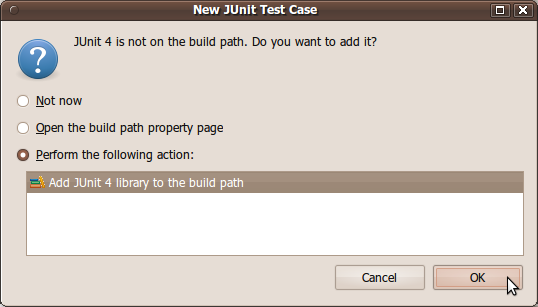
At this point Eclipse will ask whether you want it to automatically attach the JUnit library to your project. Yes, you do. Select "Perform the following action: Add JUnit 4 library to the build path" and press OK.
(If you forget to do add JUnit to your project, you can later add it to your project manually by clicking the top Project menu, then Properties, then Java Build Path, then click Add Library..., and choose JUnit 4 from the list.)
When you're done, you should have a nice new JUnit test case file. I suggest that you change the second
import statement at the top to say the following:import org.junit.*; // instead of import org.junit.Test;
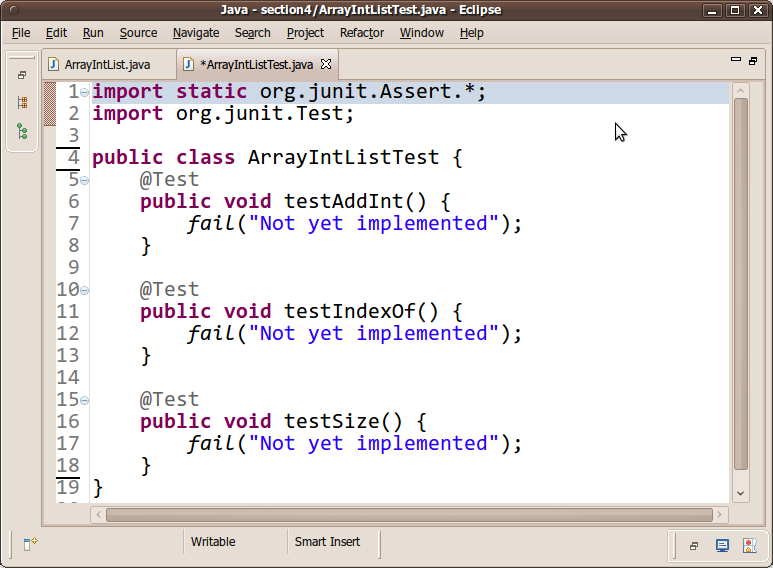
Writing Tests
Each unit test method in your JUnit test case file should test a particular small aspect of the behavior of the "class under test." For example, an ArrayIntListTest might have one testing method to see whether elements can be added to the list and then retrieved. Another test might check to make sure that the list's size is correct after various manipulations. And so on. Each testing method should be short and should test only one specific aspect of the class under test.
JUnit testing methods utilize assertions, which are statements that check whether a given condition is true or false. If the condition is false, the test method fails. If all assertions' conditions in the test method are true, the test method passes. You use assertions to state things that you expect to always be true, such as
assertEquals(3, list.size()); if you expect the array list to contain exactly 3 elements at that point in the code. JUnit provides the following assertion methods:| method name / parameters | description |
|---|---|
assertTrue(test)assertTrue("message", test) | Causes this test method to fail if the given boolean test is not true. |
assertFalse(test)assertFalse("message", test) | Causes this test method to fail if the given boolean test is not false. |
assertEquals(expectedValue, value)assertEquals("message", expectedValue, value) | Causes this test method to fail if the given two values are not equal to each other. (For objects, it uses the equals method to compare them.) The first of the two values is considered to be the result that you expect; the second is the actual result produced by the class under test. |
assertNotEquals(value1, value2)assertNotEquals("message", value1, value2) | Causes this test method to fail if the given two values are equal to each other. (For objects, it uses the equals method to compare them.) |
assertNull(value)assertNull("message", value) | Causes this test method to fail if the given value is not null. |
assertNotNull(value)assertNotNull("message", value) | Causes this test method to fail if the given value is null. |
assertSame(expectedValue, value)assertSame("message", expectedValue, value)assertNotSame(value1, value2)assertNotSame("message", value1, value2) | Identical to assertEquals and assertNotEquals respectively, except that for objects, it uses the == operator rather than the equals method to compare them. (The difference is that two objects that have the same state might be equals to each other, but not == to each other. An object is only == to itself.) |
fail()fail("message") | Causes this test method to fail. |
Here is a quick example that uses several of these assertion methods.
ArrayIntList list = new ArrayIntList();
list.add(42);
list.add(-3);
list.add(17);
list.add(99);

assertEquals(4, list.size());
assertEquals(17, list.get(2));
assertTrue(list.contains(-3));
assertFalse(list.isEmpty());
Notice that when using comparisons like
assertEquals, expected values are written as the left (first) argument, and the actual calls to the list should be written on the right (second argument). This is so that if a test fails, JUnit will give the right error message such as, "expected 4 but found 0".
A well-written test method chooses the various assertion method that is most appropriate for each check. Using the most appropriate assertion method helps JUnit provide better error messages when a test case fails. The previous assertions could have been written in the following way, but it would be poorer style:
// This code uses bad style.
assertTrue(list.size() == 4);         // bad; use assertEquals
assertTrue(list.get(2) == 17);        // bad; use assertEquals
if (!list.contains(-3)) {
    fail();                           // bad; use assertTrue
}
assertTrue(!list.isEmpty());          // bad; use assertFalse and delete the !
Good test methods are short and test only one specific aspect of the class under test. The above example code is in that sense a poor example; one should not test
size, get,contains, and isEmpty all in one method. A better (incomplete) set of tests might be more like the following:@Test
public void testAddAndGet1() {
ArrayIntList list = new ArrayIntList();
list.add(42);
list.add(-3);
list.add(17);
list.add(99);
assertEquals(42, list.get(0));
assertEquals(-3, list.get(1));
assertEquals(17, list.get(2));
assertEquals(99, list.get(3));
assertEquals("second attempt", 42, list.get(0)); // make sure I can get them a second time
assertEquals("second attempt", 99, list.get(3));
}
@Test
public void testSize1() {
ArrayIntList list = new ArrayIntList();
assertEquals(0, list.size());
list.add(42);
assertEquals(1, list.size());
list.add(-3);
assertEquals(2, list.size());
list.add(17);
assertEquals(3, list.size());
list.add(99);
assertEquals(4, list.size());
assertEquals("second attempt", 4, list.size()); // make sure I can get it a second time
}
@Test
public void testIsEmpty1() {
ArrayIntList list = new ArrayIntList();
assertTrue(list.isEmpty());
list.add(42);
assertFalse("should have one element", list.isEmpty());
list.add(-3);
assertFalse("should have two elements", list.isEmpty());
}
@Test
public void testIsEmpty2() {
ArrayIntList list = new ArrayIntList();
list.add(42);
list.add(-3);
assertFalse("should have two elements", list.isEmpty());
list.remove(1);
list.remove(0);
assertTrue("after removing all elements", list.isEmpty());
list.add(42);
assertFalse("should have one element", list.isEmpty());
}
...
There is -much- more that could be said about writing effective unit tests, but that is outside the scope of this document. If you are curious, you could learn more by reading pages such as this or this.
You might think that writing unit tests is not useful. After all, we can just look at the code of methods like
add or isEmpty to see whether they work. But it's easy to have bugs, and JUnit will catch them better than our own eyes.
Even if we already know that the code works, unit testing can still prove useful. Sometimes we introduce a bug when adding new features or changing existing code; something that used to work is now broken. This is called a regression. If we have JUnit tests over the old code, we can make sure that they still pass and avoid costly regressions.
Running Your Test Case
Once you have written one or two test methods, run your JUnit test case. There are two ways to do this. One way is to click the Run button in the top toolbar (it looks like a green "Play" symbol). A menu will drop down; choose to run the class as a JUnit Test.
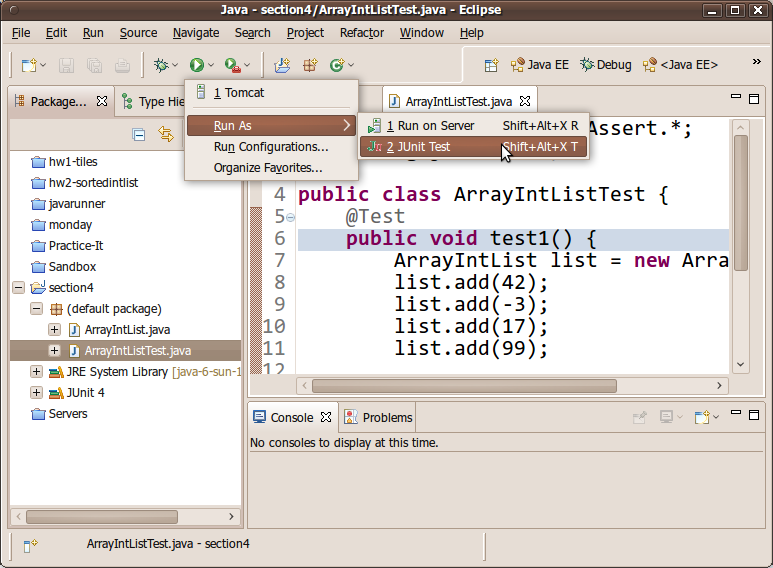
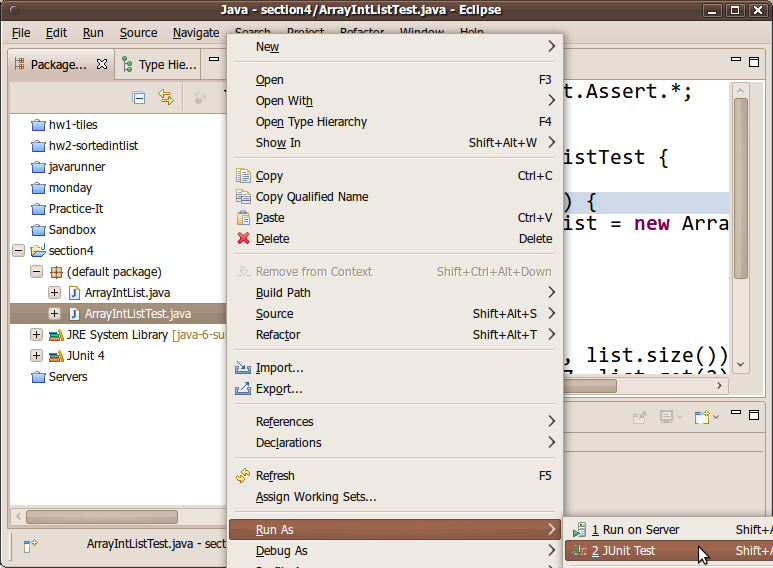
The other way is to right-click your JUnit test case class and choose Run As → JUnit Test.
A new pane will appear showing the test results for each method. You should see a green bar if all of the tests passed, or a red bar if any of the tests failed. If any tests fail, you can view the details about the failure by clicking on the failed test's name/icon and looking at the details in the pane below.
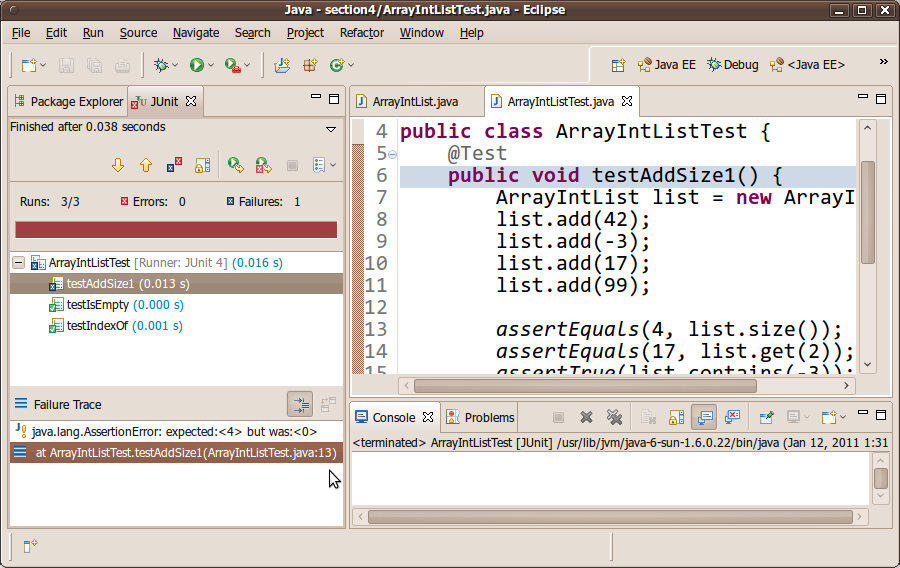
Most people think that getting a red failure bar is bad. It's not! It is good; it means that you have found a potential bug to be fixed. Finding and fixing bugs is a good thing. Making a red bar become a green bar (by fixing the code and then re-running the test program) can be very rewarding.
